
Introduction
In the digital era, we subscribe to more and more services: Netflix, Spotify, YouTube Premium, various cloud storage services, website memberships, and so on. These subscription fees might seem small individually, but they add up to a significant expense over time. Sometimes, we forget what we have subscribed to, leading to paying for services we no longer use.
Wallos, which we are introducing today, solves this problem. It is a lightweight, self-hosted personal subscription management application with a beautiful interface and powerful features.
And it is very simple to deploy! As long as you have Docker, you can set it up in just a few minutes. It has minimal hardware requirements, running stably on a Raspberry Pi, NAS, or cloud server.
Before starting, you can check out the online demo here: https://demo.wallosapp.com (username: demo, password: demo)
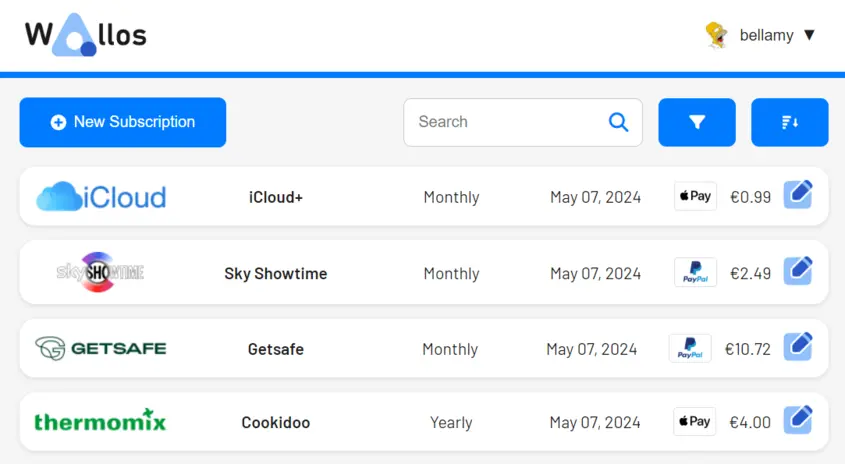
Key Features of Wallos
Wallos is an open-source personal subscription management application written in PHP: GitHub Repository, currently boasting over 6k Stars.
- Open Source & Self-hosted: Designed for privacy and data autonomy.
- Lightweight & Fast: Powered by SQLite database, optimized for performance.
- Simple Installation: Fully supports Docker deployment.
- Modern & Friendly User Interface: Responsive design, mobile-friendly.
- Powerful Subscription Management:
- Category management and custom tags for subscriptions.
- Multi-currency support and automatic exchange rate conversion.
- Automatic logo search.
- Payment cycle tracking (monthly, yearly, etc.).
- Subscription statistics and visualization charts.
- Smart Notification System: Supports multiple notification methods including Email, Discord, Telegram, Pushover, etc.
- Multi-language Support: Supports over 21 languages.
- AI Analysis: Supports AI recommendation analysis (requires providing your own API Key).
We will use Docker and Docker Compose to quickly build Wallos.
1. Environment Preparation
Before starting, you need your own VPS or a NAS system that supports Docker containers.
1. Installing Docker and Docker Compose
This is the foundation of our containerized deployment. If your server does not have it installed yet, you can refer to the following tutorial.
Extended Reading: Installing Docker and Docker Compose in Debian
2. Prepare Domain Name (Optional)
To access your subscription management system securely via HTTPS, you can prepare a domain name and resolve it to your server's IP address. Of course, you can also access it directly via the IP address.
3. Create Project Directory
Create a dedicated directory for Wallos to store configuration files and data.
1 | mkdir -p /opt/wallos |
2. Deploying with Docker Compose
Creating the compose.yml File
In the project directory (/opt/wallos), create a file named compose.yml.
1 | vim compose.yml |
Fill in the following content:
1 | services: |
Configuration Explanation:
ports: Maps port 80 of the container to port127.0.0.1:8282of the host. 127.0.0.1 means Wallos can only be accessed via localhost (or a reverse proxy), enhancing security.environment:TZ: Sets the timezone (e.g., Asia/Shanghai).
volumes: Persists Wallos database files and logo images in the current directory on the host, ensuring data is not lost when the container is updated or rebuilt.
You can temporarily set
portsto"8282:80"to confirm successful access after startup, then change it to"127.0.0.1:8282:80".
Starting the Service
In the directory where compose.yml is located, execute the following command to pull the image and start the service:
1 | docker compose up -d |
Once started successfully, you can check the running status with the following command:
1 | docker compose ps |
If you did not specify 127.0.0.1:8282 in ports settings, you can visit http://ip:8282 to access the Wallos Web interface.
3. Configuring Nginx Reverse Proxy
To access your subscription management system securely via HTTPS, it is highly recommended to use a reverse proxy tool like Nginx.
Below is an Nginx configuration example. You need to obtain an SSL certificate for your domain (e.g., via Let's Encrypt).
1 | # /etc/nginx/sites-available/wallos.yourdomain.com.conf |
Note:
- Replace
wallos.yourdomain.comwith your actual domain name. - Replace the SSL certificate paths
/path/to/your/fullchain.pemand/path/to/your/privkey.pemwith your actual certificate file paths.
Test and reload Nginx configuration:
1 | nginx -t |
1 | nginx -s reload |
4. Getting Started
Now, you can access your subscription management system via https://wallos.yourdomain.com or http://your-server-ip:8282 in your browser.
Upon the first visit, Wallos will automatically open the initialization interface. Simply complete the basic configuration according to the prompts.
Basic Configuration
- Create Administrator Account: Set username and password.
- Currency Settings: Choose your primary currency and exchange rate API (Fixer and ApiLayer both provide 100 free API requests per month, which is enough for our use case).
- Notification Configuration: Configure email or other notification methods as needed.
Adding a Subscription Service
Once configured, you can start adding your first subscription service:
- Click the "Add Subscription" button.
- Enter the service name (Wallos can fetch the corresponding logo from the internet when you click the search button).
- Set the price and payment cycle.
- Select the category and tags.
- Set the next payment date.
5. Advanced Feature Configuration
1. Exchange Rate API Configuration
If you subscribe to services in multiple currencies, it is recommended to configure the Fixer API to get real-time exchange rates:
- Visit Fixer.io to register a free account.
- Get the API Key.
- Configure the API Key in the Wallos settings.
2. Notification Settings
Wallos supports multiple notification methods to remind you when subscriptions are about to expire:
- Email Notifications: Configure SMTP server.
- Telegram Notifications: Send messages via Bot API.
- Discord Notifications: Send messages via Webhook.
- Pushover Notifications: Mobile push notifications.
6. Data Backup and Recovery
Since all data is stored in an SQLite database, backing up is very simple:
Backing Up Data
1 | cd /opt |
Summary
With Docker and Wallos, we built a fully functional, beautifully designed personal subscription management system in just a few minutes. Compared to commercial subscription management applications on the market, the self-hosted solution is not only free but also fundamentally protects the privacy of your financial data.
Wallos' advantages are:
- Completely free and open source & transparent.
- Data privacy is fully secured.
- Rich features, supporting multi-currency, AI analysis, and various notification methods.
- User-friendly interface, supporting mobile access.
- Simple deployment and low maintenance cost.
Start using Wallos to manage your subscriptions and say goodbye to forgotten subscription charges!

Comments