<?xml version="1.0" encoding="utf-8"?>
<feed xmlns="http://www.w3.org/2005/Atom">
  <author>
    <name>Mr. O</name>
  </author>
  <generator uri="https://hexo.io/">Hexo</generator>
  <id>https://ooo.run/en/</id>
  <link href="https://ooo.run/en/" rel="alternate"/>
  <link href="https://ooo.run/en/atom.xml" rel="self"/>
  <rights>All rights reserved 2026, Mr. O</rights>
  <subtitle>Mr. O's Sharing Station, sharing interesting things</subtitle>
  <title>O's World</title>
  <updated>2026-07-04T04:21:32.746Z</updated>
  <entry>
    <author>
      <name>Mr. O</name>
    </author>
    <category term="Tutorial" scheme="https://ooo.run/en/categories/Tutorial/"/>
    <category term="Docker" scheme="https://ooo.run/en/tags/Docker/"/>
    <category term="Docker Compose" scheme="https://ooo.run/en/tags/Docker-Compose/"/>
    <category term="Init Containers" scheme="https://ooo.run/en/tags/Init-Containers/"/>
    <content>
      <![CDATA[<p>When deploying applications with Docker Compose, have you ever struggled with how to gracefully run database migrations or fix directory permissions before the main application starts?</p><p>In the past, we had to write all kinds of one-off services and chain them using complex <code>depends_on</code> rules. Now, with the release of the new Docker Compose features, we finally have official <strong>Init Containers</strong> support. In this post, we&#39;ll dive into how it works and how it can help us slim down our <code>compose.yaml</code>!</p><span id="more"></span><p>When deploying applications with <strong>Docker Compose</strong>, we often run into a very common requirement: performing some initialization tasks before the main application boots up.</p><p>For example:</p><ul><li>Running database migrations before starting the web service.</li><li>Fixing mount directory permissions before running the container as a non-root user.</li><li>Generating configuration files before the application officially launches.</li><li>Importing initial seed data before launching the main service.</li></ul><p>In the past, we usually defined a separate, one-off service like <code>migrate</code>, <code>init</code>, or <code>setup</code>, and controlled the execution order using <code>depends_on</code> with <code>condition: service_completed_successfully</code>.</p><p>Now, <strong>Docker Compose</strong> officially provides a more natural approach: <strong>Init Containers</strong>.</p><div class="flatpaper-note flatpaper-note--info"><span class="flatpaper-note__icon" aria-hidden="true"></span><div class="flatpaper-note__body"><p>According to the official Docker documentation, this feature requires <strong>Docker Compose 5.3.0</strong> or above.</p></div></div><p>Init Containers are essentially short-lived containers that execute sequentially before the main service container starts. If any step exits with a non-zero code, the main service will not start.</p><h2 id="What-Are-Init-Containers"><a href="#What-Are-Init-Containers" class="headerlink" title="What Are Init Containers?"></a>What Are Init Containers?</h2><p>You can think of Init Containers as:</p><blockquote><p>A set of initialization steps bound to run before a specific service starts.</p></blockquote><p>They are not long-running services or background tasks, but rather temporary containers that &quot;run and exit&quot;.</p><p>In <strong>Docker Compose</strong>, this capability is implemented via the <code>pre_start</code> lifecycle hook. According to the official documentation, each step in <code>pre_start</code> runs in its own independent temporary container, which executes after the service container is created but before it actually starts.</p><p>Here is a simple example:</p><figure class="highlight yaml"><table><tr><td class="gutter"><pre><span class="line">1</span><br><span class="line">2</span><br><span class="line">3</span><br><span class="line">4</span><br><span class="line">5</span><br></pre></td><td class="code"><pre><span class="line"><span class="attr">services:</span></span><br><span class="line">  <span class="attr">app:</span></span><br><span class="line">    <span class="attr">image:</span> <span class="string">myapp:latest</span></span><br><span class="line">    <span class="attr">pre_start:</span></span><br><span class="line">      <span class="bullet">-</span> <span class="attr">command:</span> [<span class="string">&quot;./manage.py&quot;</span>, <span class="string">&quot;migrate&quot;</span>]</span><br></pre></td></tr></table></figure><p>This configuration means:</p><ol><li><strong>Docker Compose</strong> first creates the <code>app</code> service container.</li><li>Before <code>app</code> actually starts, it runs <code>./manage.py migrate</code>.</li><li>If the migration command exits successfully (exiting with status code <code>0</code>), <code>app</code> will start.</li><li>If the migration fails, <code>app</code> will not start.</li></ol><p>This is much cleaner than writing a separate <code>migrate</code> service like we used to.</p><h2 id="How-Did-We-Do-It-Before"><a href="#How-Did-We-Do-It-Before" class="headerlink" title="How Did We Do It Before?"></a>How Did We Do It Before?</h2><p>Before <code>pre_start</code> came along, if we wanted to express &quot;run migration first, then start the application&quot;, we typically wrote it like this:</p><figure class="highlight yaml"><table><tr><td class="gutter"><pre><span class="line">1</span><br><span class="line">2</span><br><span class="line">3</span><br><span class="line">4</span><br><span class="line">5</span><br><span class="line">6</span><br><span class="line">7</span><br><span class="line">8</span><br><span class="line">9</span><br><span class="line">10</span><br><span class="line">11</span><br></pre></td><td class="code"><pre><span class="line"><span class="attr">services:</span></span><br><span class="line">  <span class="attr">migrate:</span></span><br><span class="line">    <span class="attr">image:</span> <span class="string">myapp:latest</span></span><br><span class="line">    <span class="attr">command:</span> [<span class="string">&quot;./manage.py&quot;</span>, <span class="string">&quot;migrate&quot;</span>]</span><br><span class="line">    <span class="attr">restart:</span> <span class="string">&quot;no&quot;</span></span><br><span class="line"></span><br><span class="line">  <span class="attr">app:</span></span><br><span class="line">    <span class="attr">image:</span> <span class="string">myapp:latest</span></span><br><span class="line">    <span class="attr">depends_on:</span></span><br><span class="line">      <span class="attr">migrate:</span></span><br><span class="line">        <span class="attr">condition:</span> <span class="string">service_completed_successfully</span></span><br></pre></td></tr></table></figure><p>While this approach works, it has several obvious issues:</p><ul><li><strong>Conceptual Confusion</strong>: <code>migrate</code> is not actually a long-running service; it is just an initialization step for <code>app</code>. Putting it at the top-level of <code>services</code> makes the Compose configuration file bloated.</li><li><strong>Residual State</strong>: Once the task is complete, it remains in the <code>docker compose ps</code> list as an exited service, which litters your active service list.</li><li><strong>Tedious Orchestration</strong>: If you have multiple initialization steps (e.g., migrating the database, seeding default data, and generating configuration files), you have to define multiple one-off services and chain them using a series of complex <code>depends_on</code> rules.</li></ul><p>With the new <code>pre_start</code> feature, we can consolidate them directly inside the service:</p><figure class="highlight yaml"><table><tr><td class="gutter"><pre><span class="line">1</span><br><span class="line">2</span><br><span class="line">3</span><br><span class="line">4</span><br><span class="line">5</span><br><span class="line">6</span><br></pre></td><td class="code"><pre><span class="line"><span class="attr">services:</span></span><br><span class="line">  <span class="attr">app:</span></span><br><span class="line">    <span class="attr">image:</span> <span class="string">myapp:latest</span></span><br><span class="line">    <span class="attr">pre_start:</span></span><br><span class="line">      <span class="bullet">-</span> <span class="attr">command:</span> [<span class="string">&quot;./manage.py&quot;</span>, <span class="string">&quot;migrate&quot;</span>]</span><br><span class="line">      <span class="bullet">-</span> <span class="attr">command:</span> [<span class="string">&quot;./manage.py&quot;</span>, <span class="string">&quot;loaddata&quot;</span>, <span class="string">&quot;fixtures.json&quot;</span>]</span><br></pre></td></tr></table></figure><p>Official <strong>Docker</strong> documentation highlights the following benefits of <code>pre_start</code>:</p><ol><li>Initialization logic is expressed as a <strong>sub-step</strong> of the service, rather than masquerading as a parallel, independent service.</li><li>Completed temporary steps do not appear in <code>docker compose ps</code>, keeping the environment clean.</li><li>Multiple steps are executed sequentially, eliminating the need for complex chain-like <code>depends_on</code> logic.</li></ol><h2 id="Example-1-Running-Database-Migrations-Before-Start"><a href="#Example-1-Running-Database-Migrations-Before-Start" class="headerlink" title="Example 1: Running Database Migrations Before Start"></a>Example 1: Running Database Migrations Before Start</h2><p>This is the most classic use case.</p><figure class="highlight yaml"><table><tr><td class="gutter"><pre><span class="line">1</span><br><span class="line">2</span><br><span class="line">3</span><br><span class="line">4</span><br><span class="line">5</span><br><span class="line">6</span><br><span class="line">7</span><br><span class="line">8</span><br><span class="line">9</span><br><span class="line">10</span><br><span class="line">11</span><br><span class="line">12</span><br><span class="line">13</span><br><span class="line">14</span><br><span class="line">15</span><br><span class="line">16</span><br><span class="line">17</span><br><span class="line">18</span><br><span class="line">19</span><br><span class="line">20</span><br><span class="line">21</span><br></pre></td><td class="code"><pre><span class="line"><span class="attr">services:</span></span><br><span class="line">  <span class="attr">app:</span></span><br><span class="line">    <span class="attr">image:</span> <span class="string">myapp:latest</span></span><br><span class="line">    <span class="attr">depends_on:</span></span><br><span class="line">      <span class="attr">db:</span></span><br><span class="line">        <span class="attr">condition:</span> <span class="string">service_healthy</span></span><br><span class="line">    <span class="attr">pre_start:</span></span><br><span class="line">      <span class="bullet">-</span> <span class="attr">command:</span> [<span class="string">&quot;./manage.py&quot;</span>, <span class="string">&quot;migrate&quot;</span>]</span><br><span class="line"></span><br><span class="line">  <span class="attr">db:</span></span><br><span class="line">    <span class="attr">image:</span> <span class="string">postgres:18</span></span><br><span class="line">    <span class="attr">environment:</span></span><br><span class="line">      <span class="attr">POSTGRES_USER:</span> <span class="string">app</span></span><br><span class="line">      <span class="attr">POSTGRES_PASSWORD:</span> <span class="string">password</span></span><br><span class="line">      <span class="attr">POSTGRES_DB:</span> <span class="string">app</span></span><br><span class="line">    <span class="attr">healthcheck:</span></span><br><span class="line">      <span class="attr">test:</span> [<span class="string">&quot;CMD-SHELL&quot;</span>, <span class="string">&quot;pg_isready -U $$&#123;POSTGRES_USER&#125; -d $$&#123;POSTGRES_DB&#125;&quot;</span>]</span><br><span class="line">      <span class="attr">interval:</span> <span class="string">10s</span></span><br><span class="line">      <span class="attr">retries:</span> <span class="number">5</span></span><br><span class="line">      <span class="attr">start_period:</span> <span class="string">30s</span></span><br><span class="line">      <span class="attr">timeout:</span> <span class="string">10s</span></span><br></pre></td></tr></table></figure><p>There are two key details here:</p><ol><li><strong>Dependency</strong>: <code>app</code> waits for the <code>db</code> container to reach a <code>service_healthy</code> state via <code>depends_on</code>.</li><li><strong>Initialization Timing</strong>: Before <code>app</code> starts, it executes <code>./manage.py migrate</code> inside a temporary container.</li></ol><p>If the database migration succeeds, the main <code>app</code> service starts; if it fails, <code>app</code> will not start, and the error logs will output directly within <code>docker compose up</code>.</p><p>This design is perfect for <strong>Django</strong>, <strong>Rails</strong>, <strong>Laravel</strong>, <strong>Prisma</strong>, <strong>Drizzle</strong>, <strong>Alembic</strong>, or any other framework that requires database schema migration before running the app.</p><h2 id="Example-2-Fixing-Volume-Permissions"><a href="#Example-2-Fixing-Volume-Permissions" class="headerlink" title="Example 2: Fixing Volume Permissions"></a>Example 2: Fixing Volume Permissions</h2><p>Another major pain point is permissions: when a service runs as a non-root user but is mounted to a <strong>Docker named volume</strong> (which defaults to root ownership), the container can crash due to lack of write access.</p><p>In the past, we had to modify the <code>Dockerfile</code> extensively or spin up a separate sidecar container. Now, <code>pre_start</code> makes it incredibly lightweight:</p><figure class="highlight yaml"><table><tr><td class="gutter"><pre><span class="line">1</span><br><span class="line">2</span><br><span class="line">3</span><br><span class="line">4</span><br><span class="line">5</span><br><span class="line">6</span><br><span class="line">7</span><br><span class="line">8</span><br><span class="line">9</span><br><span class="line">10</span><br><span class="line">11</span><br><span class="line">12</span><br><span class="line">13</span><br></pre></td><td class="code"><pre><span class="line"><span class="attr">services:</span></span><br><span class="line">  <span class="attr">app:</span></span><br><span class="line">    <span class="attr">image:</span> <span class="string">myapp:latest</span></span><br><span class="line">    <span class="attr">user:</span> <span class="string">&quot;1000:1000&quot;</span></span><br><span class="line">    <span class="attr">volumes:</span></span><br><span class="line">      <span class="bullet">-</span> <span class="string">data:/data</span></span><br><span class="line">    <span class="attr">pre_start:</span></span><br><span class="line">      <span class="bullet">-</span> <span class="attr">image:</span> <span class="string">busybox</span></span><br><span class="line">        <span class="attr">user:</span> <span class="string">root</span></span><br><span class="line">        <span class="attr">command:</span> <span class="string">sh</span> <span class="string">-c</span> <span class="string">&#x27;chown -R 1000:1000 /data&#x27;</span></span><br><span class="line"></span><br><span class="line"><span class="attr">volumes:</span></span><br><span class="line">  <span class="attr">data:</span></span><br></pre></td></tr></table></figure><p>In this example:</p><ul><li>The <code>app</code> container runs as a non-root user <code>1000:1000</code>.</li><li>The <code>pre_start</code> step overrides the image to <code>busybox</code> and executes <code>chown</code> as <code>root</code> to correct the directory ownership before the main service runs.</li></ul><p>This scenario is extremely useful in self-hosted and open-source deployments, such as:</p><ul><li>Fixing upload or cache directory permissions.</li><li>Automatically initializing the structure of a data directory.</li><li>Pre-generating default configuration files in a mounted path.</li></ul><h2 id="Example-3-Chaining-Multiple-Initialization-Steps"><a href="#Example-3-Chaining-Multiple-Initialization-Steps" class="headerlink" title="Example 3: Chaining Multiple Initialization Steps"></a>Example 3: Chaining Multiple Initialization Steps</h2><p><code>pre_start</code> supports defining a list of steps that will execute <strong>sequentially</strong>. The next step will run only if the previous one exits successfully (returns <code>0</code>). If any intermediate step fails, subsequent steps and the main service will terminate.</p><p>For example:</p><figure class="highlight yaml"><table><tr><td class="gutter"><pre><span class="line">1</span><br><span class="line">2</span><br><span class="line">3</span><br><span class="line">4</span><br><span class="line">5</span><br><span class="line">6</span><br><span class="line">7</span><br><span class="line">8</span><br><span class="line">9</span><br><span class="line">10</span><br><span class="line">11</span><br><span class="line">12</span><br><span class="line">13</span><br></pre></td><td class="code"><pre><span class="line"><span class="attr">services:</span></span><br><span class="line">  <span class="attr">app:</span></span><br><span class="line">    <span class="attr">image:</span> <span class="string">myapp:latest</span></span><br><span class="line">    <span class="attr">depends_on:</span></span><br><span class="line">      <span class="attr">db:</span></span><br><span class="line">        <span class="attr">condition:</span> <span class="string">service_healthy</span></span><br><span class="line">    <span class="attr">pre_start:</span></span><br><span class="line">      <span class="bullet">-</span> <span class="attr">command:</span> [<span class="string">&quot;./manage.py&quot;</span>, <span class="string">&quot;migrate&quot;</span>]</span><br><span class="line">      <span class="bullet">-</span> <span class="attr">command:</span> [<span class="string">&quot;./manage.py&quot;</span>, <span class="string">&quot;loaddata&quot;</span>, <span class="string">&quot;fixtures.json&quot;</span>]</span><br><span class="line">      <span class="bullet">-</span> <span class="attr">command:</span> [<span class="string">&quot;./scripts/generate-config.sh&quot;</span>]</span><br><span class="line"></span><br><span class="line">  <span class="attr">db:</span></span><br><span class="line">    <span class="attr">image:</span> <span class="string">postgres:18</span></span><br></pre></td></tr></table></figure><p>The entire startup flow is:</p><ol><li><strong>Wait</strong> for the database container to become healthy.</li><li><strong>Execute</strong> the database schema migrations.</li><li><strong>Import</strong> initial seed data.</li><li><strong>Generate</strong> dynamic configuration files.</li><li><strong>Spin up</strong> the main application container.</li></ol><div class="flatpaper-note flatpaper-note--warning"><span class="flatpaper-note__icon" aria-hidden="true"></span><div class="flatpaper-note__body"><p>Keep in mind that the steps in <code>pre_start</code> <strong>are not transactional</strong>. If the second step succeeds and the third one fails, <strong>Docker Compose</strong> will not roll back the second step.<br>Therefore, it is highly recommended to design initialization scripts with <strong>idempotent logic</strong>.</p></div></div><p>For instance, when inserting seed data:</p><figure class="highlight sql"><table><tr><td class="gutter"><pre><span class="line">1</span><br><span class="line">2</span><br><span class="line">3</span><br><span class="line">4</span><br><span class="line">5</span><br><span class="line">6</span><br></pre></td><td class="code"><pre><span class="line"><span class="comment">-- Not recommended: naive insert every time, which might cause primary key conflicts or duplicate data</span></span><br><span class="line"><span class="keyword">INSERT INTO</span> users (id, name) <span class="keyword">VALUES</span> (<span class="number">1</span>, <span class="string">&#x27;admin&#x27;</span>);</span><br><span class="line"></span><br><span class="line"><span class="comment">-- Recommended: skip when conflict is detected, ensuring idempotency</span></span><br><span class="line"><span class="keyword">INSERT INTO</span> users (id, name) <span class="keyword">VALUES</span> (<span class="number">1</span>, <span class="string">&#x27;admin&#x27;</span>)</span><br><span class="line"><span class="keyword">ON</span> CONFLICT (id) DO NOTHING;</span><br></pre></td></tr></table></figure><h2 id="Execution-Rules-of-pre-start-Containers"><a href="#Execution-Rules-of-pre-start-Containers" class="headerlink" title="Execution Rules of pre_start Containers"></a>Execution Rules of <code>pre_start</code> Containers</h2><p>According to the official documentation, the temporary containers spun up by <code>pre_start</code> behave according to these rules:</p><ul><li><strong>Independent Containers</strong>: Each step runs in its own dedicated, short-lived container.</li><li><strong>Inherited by Default</strong>: They inherit the <code>image</code> defined by the host service, so you don&#39;t need to specify it repeatedly.</li><li><strong>Image Override Allowed</strong>: You can specify another lightweight utility image (like <code>busybox</code>) via the <code>image</code> field.</li><li><strong>Shared Network</strong>: They automatically join the network of the host service, giving them direct access to other dependent services declared in <code>depends_on</code>.</li><li><strong>Shared Volume Mounts</strong>: They automatically share all <code>volumes</code> declared on the host service.</li><li><strong>Strict Status Code Constraint</strong>: They must return exit code <code>0</code> for subsequent steps and the main service to run.</li></ul><p>These features make configurations extremely convenient. For instance, if the migration command is already bundled in the application image, you can declare it directly without specifying the image:</p><figure class="highlight yaml"><table><tr><td class="gutter"><pre><span class="line">1</span><br><span class="line">2</span><br></pre></td><td class="code"><pre><span class="line"><span class="attr">pre_start:</span></span><br><span class="line">  <span class="bullet">-</span> <span class="attr">command:</span> [<span class="string">&quot;pnpm&quot;</span>, <span class="string">&quot;db:migrate&quot;</span>]</span><br></pre></td></tr></table></figure><p>If you need a helper image (such as <code>busybox</code>) for file operations, just override the <code>image</code> in the step:</p><figure class="highlight yaml"><table><tr><td class="gutter"><pre><span class="line">1</span><br><span class="line">2</span><br><span class="line">3</span><br><span class="line">4</span><br></pre></td><td class="code"><pre><span class="line"><span class="attr">pre_start:</span></span><br><span class="line">  <span class="bullet">-</span> <span class="attr">image:</span> <span class="string">busybox</span></span><br><span class="line">    <span class="attr">user:</span> <span class="string">root</span></span><br><span class="line">    <span class="attr">command:</span> <span class="string">sh</span> <span class="string">-c</span> <span class="string">&#x27;chown -R 1000:1000 /data&#x27;</span></span><br></pre></td></tr></table></figure><p>Since the temporary containers share the same network and <code>volumes</code>, any configuration file generated, permissions fixed, or data populated in the mount path will be immediately visible to the main container when it starts.</p><h2 id="Does-It-Run-Every-Time-I-Execute-docker-compose-up"><a href="#Does-It-Run-Every-Time-I-Execute-docker-compose-up" class="headerlink" title="Does It Run Every Time I Execute docker compose up?"></a>Does It Run Every Time I Execute <code>docker compose up</code>?</h2><p>The answer is: <strong>No</strong>. This is a crucial detail to keep in mind.</p><p>According to the official Docker documentation:</p><ul><li>If a <code>pre_start</code> step has already <strong>run successfully</strong> in a previous deployment and its <strong>definition has not changed</strong>, Compose will <strong>automatically skip</strong> it on subsequent runs of <code>docker compose up</code>.</li><li>If a service restarts due to its <code>restart</code> policy, <code>pre_start</code> <strong>will not</strong> be triggered again.</li><li>The initialization steps will <strong>only run again</strong> if:<ol><li>The step&#39;s configuration definition changes.</li><li>The previous execution failed (exited with a non-zero code).</li><li>You force recreation using <code>docker compose up --force-recreate</code>.</li></ol></li></ul><p>Thus, <code>pre_start</code> acts more like a &quot;one-time deployment initialization&quot; in the lifecycle of the host service, rather than a recurring process wrapper.</p><div class="flatpaper-note flatpaper-note--info"><span class="flatpaper-note__icon" aria-hidden="true"></span><div class="flatpaper-note__body"><p>If you have logic that must run on every container restart, scale-up, or process launch (such as reading the latest environment variables), you should still embed it in the image&#39;s <code>entrypoint.sh</code> entrypoint script.</p></div></div><h2 id="When-Are-Init-Containers-Not-Suitable"><a href="#When-Are-Init-Containers-Not-Suitable" class="headerlink" title="When Are Init Containers Not Suitable?"></a>When Are Init Containers Not Suitable?</h2><p>While Init Containers are highly convenient, they are not a silver bullet. According to official guidelines, if your requirement is simply to inject static configuration files or credentials, you should prioritize <strong>Docker Compose</strong>&#39;s native <code>configs</code> and <code>secrets</code>, which support direct mounts and fine-grained permissions&#x2F;ownership controls.</p><p>We do not recommend using <code>pre_start</code> in the following scenarios:</p><h3 id="1-Mounting-Static-Configuration-Files"><a href="#1-Mounting-Static-Configuration-Files" class="headerlink" title="1. Mounting Static Configuration Files"></a>1. Mounting Static Configuration Files</h3><p>For fixed configuration files that do not need to be dynamically generated, mount them directly instead of spinning up an initialization container to write them.</p><p><strong>Recommended Approach:</strong></p><figure class="highlight yaml"><table><tr><td class="gutter"><pre><span class="line">1</span><br><span class="line">2</span><br><span class="line">3</span><br><span class="line">4</span><br><span class="line">5</span><br><span class="line">6</span><br><span class="line">7</span><br><span class="line">8</span><br><span class="line">9</span><br><span class="line">10</span><br></pre></td><td class="code"><pre><span class="line"><span class="attr">configs:</span></span><br><span class="line">  <span class="attr">app_config:</span></span><br><span class="line">    <span class="attr">file:</span> <span class="string">./config/app.yml</span></span><br><span class="line"></span><br><span class="line"><span class="attr">services:</span></span><br><span class="line">  <span class="attr">app:</span></span><br><span class="line">    <span class="attr">image:</span> <span class="string">myapp:latest</span></span><br><span class="line">    <span class="attr">configs:</span></span><br><span class="line">      <span class="bullet">-</span> <span class="attr">source:</span> <span class="string">app_config</span></span><br><span class="line">        <span class="attr">target:</span> <span class="string">/app/config.yml</span></span><br></pre></td></tr></table></figure><h3 id="2-Sensitive-Credential-Secret-Injection"><a href="#2-Sensitive-Credential-Secret-Injection" class="headerlink" title="2. Sensitive Credential (Secret) Injection"></a>2. Sensitive Credential (Secret) Injection</h3><p>Database passwords, API keys, and other sensitive tokens should never be written to a volume or filesystem using initialization scripts to avoid leakage.</p><p><strong>Recommended Approach:</strong></p><figure class="highlight yaml"><table><tr><td class="gutter"><pre><span class="line">1</span><br><span class="line">2</span><br><span class="line">3</span><br><span class="line">4</span><br><span class="line">5</span><br><span class="line">6</span><br><span class="line">7</span><br><span class="line">8</span><br><span class="line">9</span><br></pre></td><td class="code"><pre><span class="line"><span class="attr">secrets:</span></span><br><span class="line">  <span class="attr">db_password:</span></span><br><span class="line">    <span class="attr">file:</span> <span class="string">./secrets/db_password.txt</span></span><br><span class="line"></span><br><span class="line"><span class="attr">services:</span></span><br><span class="line">  <span class="attr">app:</span></span><br><span class="line">    <span class="attr">image:</span> <span class="string">myapp:latest</span></span><br><span class="line">    <span class="attr">secrets:</span></span><br><span class="line">      <span class="bullet">-</span> <span class="string">db_password</span></span><br></pre></td></tr></table></figure><h3 id="3-Cron-Jobs-and-Background-Maintenance-Tasks"><a href="#3-Cron-Jobs-and-Background-Maintenance-Tasks" class="headerlink" title="3. Cron Jobs and Background Maintenance Tasks"></a>3. Cron Jobs and Background Maintenance Tasks</h3><p>For example:</p><ul><li>Routine data backups.</li><li>Periodic cleanup of cache or temporary files.</li><li>Post-termination cleanup work.</li></ul><p>These tasks are not blocker dependencies for the main application start, and therefore should not be put in <code>pre_start</code>.</p><h2 id="Current-Design-Limitations"><a href="#Current-Design-Limitations" class="headerlink" title="Current Design Limitations"></a>Current Design Limitations</h2><p>Since this feature is relatively new, you should keep the following limitations in mind:</p><ul><li><strong>No Per-Replica Execution</strong>: <code>pre_start</code> runs once per service, not per container instance (currently, there is no <code>per_replica: true</code> support).</li><li><strong>Incompatibility with Certain Mounts</strong>: While shared named volumes and bind mounts work perfectly, <code>pre_start</code> cannot share files with main containers if you are using anonymous volumes or <code>tmpfs</code> mounts, which are unique to each container instance.</li><li><strong>No Trigger on Scaling</strong>: When scaling up (e.g., running <code>docker compose up --scale app=3</code>), new container instances <strong>do not</strong> trigger <code>pre_start</code> again. It still follows the &quot;config changed or forced recreation&quot; triggering logic.</li></ul><p>Therefore, if your initialization logic (like local cache pre-warming) must run on every replica, do not rely on <code>pre_start</code> for now.</p><h2 id="Differences-from-Kubernetes-Init-Containers"><a href="#Differences-from-Kubernetes-Init-Containers" class="headerlink" title="Differences from Kubernetes Init Containers"></a>Differences from Kubernetes Init Containers</h2><p>Conceptually, both serve the same purpose: preparing the environment before the main workload container starts.</p><p>However, they differ in implementation and power:</p><ul><li><strong>Kubernetes (K8s)</strong> Init Containers are first-class, Pod-level entities deeply integrated with cloud-native distributed scheduling, and natively support initializing each replica independently.</li><li><strong>Docker Compose</strong> Init Containers are implemented as a <strong>lightweight solution</strong> via the <code>pre_start</code> lifecycle hook. It is geared towards single-host deployments, local development, and small-scale self-hosted environments.</li></ul><p>Simply put, <strong>Docker Compose&#39;s Init Containers are a simplified initialization mechanism tailored specifically for Compose workloads</strong>—small but highly capable.</p><h2 id="Best-Practice-Recommendations"><a href="#Best-Practice-Recommendations" class="headerlink" title="Best Practice Recommendations"></a>Best Practice Recommendations</h2><p>When using <code>pre_start</code> in production or development environments, we recommend following these principles:</p><ol><li><strong>Absolute Idempotency</strong>: Your initialization scripts must achieve &quot;identical results over multiple runs&quot; to handle retries and recreations cleanly.</li><li><strong>No Persistent Processes</strong>: Each step in <code>pre_start</code> must exit quickly with <code>0</code>. Long-running or daemonized processes will block the main service startup indefinitely.</li><li><strong>Separate Production and Development Migration Strategies</strong>: While auto-running <code>migrate</code> in <code>pre_start</code> is convenient, running migrations automatically in production carries risk. Consider triggering database migrations via an independent CI&#x2F;CD pipeline for critical online environments.</li><li><strong>Encapsulate Complex Logic in Scripts</strong>: If your initialization contains complex checks or multiple setup steps, package them into a dedicated shell script (e.g., <code>./scripts/init.sh</code>) inside the container and call it from the <code>compose.yaml</code> to keep your configuration clean.</li></ol><figure class="highlight yaml"><table><tr><td class="gutter"><pre><span class="line">1</span><br><span class="line">2</span><br></pre></td><td class="code"><pre><span class="line"><span class="attr">pre_start:</span></span><br><span class="line">  <span class="bullet">-</span> <span class="attr">command:</span> [<span class="string">&quot;./scripts/init.sh&quot;</span>]</span><br></pre></td></tr></table></figure><h2 id="Conclusion"><a href="#Conclusion" class="headerlink" title="Conclusion"></a>Conclusion</h2><p><strong>Docker Compose</strong>&#39;s <strong>Init Containers</strong> finally address a long-standing pain point in container orchestration: <strong>how to gracefully define start-up dependencies</strong>.</p><p>We can summarize the suitable and unsuitable scenarios as follows:</p><table><thead><tr><th align="left">Suitable ✅</th><th align="left">Unsuitable ❌</th></tr></thead><tbody><tr><td align="left">Automatic database migrations (<code>migrate</code>)</td><td align="left">Long-running background tasks</td></tr><tr><td align="left">Seed data import &amp; database initialization</td><td align="left">Cron tasks like scheduled backups or logs cleanup</td></tr><tr><td align="left">Adjusting host volume mount permissions</td><td align="left">Static configuration file injection (use <code>configs</code>)</td></tr><tr><td align="left">Generating local&#x2F;dynamic configuration files</td><td align="left">Sensitive credentials management (use <code>secrets</code>)</td></tr><tr><td align="left">Chaining ordered validation steps</td><td align="left">Initialization logic that must run on <em>each</em> replica</td></tr></tbody></table><p>Let&#39;s conclude with a side-by-side comparison of the configuration before and after this feature:</p><div class="flatpaper-tabs"><div class="flatpaper-tabs__nav" role="tablist"><button type="button" role="tab" id="tabs-21-tab-0" aria-controls="tabs-21-panel-0" aria-selected="true" class="flatpaper-tabs__nav-item is-active" data-index="0">Old Way (depends_on)</button><button type="button" role="tab" id="tabs-21-tab-1" aria-controls="tabs-21-panel-1" aria-selected="false" class="flatpaper-tabs__nav-item" data-index="1">New Way (pre_start)</button></div><div class="flatpaper-tabs__panels"><section role="tabpanel" id="tabs-21-panel-0" aria-labelledby="tabs-21-tab-0" class="flatpaper-tabs__panel is-active" data-index="0"><figure class="highlight yaml"><table><tr><td class="gutter"><pre><span class="line">1</span><br><span class="line">2</span><br><span class="line">3</span><br><span class="line">4</span><br><span class="line">5</span><br><span class="line">6</span><br><span class="line">7</span><br><span class="line">8</span><br><span class="line">9</span><br><span class="line">10</span><br><span class="line">11</span><br></pre></td><td class="code"><pre><span class="line"><span class="attr">services:</span></span><br><span class="line">  <span class="attr">migrate:</span></span><br><span class="line">    <span class="attr">image:</span> <span class="string">myapp:latest</span></span><br><span class="line">    <span class="attr">command:</span> [<span class="string">&quot;./manage.py&quot;</span>, <span class="string">&quot;migrate&quot;</span>]</span><br><span class="line">    <span class="attr">restart:</span> <span class="string">&quot;no&quot;</span></span><br><span class="line"></span><br><span class="line">  <span class="attr">app:</span></span><br><span class="line">    <span class="attr">image:</span> <span class="string">myapp:latest</span></span><br><span class="line">    <span class="attr">depends_on:</span></span><br><span class="line">      <span class="attr">migrate:</span></span><br><span class="line">        <span class="attr">condition:</span> <span class="string">service_completed_successfully</span></span><br></pre></td></tr></table></figure></section><section role="tabpanel" id="tabs-21-panel-1" aria-labelledby="tabs-21-tab-1" class="flatpaper-tabs__panel" data-index="1" hidden><figure class="highlight yaml"><table><tr><td class="gutter"><pre><span class="line">1</span><br><span class="line">2</span><br><span class="line">3</span><br><span class="line">4</span><br><span class="line">5</span><br></pre></td><td class="code"><pre><span class="line"><span class="attr">services:</span></span><br><span class="line">  <span class="attr">app:</span></span><br><span class="line">    <span class="attr">image:</span> <span class="string">myapp:latest</span></span><br><span class="line">    <span class="attr">pre_start:</span></span><br><span class="line">      <span class="bullet">-</span> <span class="attr">command:</span> [<span class="string">&quot;./manage.py&quot;</span>, <span class="string">&quot;migrate&quot;</span>]</span><br></pre></td></tr></table></figure></section></div></div><p>This is the core value of <strong>Docker Compose Init Containers</strong>: <strong>letting initialization steps gracefully return to where they truly belong</strong>.</p>]]>
    </content>
    <id>https://ooo.run/en/post/docker-compose-init-containers.html</id>
    <link href="https://ooo.run/en/post/docker-compose-init-containers.html"/>
    <published>2026-07-04T03:00:00.000Z</published>
    <summary>
      <![CDATA[<p>When deploying applications with Docker Compose, have you ever struggled with how to gracefully run database migrations or fix directory permissions before the main application starts?</p>
<p>In the past, we had to write all kinds of one-off services and chain them using complex <code>depends_on</code> rules. Now, with the release of the new Docker Compose features, we finally have official <strong>Init Containers</strong> support. In this post, we&#39;ll dive into how it works and how it can help us slim down our <code>compose.yaml</code>!</p>]]>
    </summary>
    <title>Docker Compose Adds Init Containers: Say Goodbye to One-Off Initialization Services</title>
    <updated>2026-07-04T04:21:32.746Z</updated>
  </entry>
  <entry>
    <author>
      <name>Mr. O</name>
    </author>
    <category term="Tools &amp; Resources" scheme="https://ooo.run/en/categories/Tools-Resources/"/>
    <category term="Open Source" scheme="https://ooo.run/en/tags/Open-Source/"/>
    <category term="Frontend Development" scheme="https://ooo.run/en/tags/Frontend-Development/"/>
    <category term="WebGL" scheme="https://ooo.run/en/tags/WebGL/"/>
    <category term="React" scheme="https://ooo.run/en/tags/React/"/>
    <content>
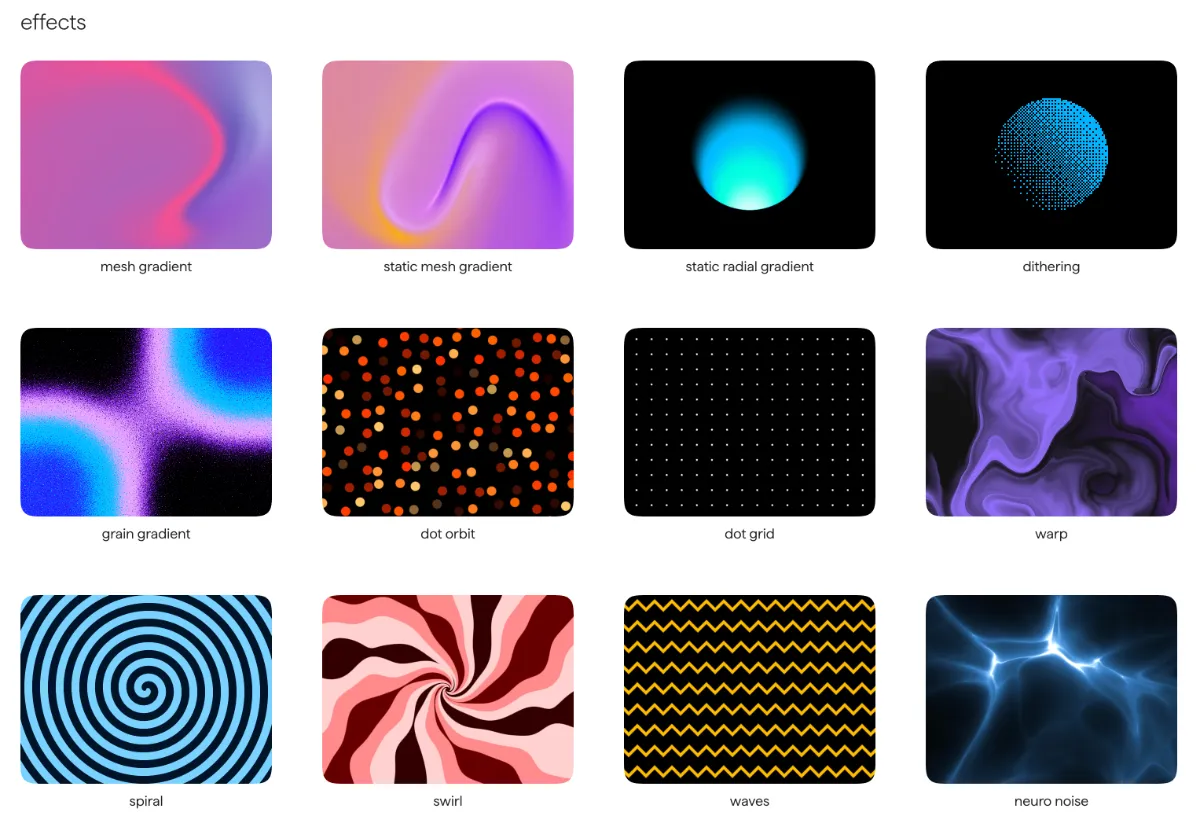
      <![CDATA[<p>If you&#39;ve ever worked on frontend visual effects, you&#39;ve likely run into an awkward problem:<br>Standard CSS is convenient, but once you want to create more complex dynamic textures, noise, gradients, glass, liquid metal, or particle backgrounds, you&#39;re easily forced to dive into WebGL, Three.js, GLSL, and a mountain of boilerplate initialization code.</p><p>And <strong>Paper Shaders</strong> is designed to solve exactly this problem.</p><p>It is a set of <strong>zero-dependency Canvas &#x2F; WebGL Shader components</strong> open-sourced by the Paper Design team. You can install and use it directly via npm, or visually adjust it in the Paper design tool before exporting the code. The project is currently hosted on GitHub and open-sourced under the Apache 2.0 license. The official positioning is &quot;ultra fast zero-dependency shaders for your designs&quot;.</p><h2 id="What-is-Paper-Shaders"><a href="#What-is-Paper-Shaders" class="headerlink" title="What is Paper Shaders?"></a>What is Paper Shaders?</h2><p>Simply put, Paper Shaders is a library of visual effect components that you can drop directly into your webpages.</p><p>It wraps the complex process of writing GLSL from scratch, configuring the WebGL context, and handling the Canvas rendering loop into something that feels much closer to standard frontend components. For React projects, you can install it directly:</p><figure class="highlight bash"><table><tr><td class="gutter"><pre><span class="line">1</span><br></pre></td><td class="code"><pre><span class="line">npm i @paper-design/shaders-react</span><br></pre></td></tr></table></figure><p>If you&#39;re not using React, you can also install the vanilla version:</p><figure class="highlight bash"><table><tr><td class="gutter"><pre><span class="line">1</span><br></pre></td><td class="code"><pre><span class="line">npm i @paper-design/shaders</span><br></pre></td></tr></table></figure><p>The official README also warns that the project is currently in the <code>0.0.x</code> version stage and may undergo breaking changes, so it is recommended to lock your dependency version.</p><h2 id="What-Effects-Can-It-Produce"><a href="#What-Effects-Can-It-Produce" class="headerlink" title="What Effects Can It Produce?"></a>What Effects Can It Produce?</h2><p>Paper Shaders comes built-in with many visual effects suitable for modern website design. The official showcase site categorizes them into several types:</p><p><strong>Image Filters</strong>:<br>Such as paper texture, fluted glass, water, image dithering, halftone dots, and halftone cmyk.</p><p><img src="https://img.nep.me/ooo/paper-shaders-1.webp" alt="paper-shaders-1.png"></p><p><strong>Logo Animations</strong>:<br>Such as heatmap, liquid metal, and gem smoke.</p><p><img src="https://img.nep.me/ooo/paper-shaders-2.webp" alt="paper-shaders-2.png"></p><p><strong>Background &amp; Dynamic Effects</strong>:<br>Such as mesh gradient, static mesh gradient, grain gradient, dot orbit, warp, spiral, swirl, waves, neuro noise, perlin, simplex noise, voronoi, metaballs, god rays, etc.</p><p><img src="https://img.nep.me/ooo/paper-shaders-3.webp" alt="paper-shaders-3.png"></p><p>These effects are perfect for:</p><ul><li>Landing Page hero backgrounds</li><li>Product website Hero sections</li><li>Logo motion designs</li><li>Article cover image generation</li><li>Developer tool websites</li><li>Design-conscious SaaS pages</li><li>Portfolio websites</li><li>Music, gaming, and creative project pages</li></ul><p>Compared to using static images, the advantage of Shaders is that they can render in real time, change dynamically, and generally maintain better responsive adaptability.</p><h2 id="How-to-Use-in-React"><a href="#How-to-Use-in-React" class="headerlink" title="How to Use in React?"></a>How to Use in React?</h2><p>The React usage of Paper Shaders is very similar to standard components.</p><p>For example, here is the <code>MeshGradient</code> example from the official README:</p><figure class="highlight tsx"><table><tr><td class="gutter"><pre><span class="line">1</span><br><span class="line">2</span><br><span class="line">3</span><br><span class="line">4</span><br><span class="line">5</span><br><span class="line">6</span><br><span class="line">7</span><br><span class="line">8</span><br><span class="line">9</span><br><span class="line">10</span><br><span class="line">11</span><br><span class="line">12</span><br><span class="line">13</span><br><span class="line">14</span><br><span class="line">15</span><br><span class="line">16</span><br><span class="line">17</span><br><span class="line">18</span><br><span class="line">19</span><br><span class="line">20</span><br><span class="line">21</span><br><span class="line">22</span><br></pre></td><td class="code"><pre><span class="line"><span class="keyword">import</span> &#123; <span class="title class_">MeshGradient</span>, <span class="title class_">DotOrbit</span> &#125; <span class="keyword">from</span> <span class="string">&#x27;@paper-design/shaders-react&#x27;</span>;</span><br><span class="line"></span><br><span class="line"><span class="keyword">export</span> <span class="keyword">default</span> <span class="keyword">function</span> <span class="title function_">App</span>(<span class="params"></span>) &#123;</span><br><span class="line">  <span class="keyword">return</span> (</span><br><span class="line">    <span class="language-xml"><span class="tag">&lt;&gt;</span></span></span><br><span class="line"><span class="language-xml">      <span class="tag">&lt;<span class="name">MeshGradient</span></span></span></span><br><span class="line"><span class="tag"><span class="language-xml">        <span class="attr">colors</span>=<span class="string">&#123;[</span>&#x27;#<span class="attr">5100ff</span>&#x27;, &#x27;#<span class="attr">00ff80</span>&#x27;, &#x27;#<span class="attr">ffcc00</span>&#x27;, &#x27;#<span class="attr">ea00ff</span>&#x27;]&#125;</span></span></span><br><span class="line"><span class="tag"><span class="language-xml">        <span class="attr">distortion</span>=<span class="string">&#123;1&#125;</span></span></span></span><br><span class="line"><span class="tag"><span class="language-xml">        <span class="attr">swirl</span>=<span class="string">&#123;0.8&#125;</span></span></span></span><br><span class="line"><span class="tag"><span class="language-xml">        <span class="attr">speed</span>=<span class="string">&#123;0.2&#125;</span></span></span></span><br><span class="line"><span class="tag"><span class="language-xml">        <span class="attr">style</span>=<span class="string">&#123;&#123;</span> <span class="attr">width:</span> <span class="attr">200</span>, <span class="attr">height:</span> <span class="attr">200</span> &#125;&#125;</span></span></span><br><span class="line"><span class="tag"><span class="language-xml">      /&gt;</span></span></span><br><span class="line"><span class="language-xml"></span></span><br><span class="line"><span class="language-xml">      <span class="tag">&lt;<span class="name">DotOrbit</span></span></span></span><br><span class="line"><span class="tag"><span class="language-xml">        <span class="attr">colors</span>=<span class="string">&#123;[</span>&#x27;#<span class="attr">d2822d</span>&#x27;, &#x27;#<span class="attr">0c3b7e</span>&#x27;, &#x27;#<span class="attr">b31a57</span>&#x27;, &#x27;#<span class="attr">37a066</span>&#x27;]&#125;</span></span></span><br><span class="line"><span class="tag"><span class="language-xml">        <span class="attr">colorBack</span>=<span class="string">&quot;#000000&quot;</span></span></span></span><br><span class="line"><span class="tag"><span class="language-xml">        <span class="attr">scale</span>=<span class="string">&#123;0.3&#125;</span></span></span></span><br><span class="line"><span class="tag"><span class="language-xml">        <span class="attr">style</span>=<span class="string">&#123;&#123;</span> <span class="attr">width:</span> <span class="attr">200</span>, <span class="attr">height:</span> <span class="attr">200</span> &#125;&#125;</span></span></span><br><span class="line"><span class="tag"><span class="language-xml">      /&gt;</span></span></span><br><span class="line"><span class="language-xml">    <span class="tag">&lt;/&gt;</span></span></span><br><span class="line">  );</span><br><span class="line">&#125;</span><br></pre></td></tr></table></figure><p>As you can see from this example, it doesn&#39;t require developers to understand the full WebGL rendering pipeline beforehand. Instead, it adjusts visual presentation through parameters like <code>colors</code>, <code>distortion</code>, <code>swirl</code>, <code>speed</code>, and <code>scale</code>. For designers or frontend developers, this abstraction makes trial and error much easier.</p><h2 id="A-Designer-Friendly-Shader-Workflow"><a href="#A-Designer-Friendly-Shader-Workflow" class="headerlink" title="A Designer-Friendly Shader Workflow"></a>A Designer-Friendly Shader Workflow</h2><p>The most interesting part of Paper Shaders is not just that it &quot;provides a bunch of Shader components,&quot; but that it attempts to bridge the gap between <strong>design tools → frontend code</strong>.</p><p>The project README mentions that one of its goals is to allow designers to use common shaders in a visual way, and the final output can be directly exported as lightweight code to be placed in any codebase.</p><p>This is actually very important.</p><p>Many web visual effects look beautiful in design drafts, but face several issues when they are actually implemented:</p><ul><li>Designers don&#39;t know how to describe Shader parameters;</li><li>Developers don&#39;t want to write WebGL from scratch;</li><li>Dynamic effects in design drafts are difficult to accurately reproduce;</li><li>In the end, they are often replaced by videos, GIFs, or static images.</li></ul><p>Paper Shaders&#39; approach is to turn Shaders into a more &quot;productized&quot; design asset:<br>adjustable during the design phase, directly usable in the development phase, and not requiring heavy runtime dependencies when going live.</p><h2 id="The-Significance-of-Zero-Dependencies"><a href="#The-Significance-of-Zero-Dependencies" class="headerlink" title="The Significance of Zero Dependencies"></a>The Significance of Zero Dependencies</h2><p>Paper Shaders officially emphasizes that it consists of <strong>zero-dependency HTML canvas shaders</strong>.</p><p>This is highly attractive for frontend projects. While many visual motion libraries are powerful, they often bring significant bundle size, complex dependency chains, and runtime overhead. For projects that just want to add a dynamic background to the homepage, add a touch of sophistication to a logo, or create a lightweight interactive effect, importing a full 3D engine can sometimes feel too heavy.</p><p>Paper Shaders has a lighter positioning:<br>It does not aim to replace Three.js, R3F, or professional graphics engines, but rather to provide a set of high-quality Shader effects that can be quickly embedded into web pages.</p><h2 id="Open-Source-License-Commercial-Use"><a href="#Open-Source-License-Commercial-Use" class="headerlink" title="Open Source License &amp; Commercial Use"></a>Open Source License &amp; Commercial Use</h2><p>Paper Shaders uses the <strong>Apache 2.0 License</strong>. The official documentation mentions that it can be used in commercial websites, applications, games, videos, prototypes, internal tools, and other end products, with no visible attribution required. If you redistribute the Paper Shaders code as part of another shader library, plugin, or tool, you need to retain the LICENSE and NOTICE files.</p><p>This makes it very friendly for personal projects, commercial websites, SaaS products, and internal tools alike.</p><h2 id="Which-Projects-is-It-Suitable-For"><a href="#Which-Projects-is-It-Suitable-For" class="headerlink" title="Which Projects is It Suitable For?"></a>Which Projects is It Suitable For?</h2><p>I think Paper Shaders is particularly suitable for the following scenarios:</p><p>First, <strong>websites that want to quickly elevate their visual appeal</strong>.<br>For instance, AI tools, design tools, developer platforms, or SaaS product homepages. Using effects like Mesh Gradient, Grain Gradient, or God Rays can easily transform a page from looking like a &quot;generic template&quot; to something much more memorable.</p><p>Second, <strong>projects requiring dynamic logos or brand motion designs</strong>.<br>Effects like Liquid Metal, Heatmap, and Gem Smoke are perfect for brand showcases, especially for tech, creative, or design products.</p><p>Third, <strong>frontend projects that want to avoid writing low-level WebGL</strong>.<br>If you just want a beautiful Shader background rather than building a graphics engine from scratch, Paper Shaders&#39; component-based encapsulation makes it much easier than writing WebGL from the ground up.</p><p>Fourth, <strong>teams with close collaboration between designers and developers</strong>.<br>If designers want dynamic visual effects to be directly converted into usable code rather than leaving developers to guess based on screenshots, then the direction of Paper Shaders is definitely worth keeping an eye on.</p><h2 id="Points-to-Consider"><a href="#Points-to-Consider" class="headerlink" title="Points to Consider"></a>Points to Consider</h2><p>Of course, it is not a silver bullet.</p><p>First, Paper Shaders is currently in version <code>0.0.x</code>, and the official team explicitly recommends locking the dependency version since breaking changes may still occur at this stage.</p><p>Second, Shaders are essentially real-time rendering effects. Although the official documentation highlights lightweight and high performance, in actual projects, it is still recommended to keep in mind mobile performance, behavior on lower-end devices, battery consumption, and whether it impacts page readability.</p><p>Finally, visual effects should not be overused. Shaders are great for creating atmosphere and brand identity, but if the entire page is filled with dynamic textures, noise, and flickering gradients, it will instead hinder content readability.</p><h2 id="Summary"><a href="#Summary" class="headerlink" title="Summary"></a>Summary</h2><p>Paper Shaders is a very interesting open-source project.</p><p>It wraps Shaders, which originally belonged to the realm of graphics programming, into a format closer to modern frontend components: it can be installed via npm, used in React, adjusted with parameters, and integrated with design tools. For developers looking to add dynamic backgrounds, textures, logo animations, and premium visual effects to their websites, it offers a much lighter path than writing WebGL from scratch.</p><p>It is not a massive 3D framework, but rather more like a bottle of colored ink:<br>You don&#39;t need to reinvent the canvas; you just drip it onto the page to give the originally flat interface a bit of fluidity, texture, and life.</p><h2 id="Project-Links"><a href="#Project-Links" class="headerlink" title="Project Links"></a>Project Links</h2><ul><li>Official Website: <a href="https://shaders.paper.design/">https://shaders.paper.design/</a></li><li>GitHub: <a href="https://github.com/paper-design/shaders">https://github.com/paper-design/shaders</a></li></ul>]]>
    </content>
    <id>https://ooo.run/en/post/paper-shaders-open-source-webgl-design-effects.html</id>
    <link href="https://ooo.run/en/post/paper-shaders-open-source-webgl-design-effects.html"/>
    <published>2026-07-02T03:42:27.000Z</published>
    <summary>
      <![CDATA[<p>If you&#39;ve ever worked on frontend visual effects, you&#39;ve likely run into an awkward problem:<br>Standard CSS is convenient, but o]]>

    </summary>
    <title>Open Source Project: Turning Cool WebGL Shaders into Frontend Components - An Introduction to Paper Shaders</title>
    <updated>2026-07-02T03:56:59.483Z</updated>
  </entry>
  <entry>
    <author>
      <name>Mr. O</name>
    </author>
    <category term="News" scheme="https://ooo.run/en/categories/News/"/>
    <category term="AI" scheme="https://ooo.run/en/tags/AI/"/>
    <category term="Claude" scheme="https://ooo.run/en/tags/Claude/"/>
    <category term="Sonnet 5" scheme="https://ooo.run/en/tags/Sonnet-5/"/>
    <content>
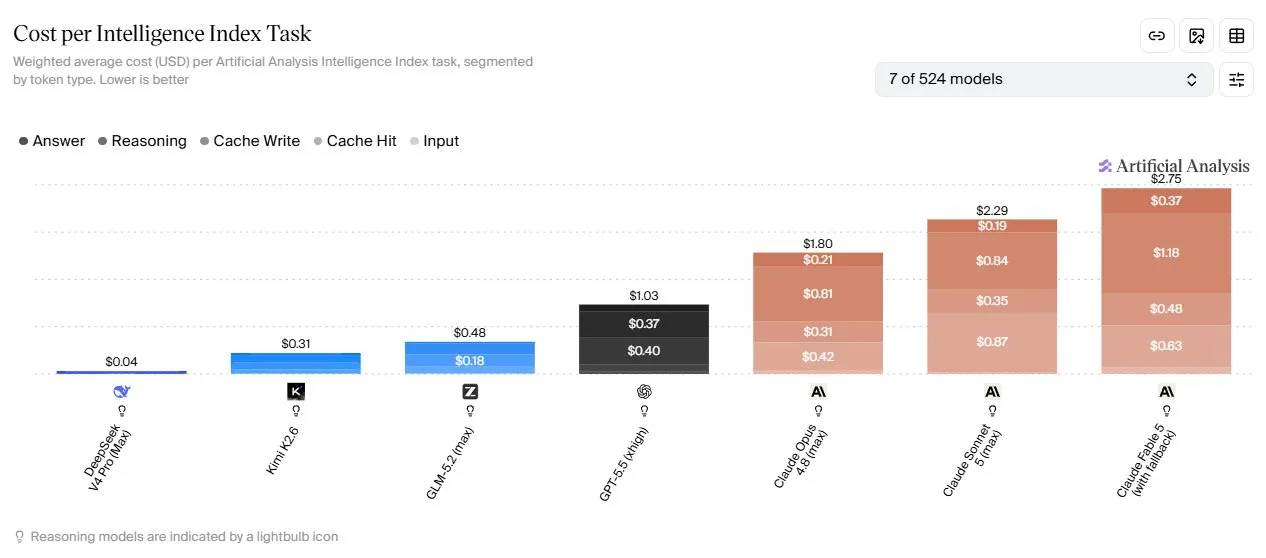
      <![CDATA[<p>On July 1, 2026, Beijing time, Anthropic announced that the ban on <strong>Fable 5</strong> has been lifted and released their new model, <strong>Sonnet 5</strong>. Anthropic claimed that this version significantly improves agent capabilities for autonomous task execution and tool calling, with performance approaching the flagship Opus 4.8, and features a brand-new tokenizer. The pricing details are as follows:</p><table><thead><tr><th>Model</th><th>Input (per M Tokens)</th><th>Output (per M Tokens)</th><th>Notes</th></tr></thead><tbody><tr><td>Sonnet 5</td><td>$3</td><td>$15</td><td>Promotional price of $2 &#x2F; $10 before August 31</td></tr><tr><td>Opus 4.8</td><td>$5</td><td>$25</td><td>Unlimited-time promotional price</td></tr><tr><td>Fable 5</td><td>$10</td><td>$50</td><td>Not included Claude Pro&#x2F;MAX after July 7; API billing only.</td></tr></tbody></table><p>Whether for input or output, the unit price of Sonnet 5 is only 60% of Opus. However, a lower unit price does not necessarily mean it&#39;s more cost-effective. As we will discuss later, measured by actual task cost, Sonnet 5 might end up costing more to complete the same task—which is the source of the controversy.</p><p>With a lower unit price compared to Opus and a major version jump, you might wonder: is Sonnet 5 really worth using?</p><h2 id="Conclusion"><a href="#Conclusion" class="headerlink" title="Conclusion"></a>Conclusion</h2><p>Let&#39;s jump straight to the conclusion:</p><p><strong>Sonnet 5 is not suitable to be used directly as the default model. Its performance is inferior to Opus 4.8, but it has received outstanding reviews for writing tasks.</strong></p><p>Therefore, for large-scale, extensive code editing, you should stick to the Opus 4.8 series or use Fable 5 (which will no longer be available in the Claude Code Pro subscription after July 7).</p><p>When cost needs to be considered, when a newer knowledge base is required (updated to January 2026), and in small tasks or writing tasks, you can switch to Sonnet 5.</p><p>For simpler tasks, other more economical models will suffice.</p><h2 id="What-is-Sonnet-5"><a href="#What-is-Sonnet-5" class="headerlink" title="What is Sonnet 5?"></a>What is Sonnet 5?</h2><p>According to Anthropic&#39;s official announcement, Claude Sonnet 5 is the next-generation model in the Sonnet family, positioned as a &#39;state-of-the-art performance model for coding, agents, and professional tasks.&#39; Anthropic placed it in the Sonnet product line rather than the higher-end, more expensive Opus or Fable flagship lines. This itself is a signal: Sonnet 5 is not designed to top benchmark leaderboards, but to be used &#39;every single day.&#39;</p><p>Foreign media reports also note that Sonnet 5 is designed to be better suited for high-frequency daily use, with specific enhancements in browsing, coding, planning, knowledge work, and autonomous task execution. It has been rolled out simultaneously to all subscription tiers, including Claude Free, Pro, Max, Team, and Enterprise. This &#39;full release at launch&#39; approach confirms its positioning as a workhorse model, not a niche feature.</p><p>In short, Sonnet 5 is not a &#39;highest-spec show-off model,&#39; but the primary workhorse model Anthropic wants to push to most Claude users.</p><p>This aligns with Anthropic&#39;s historical positioning of the Sonnet series: <strong>stronger than Haiku, cheaper than Opus, and suited as a daily driver.</strong></p><h2 id="Social-Media-Feedback-A-Complete-Waste-of-Money"><a href="#Social-Media-Feedback-A-Complete-Waste-of-Money" class="headerlink" title="Social Media Feedback: A Complete Waste of Money"></a>Social Media Feedback: A Complete Waste of Money</h2><p>A chart from Artificial Analysis showing &#39;Cost per Intelligence Index Task&#39; indicates that under <strong>Max thinking level</strong>, Claude Sonnet 5&#39;s single-task cost is significantly higher than models like GPT-5.5, GLM-5.2, Kimi-K2.6, DeepSeek-V4-Pro, and even higher than the Opus series. Some users quickly summarized it as:</p><blockquote><p>Sonnet 5 should go straight to the trash bin.<br>1.2x more expensive than Opus 4.8 Max<br>2x more expensive than GPT-5.5-xhigh<br>5x more expensive than GLM-5.2<br>7x more expensive than Kimi-K2.6<br>57x more expensive than DeepSeek-V4-Pro</p></blockquote><p><img src="https://img.nep.me/ooo/sonnet5-per-task-cost.webp" alt="sonnet5-per-task-cost"></p><p>In response, Peter Steinberger, creator of OpenClaw, <a href="https://x.com/steipete/status/2072144627474579925">pointed out</a> that <strong>price per token !&#x3D; actual task cost !&#x3D; final productivity cost</strong>.</p><p>Because Sonnet 5&#39;s intelligence hasn&#39;t made a massive leap forward, it needs to consume more tokens to complete tasks, making the total consumption higher than that of the Opus series.</p><p>Therefore, for large-scale code editing projects, it is better to directly use the higher-intelligence Opus series.</p><h2 id="The-Debate-Is-Sonnet-5-Expensive"><a href="#The-Debate-Is-Sonnet-5-Expensive" class="headerlink" title="The Debate: Is Sonnet 5 Expensive?"></a>The Debate: Is Sonnet 5 Expensive?</h2><p>Yes, it is.</p><p>Especially looking at it from the perspective of 2026, the cost pressure of Sonnet 5 is more obvious than in the past.</p><p>The cost chart from Artificial Analysis does not simply compare the input&#x2F;output token unit prices. Instead, it is weighted according to Intelligence Index tasks, including different token types such as Input, Answer, Reasoning, Cache Write, and Cache Hit. It attempts to answer the question: how much does it cost on average to complete a standardized intelligence task?</p><p>This explains why models with seemingly similar API unit prices can have completely different actual task costs. For example, if a model requires an average of 3 rounds of tool calls—rereading the entire context each round to complete a task—while another model can yield a usable result in 1 round, the actual bill of the former will be several times that of the latter even if their unit prices are identical. The gap doesn&#39;t come from the pricing table; it comes from &#39;how many detours the model takes to solve a problem.&#39;</p><p>If a model has:</p><ul><li>Longer outputs</li><li>More reasoning tokens</li><li>Heavier tool call chains</li><li>Inability to get it right the first time, requiring iterative corrections</li><li>Low cache utilization</li></ul><p>Then its actual cost will be driven up.</p><p>This is why many people criticize Sonnet 5:<br><strong>Anthropic&#39;s models are increasingly like luxury gas-guzzlers: high performance, but not cheap to run.</strong></p><h2 id="But-Looking-Only-at-Single-Task-Cost-Can-Be-Misleading"><a href="#But-Looking-Only-at-Single-Task-Cost-Can-Be-Misleading" class="headerlink" title="But Looking Only at Single-Task Cost Can Be Misleading"></a>But Looking Only at Single-Task Cost Can Be Misleading</h2><p>The catch is that developers rarely care about &#39;how much it costs to run a single benchmark.&#39; Instead, they care about:</p><p><strong>Will it save me from hassle?</strong></p><p>When it comes to writing code, refactoring projects, analyzing repositories, fixing bugs, and running agents, the model cost is only one part of the total cost. What matters more is:</p><ul><li>Whether the first proposed solution is solid</li><li>Whether it understands the context of a large project</li><li>Whether it avoids modifying unrelated files</li><li>Whether it maintains stability across long-running tasks</li><li>Whether it can detect and correct its own errors</li><li>Whether it reduces manual review and rework</li></ul><p>If Sonnet 5 is significantly stronger in these areas than cheaper models, it might still end up being more cost-effective overall, even if its cost per task is higher.</p><p>To illustrate, consider a medium-sized refactoring task. A cheaper model might cost only a fifth of Sonnet 5 per token, but because it fails to grasp the project boundaries, it takes 6 rounds of trial and error to barely make it work, while accidentally breaking two unrelated files that you have to manually roll back. On the other hand, Sonnet 5 is more expensive but delivers a working solution in 2 rounds without touching unrelated files. Once you factor in your time spent troubleshooting, rolling back, and re-verifying, the &#39;total cost&#39; of the cheaper model might not be lower than Sonnet 5—it&#39;s just that this cost doesn&#39;t show up on your API bill; it manifests as your wasted time.</p><p>It&#39;s just like cloud servers:</p><p>Cheap ones are indeed very cheap, but if they crash three times a day, suffer from IO throttling, or routing issues, you end up wasting valuable human hours.</p><p>The same goes for AI models.</p><h2 id="Sonnet-5-True-Value-Agents-and-Code-Workflows"><a href="#Sonnet-5-True-Value-Agents-and-Code-Workflows" class="headerlink" title="Sonnet 5 True Value: Agents and Code Workflows"></a>Sonnet 5 True Value: Agents and Code Workflows</h2><p>Judging from Anthropic&#39;s marketing focus, the core selling point of Sonnet 5 is not standard chat, but <strong>Agentic Workflows</strong>.</p><p>That is, enabling the model to not just answer questions, but execute tasks sequentially:</p><ul><li>Read project files</li><li>Understand the existing architecture</li><li>Formulate a modification plan</li><li>Call the terminal</li><li>Modify code</li><li>Run tests</li><li>Continue fixing based on errors</li><li>Finally, summarize changes</li></ul><p>This is precisely the capability that tools like Claude Code, Cursor, Windsurf, and OpenClaw rely on most.</p><p>For these scenarios, the model&#39;s &#39;adherence to instructions,&#39; &#39;context stability,&#39; and &#39;tool-calling judgment&#39; are often more critical than simple Q&amp;A. Anthropic&#39;s previous generations of Sonnet have had a great reputation in code agent scenarios. If Sonnet 5 continues to strengthen this trajectory, it will remain an indispensable tool for developers.</p><p>In complex projects, the issue with many models is not that they cannot write code, but rather that:</p><ul><li>They fail to grasp project boundaries</li><li>They tend to rewrite entire files</li><li>They break B while fixing A</li><li>They make wild guesses when tests fail</li><li>They lose track of context once it grows long</li><li>They repeat the same incorrect fix when seeing an error</li></ul><p>If Sonnet 5 can reduce these issues, then it is not just &#39;expensive&#39; but &#39;expensive but hassle-free.&#39;</p><h2 id="Is-It-for-Everyone"><a href="#Is-It-for-Everyone" class="headerlink" title="Is It for Everyone?"></a>Is It for Everyone?</h2><p><strong>No.</strong></p><p>If your requirements are limited to:</p><ul><li>Translation</li><li>Summarization</li><li>Writing standard articles</li><li>Generating short code snippets</li><li>Asking general knowledge questions</li><li>Light customer support QA</li><li>Bulk processing of low-value text</li></ul><p>Then Sonnet 5 is likely not the most cost-effective choice.</p><p>These tasks have entered a stage of &#39;model surplus.&#39; Lower-priced models from GLM, Kimi, DeepSeek, and GPT can do them quite well. Especially for batch tasks, the cost difference will be amplified infinitely.</p><p>For instance, for a blog summary, a JSON conversion, or a standard SQL generation task, the benefits of Sonnet 5 may not offset its cost.</p><p>In these cases, a more sensible strategy is:</p><p><strong>Use cheaper models for basic tasks, the Opus &#x2F; Fable series for large and complex tasks, and delegate medium-complexity, small-scale tasks to Sonnet 5 when budget is a consideration.</strong></p><h2 id="My-Recommendation-Don-t-Use-Sonnet-5-as-the-Default-Option-Mindlessly"><a href="#My-Recommendation-Don-t-Use-Sonnet-5-as-the-Default-Option-Mindlessly" class="headerlink" title="My Recommendation: Don&#39;t Use Sonnet 5 as the Default Option Mindlessly"></a>My Recommendation: Don&#39;t Use Sonnet 5 as the Default Option Mindlessly</h2><p>The best way to use Sonnet 5 is not to direct every single request to it, but to treat it as an economical utility model.</p><p>You can categorize tasks as follows:</p><h3 id="1-General-Text-Tasks-Avoid-Sonnet-5"><a href="#1-General-Text-Tasks-Avoid-Sonnet-5" class="headerlink" title="1. General Text Tasks: Avoid Sonnet 5"></a>1. General Text Tasks: Avoid Sonnet 5</h3><p>For translation, polishing, modifying titles, writing summaries, and generating basic Markdown, cheaper models are more than enough.</p><p>These tasks do not require deep reasoning, tool calling, or project-wide understanding. Using Sonnet 5 here is overkill.</p><h3 id="2-Basic-Code-Snippets-Case-by-Case"><a href="#2-Basic-Code-Snippets-Case-by-Case" class="headerlink" title="2. Basic Code Snippets: Case-by-Case"></a>2. Basic Code Snippets: Case-by-Case</h3><p>For writing simple functions, editing CSS, or generating a Docker Compose file, cheaper models can get the job done.</p><p>However, if they start failing repeatedly, or if you&#39;ve already spent 10 minutes debugging, it is time to try switching to Sonnet 5.</p><p><strong>The most expensive part of a cheap model is making you believe it is &#39;almost there.&#39;</strong></p><h3 id="3-Medium-to-Small-Code-Tasks-Suitable-for-Sonnet-5"><a href="#3-Medium-to-Small-Code-Tasks-Suitable-for-Sonnet-5" class="headerlink" title="3. Medium-to-Small Code Tasks: Suitable for Sonnet 5"></a>3. Medium-to-Small Code Tasks: Suitable for Sonnet 5</h3><p>Examples include:</p><ul><li>Modifying a single page</li><li>Creating a component</li><li>Writing a helper script</li><li>Fixing a specific, clear error</li><li>Adding a simple API endpoint</li><li>Generating test cases</li><li>Performing minor refactoring on existing code</li></ul><p>These tasks have clear boundaries, shorter contexts, and low costs of failure. Here, Sonnet 5 can leverage the Claude family&#39;s signature code understanding and instruction-following, while keeping the unit cost lower than Opus 4.8.</p><p>If the task is not complex, using Opus 4.8 might be wasteful; but if cheaper models keep stumbling, Sonnet 5 offers an excellent middle ground.</p><p>It is perfect for code tasks that &#39;need a bit of intelligence, but do not yet warrant the most advanced model.&#39;</p><h3 id="4-Large-Project-Development-and-Refactoring-Use-Higher-Intelligence-Models-Directly"><a href="#4-Large-Project-Development-and-Refactoring-Use-Higher-Intelligence-Models-Directly" class="headerlink" title="4. Large Project Development and Refactoring: Use Higher-Intelligence Models Directly"></a>4. Large Project Development and Refactoring: Use Higher-Intelligence Models Directly</h3><p>If your goal is not fixing a minor bug, modifying a component, or writing a quick script, but rather having AI help build a complete project, Sonnet 5 is likely not the optimal choice.</p><p>Such tasks typically involve:</p><ul><li>Building a complete application from scratch</li><li>Designing project architecture</li><li>Implementing multi-module features</li><li>Modifying dozens of files sequentially</li><li>Handling databases, authentication, state management, routing, and deployment configurations</li><li>Running agent tools like Claude Code, Codex, or OpenClaw for hours</li></ul><p>In these scenarios, what matters most is not &#39;low unit cost&#39; but a &#39;high probability of getting it right on the first try.&#39;</p><p>The cost of a large project consists of multiple components, not just token fees:</p><ul><li>The cost of the model understanding requirements</li><li>The cost of maintaining context</li><li>Rework costs from multiple rounds of edits</li><li>Rollback costs from incorrectly modified files</li><li>Troubleshooting costs after test failures</li><li>Time spent on manual review and fixes</li></ul><p>If a model&#39;s intelligence is slightly lacking, it might look capable at each individual step, but issues crop up when they are combined: it forgets the architecture designed earlier, breaks a newly written interface in the next round, or fixes page A only to break page B. Eventually, the project descends into a state of &#39;it runs, but don&#39;t touch it.&#39;</p><p>This is why, for large-scale projects, you should prioritize higher-intelligence models like Opus 4.8 or Fable 5.</p><p>Although their unit prices are higher, they maintain global consistency much better in complex tasks, minimizing futile attempts and repetitive fixes. Especially when the task involves architectural design, cross-file refactoring, test fixes, and long-term context retention, the stability offered by more intelligent models outweighs the price difference.</p><p>Sonnet 5 is better suited for localized tasks:<br>Writing a page, modifying a module, generating some copy, adding a test, or fixing a specific error.</p><p>But if you are asking an AI to implement a large project from start to finish—especially running agents continuously for hours—a more reasonable strategy is:</p><p><strong>Directly use Opus 4.8 or Fable 5. Don&#39;t compromise and hand the project to Sonnet 5 just to save a few pennies.</strong></p><p>Because in large projects, the most expensive thing is continuing to trust the model after it makes a mistake.</p><h2 id="The-Catch-with-Sonnet-5-Anthropic-is-Still-Anthropic"><a href="#The-Catch-with-Sonnet-5-Anthropic-is-Still-Anthropic" class="headerlink" title="The Catch with Sonnet 5: Anthropic is Still Anthropic"></a>The Catch with Sonnet 5: Anthropic is Still Anthropic</h2><p>The release of Sonnet 5 also exposes Anthropic&#39;s long-standing issue:</p><p><strong>The model is great, but the ecosystem and pricing cause anxiety.</strong></p><p>Claude&#39;s experience has always been strong, particularly with code and long-context tasks. However, in terms of availability, quotas, regions, subscription limits, API costs, and third-party tool support, Anthropic is not as stable as OpenAI.</p><p>Moreover, as AI Agent consumption grows, the feasibility of &#39;unlimited use under a subscription&#39; becomes harder to sustain. Previous analyses have pointed out that the actual API-equivalent cost consumed by power AI users can easily exceed the subscription price. A developer running agent tasks long-term might consume more tokens in a single day than the entire monthly subscription fee. This suggests that AI companies are highly likely to adjust towards more granular, cost-reflective billing methods in the future—such as stricter usage caps, tiered speed limits, or quiet price hikes on the output side, similar to what we see with Sonnet 5.</p><p>So, the issue with Sonnet 5 is not just about a single expensive model; it represents a broader trend:</p><p><strong>Capable models will keep getting stronger, but the era of truly cheap, unrestricted use is coming to an end.</strong></p><h2 id="Summary-in-a-Sentence"><a href="#Summary-in-a-Sentence" class="headerlink" title="Summary in a Sentence"></a>Summary in a Sentence</h2><p><strong>Sonnet 5 is neither a cheap model nor the strongest model, but a daily Claude model suited for writing and medium-to-small tasks.</strong> It occupies an awkward position in code editing: simple tasks don&#39;t require it, and complex tasks are better handled by Opus or Fable.</p><p>If you treat it as a cheap alternative to Opus, you might be disappointed;<br>If you view it as a Sonnet model better suited for daily text work and lightweight tasks, it is still a worthy addition to your toolkit.</p>]]>
    </content>
    <id>https://ooo.run/en/post/is-sonnet-5-worth-using.html</id>
    <link href="https://ooo.run/en/post/is-sonnet-5-worth-using.html"/>
    <published>2026-07-01T09:30:48.000Z</published>
    <summary>
      <![CDATA[<p>On July 1, 2026, Beijing time, Anthropic announced that the ban on <strong>Fable 5</strong> has been lifted and released their new model,]]>
    </summary>
    <title>Sonnet 5 Released: Is It Worth Using?</title>
    <updated>2026-07-01T10:34:27.936Z</updated>
  </entry>
  <entry>
    <author>
      <name>Mr. O</name>
    </author>
    <category term="News" scheme="https://ooo.run/en/categories/News/"/>
    <category term="Vercel" scheme="https://ooo.run/en/tags/Vercel/"/>
    <category term="Cloud" scheme="https://ooo.run/en/tags/Cloud/"/>
    <category term="Frontend Development" scheme="https://ooo.run/en/tags/Frontend-Development/"/>
    <content>
      <![CDATA[<p>Welcome to my world! This is Mr. O. When you have a complex project with Next.js for the frontend, FastAPI for the backend, and Astro for documentation, does managing their deployment on Vercel give you a headache? Vercel recently launched <strong>Vercel Services</strong>, which officially supports running multiple independently built services within a single project. In this post, we will discuss how it works, its configuration details, and the pain points it solves.</p><span id="more"></span><p>In the past, deploying projects on <strong>Vercel</strong> was a breeze if your app was just a single <strong>Next.js</strong>, <strong>Astro</strong>, <strong>Vite</strong>, or <strong>SvelteKit</strong> project: import the repository, detect the framework, auto-build, and auto-deploy.</p><p>However, once the project gets a bit more complex, for example:</p><ul><li>Frontend: <strong>Next.js</strong></li><li>Backend: <strong>FastAPI</strong></li><li>Additional service: API written in <strong>Go</strong></li><li>Admin dashboard: <strong>Vite</strong> &#x2F; <strong>React</strong></li><li>Documentation site: <strong>Astro</strong> or <strong>Fumadocs</strong></li></ul><p>The dilemma arises: should these be deployed as a single Vercel Project or split into multiple Projects? If split, managing domains, environment variables, Preview URLs, cross-service communication, CORS, and routing rules becomes highly complex.</p><p>The recently released <strong>Vercel Services</strong> is designed specifically to solve this problem: it allows you to run multiple independently built services inside a single Vercel project, and mount them under different paths of the same deployment URL.</p><h2 id="What-is-Vercel-Services"><a href="#What-is-Vercel-Services" class="headerlink" title="What is Vercel Services?"></a>What is Vercel Services?</h2><p>Simply put, <strong>Vercel Services</strong> allows you to split a single project into multiple independent &quot;Services&quot;.</p><p>Each Service can have its own entry point directory, framework, build commands, and runtime configurations. However, they ultimately belong to the same Vercel Project and share the same deployment domain.</p><p>For example:</p><figure class="highlight txt"><table><tr><td class="gutter"><pre><span class="line">1</span><br><span class="line">2</span><br><span class="line">3</span><br></pre></td><td class="code"><pre><span class="line">https://example.vercel.app/          -&gt; Frontend application</span><br><span class="line">https://example.vercel.app/api       -&gt; Backend API</span><br><span class="line">https://example.vercel.app/admin     -&gt; Admin dashboard</span><br></pre></td></tr></table></figure><p>Previously, you might have had to create multiple Vercel Projects and link them together using environment variables or rewrite rules. Now, <strong>Vercel Services</strong> aims to let these services be deployed, previewed, and managed together within a single project.</p><p>According to Vercel&#39;s official documentation, to use a multi-service project, you need to set the project&#39;s Framework Preset to <code>Services</code>, and configure <code>services</code> (or <code>experimentalServices</code> in experimental phase) in the <code>vercel.json</code> file at the root of the project.</p><h2 id="A-Minimal-Configuration-Example"><a href="#A-Minimal-Configuration-Example" class="headerlink" title="A Minimal Configuration Example"></a>A Minimal Configuration Example</h2><p>The basic configuration shown in the official documentation looks like this:</p><figure class="highlight json"><table><tr><td class="gutter"><pre><span class="line">1</span><br><span class="line">2</span><br><span class="line">3</span><br><span class="line">4</span><br><span class="line">5</span><br><span class="line">6</span><br><span class="line">7</span><br><span class="line">8</span><br><span class="line">9</span><br><span class="line">10</span><br><span class="line">11</span><br><span class="line">12</span><br><span class="line">13</span><br><span class="line">14</span><br><span class="line">15</span><br><span class="line">16</span><br><span class="line">17</span><br><span class="line">18</span><br><span class="line">19</span><br><span class="line">20</span><br></pre></td><td class="code"><pre><span class="line"><span class="punctuation">&#123;</span></span><br><span class="line">  <span class="attr">&quot;services&quot;</span><span class="punctuation">:</span> <span class="punctuation">&#123;</span></span><br><span class="line">    <span class="attr">&quot;my_frontend&quot;</span><span class="punctuation">:</span> <span class="punctuation">&#123;</span></span><br><span class="line">      <span class="attr">&quot;root&quot;</span><span class="punctuation">:</span> <span class="string">&quot;frontend/&quot;</span><span class="punctuation">,</span></span><br><span class="line">      <span class="attr">&quot;framework&quot;</span><span class="punctuation">:</span> <span class="string">&quot;nextjs&quot;</span></span><br><span class="line">    <span class="punctuation">&#125;</span><span class="punctuation">,</span></span><br><span class="line">    <span class="attr">&quot;my_backend&quot;</span><span class="punctuation">:</span> <span class="punctuation">&#123;</span></span><br><span class="line">      <span class="attr">&quot;root&quot;</span><span class="punctuation">:</span> <span class="string">&quot;backend/&quot;</span><span class="punctuation">,</span></span><br><span class="line">      <span class="attr">&quot;entrypoint&quot;</span><span class="punctuation">:</span> <span class="string">&quot;main:app&quot;</span></span><br><span class="line">    <span class="punctuation">&#125;</span></span><br><span class="line">  <span class="punctuation">&#125;</span><span class="punctuation">,</span></span><br><span class="line">  <span class="comment">// my_backend has no public route</span></span><br><span class="line">  <span class="comment">// it is only reachable from my_frontend internally</span></span><br><span class="line">  <span class="attr">&quot;rewrites&quot;</span><span class="punctuation">:</span> <span class="punctuation">[</span></span><br><span class="line">    <span class="punctuation">&#123;</span> </span><br><span class="line">      <span class="attr">&quot;source&quot;</span><span class="punctuation">:</span> <span class="string">&quot;/(.*)&quot;</span><span class="punctuation">,</span> </span><br><span class="line">      <span class="attr">&quot;destination&quot;</span><span class="punctuation">:</span> <span class="punctuation">&#123;</span> <span class="attr">&quot;service&quot;</span><span class="punctuation">:</span> <span class="string">&quot;my_frontend&quot;</span> <span class="punctuation">&#125;</span></span><br><span class="line">    <span class="punctuation">&#125;</span></span><br><span class="line">  <span class="punctuation">]</span></span><br><span class="line"><span class="punctuation">&#125;</span></span><br></pre></td></tr></table></figure><p>Two services are defined here:</p><ul><li><code>my_frontend</code>: Frontend service, with the root directory at <code>frontend/</code>, using the <strong>Next.js</strong> framework.</li><li><code>my_backend</code>: Backend service, with the root directory at <code>backend/</code>, and the startup entrypoint as <code>main:app</code>.</li></ul><p>Notably, the configuration includes <code>rewrites</code> rules to route all external requests to the frontend service <code>my_frontend</code>. On the other hand, <code>my_backend</code> does not have a public URL route configured; it can only be invoked internally via inter-service networking, making it ideal for hosting private backend APIs.</p><p>This approach is highly useful for hybrid frontend-backend projects, and is especially suited for <strong>Monorepos</strong>.</p><h2 id="What-Pain-Points-Does-It-Solve"><a href="#What-Pain-Points-Does-It-Solve" class="headerlink" title="What Pain Points Does It Solve?"></a>What Pain Points Does It Solve?</h2><h3 id="1-No-Need-to-Split-Frontends-and-Backends-into-Multiple-Vercel-Projects"><a href="#1-No-Need-to-Split-Frontends-and-Backends-into-Multiple-Vercel-Projects" class="headerlink" title="1. No Need to Split Frontends and Backends into Multiple Vercel Projects"></a>1. No Need to Split Frontends and Backends into Multiple Vercel Projects</h3><p>Many projects start as a simple frontend site and gradually add APIs, dashboards, Webhooks, and worker services. Over time, the project directory might look like this:</p><figure class="highlight txt"><table><tr><td class="gutter"><pre><span class="line">1</span><br><span class="line">2</span><br><span class="line">3</span><br><span class="line">4</span><br><span class="line">5</span><br><span class="line">6</span><br><span class="line">7</span><br><span class="line">8</span><br><span class="line">9</span><br><span class="line">10</span><br></pre></td><td class="code"><pre><span class="line">my-project/</span><br><span class="line">├── apps/</span><br><span class="line">│   ├── web/</span><br><span class="line">│   └── admin/</span><br><span class="line">├── backend/</span><br><span class="line">│   ├── main.py</span><br><span class="line">│   └── requirements.txt</span><br><span class="line">├── packages/</span><br><span class="line">│   └── shared/</span><br><span class="line">└── vercel.json</span><br></pre></td></tr></table></figure><p>Without Services, you might struggle with decisions like:</p><ul><li>Deploying <code>apps/web</code> to one Vercel project</li><li>Deploying <code>apps/admin</code> to another Vercel project</li><li>Deploying <code>backend</code> to a different platform</li><li>Dealing with API endpoints, CORS, and environment variables across all of them</li></ul><p>The philosophy of Services is: since these components belong to the same product, they should be deployed together as multiple services of a single Vercel Project.</p><h3 id="2-Tailored-for-Polyglot-Multi-Language-Projects"><a href="#2-Tailored-for-Polyglot-Multi-Language-Projects" class="headerlink" title="2. Tailored for Polyglot (Multi-Language) Projects"></a>2. Tailored for Polyglot (Multi-Language) Projects</h3><p>Historically, <strong>Vercel</strong> provided the best developer experience primarily for the frontend and <strong>Node.js</strong> ecosystems, especially <strong>Next.js</strong>.</p><p>However, in real-world scenarios, the backend isn&#39;t always written in JavaScript. Many developers use:</p><ul><li><strong>Python</strong> + <strong>FastAPI</strong></li><li><strong>Go</strong></li><li><strong>Node.js</strong> + <strong>Express</strong></li><li><strong>Next.js</strong></li><li><strong>Vite</strong></li><li><strong>Astro</strong></li></ul><p><strong>Vercel Services</strong> allows these services to be seamlessly integrated within a single project.</p><p>For example:</p><figure class="highlight txt"><table><tr><td class="gutter"><pre><span class="line">1</span><br><span class="line">2</span><br><span class="line">3</span><br><span class="line">4</span><br></pre></td><td class="code"><pre><span class="line">apps/web        -&gt; Next.js Frontend</span><br><span class="line">backend/api     -&gt; FastAPI Backend</span><br><span class="line">services/worker -&gt; Go Service</span><br><span class="line">apps/admin      -&gt; Vite Admin Dashboard</span><br></pre></td></tr></table></figure><p>Previously, projects like this felt like &quot;stitching multiple deployments together.&quot; Now, they are treated as &quot;multiple components of a single product.&quot;</p><h3 id="3-Unified-Preview-Deployments"><a href="#3-Unified-Preview-Deployments" class="headerlink" title="3. Unified Preview Deployments"></a>3. Unified Preview Deployments</h3><p>One of Vercel&#39;s most powerful features is <strong>Preview Deployments</strong>.</p><p>For every Pull Request submitted, a preview URL is automatically generated. If the frontend and backend are split across multiple Projects, managing the linkage between these multiple Preview URLs becomes challenging.</p><p>With Services, multiple services share a single deployment URL, distinguished by paths. This makes testing Pull Requests much more natural:</p><figure class="highlight txt"><table><tr><td class="gutter"><pre><span class="line">1</span><br><span class="line">2</span><br><span class="line">3</span><br></pre></td><td class="code"><pre><span class="line">https://my-project-git-feature.vercel.app/</span><br><span class="line">https://my-project-git-feature.vercel.app/server</span><br><span class="line">https://my-project-git-feature.vercel.app/admin</span><br></pre></td></tr></table></figure><p>This simplifies things immensely for team collaboration, product QA, and ad-hoc testing.</p><h2 id="A-More-Complete-Example-Next-js-FastAPI"><a href="#A-More-Complete-Example-Next-js-FastAPI" class="headerlink" title="A More Complete Example: Next.js + FastAPI"></a>A More Complete Example: Next.js + FastAPI</h2><p>Suppose we have a project structured as follows:</p><figure class="highlight txt"><table><tr><td class="gutter"><pre><span class="line">1</span><br><span class="line">2</span><br><span class="line">3</span><br><span class="line">4</span><br><span class="line">5</span><br><span class="line">6</span><br><span class="line">7</span><br><span class="line">8</span><br><span class="line">9</span><br></pre></td><td class="code"><pre><span class="line">my-app/</span><br><span class="line">├── apps/</span><br><span class="line">│   └── web/</span><br><span class="line">│       ├── package.json</span><br><span class="line">│       └── app/</span><br><span class="line">├── backend/</span><br><span class="line">│   ├── main.py</span><br><span class="line">│   └── requirements.txt</span><br><span class="line">└── vercel.json</span><br></pre></td></tr></table></figure><p>The <code>vercel.json</code> can be configured as:</p><figure class="highlight json"><table><tr><td class="gutter"><pre><span class="line">1</span><br><span class="line">2</span><br><span class="line">3</span><br><span class="line">4</span><br><span class="line">5</span><br><span class="line">6</span><br><span class="line">7</span><br><span class="line">8</span><br><span class="line">9</span><br><span class="line">10</span><br><span class="line">11</span><br><span class="line">12</span><br><span class="line">13</span><br><span class="line">14</span><br></pre></td><td class="code"><pre><span class="line"><span class="punctuation">&#123;</span></span><br><span class="line">  <span class="attr">&quot;experimentalServices&quot;</span><span class="punctuation">:</span> <span class="punctuation">&#123;</span></span><br><span class="line">    <span class="attr">&quot;web&quot;</span><span class="punctuation">:</span> <span class="punctuation">&#123;</span></span><br><span class="line">      <span class="attr">&quot;entrypoint&quot;</span><span class="punctuation">:</span> <span class="string">&quot;apps/web&quot;</span><span class="punctuation">,</span></span><br><span class="line">      <span class="attr">&quot;routePrefix&quot;</span><span class="punctuation">:</span> <span class="string">&quot;/&quot;</span><span class="punctuation">,</span></span><br><span class="line">      <span class="attr">&quot;framework&quot;</span><span class="punctuation">:</span> <span class="string">&quot;nextjs&quot;</span></span><br><span class="line">    <span class="punctuation">&#125;</span><span class="punctuation">,</span></span><br><span class="line">    <span class="attr">&quot;api&quot;</span><span class="punctuation">:</span> <span class="punctuation">&#123;</span></span><br><span class="line">      <span class="attr">&quot;entrypoint&quot;</span><span class="punctuation">:</span> <span class="string">&quot;backend/main.py&quot;</span><span class="punctuation">,</span></span><br><span class="line">      <span class="attr">&quot;routePrefix&quot;</span><span class="punctuation">:</span> <span class="string">&quot;/api&quot;</span><span class="punctuation">,</span></span><br><span class="line">      <span class="attr">&quot;framework&quot;</span><span class="punctuation">:</span> <span class="string">&quot;fastapi&quot;</span></span><br><span class="line">    <span class="punctuation">&#125;</span></span><br><span class="line">  <span class="punctuation">&#125;</span></span><br><span class="line"><span class="punctuation">&#125;</span></span><br></pre></td></tr></table></figure><p>With this configuration:</p><figure class="highlight txt"><table><tr><td class="gutter"><pre><span class="line">1</span><br><span class="line">2</span><br></pre></td><td class="code"><pre><span class="line">/       -&gt; Next.js Frontend</span><br><span class="line">/api    -&gt; FastAPI Backend</span><br></pre></td></tr></table></figure><p>The <code>framework</code> field is optional. If omitted, <strong>Vercel</strong> will attempt to automatically detect the framework. However, you can explicitly specify it to ensure more stable build behavior.</p><h2 id="Configuration-Fields-Reference"><a href="#Configuration-Fields-Reference" class="headerlink" title="Configuration Fields Reference"></a>Configuration Fields Reference</h2><p>The core configuration fields of <strong>Vercel Services</strong> include:</p><h3 id="entrypoint"><a href="#entrypoint" class="headerlink" title="entrypoint"></a><code>entrypoint</code></h3><p>Specifies the entry file or directory of the service.</p><p>For example:</p><figure class="highlight json"><table><tr><td class="gutter"><pre><span class="line">1</span><br></pre></td><td class="code"><pre><span class="line"><span class="attr">&quot;entrypoint&quot;</span><span class="punctuation">:</span> <span class="string">&quot;apps/web&quot;</span></span><br></pre></td></tr></table></figure><p>Or:</p><figure class="highlight json"><table><tr><td class="gutter"><pre><span class="line">1</span><br></pre></td><td class="code"><pre><span class="line"><span class="attr">&quot;entrypoint&quot;</span><span class="punctuation">:</span> <span class="string">&quot;backend/main.py&quot;</span></span><br></pre></td></tr></table></figure><h3 id="routePrefix"><a href="#routePrefix" class="headerlink" title="routePrefix"></a><code>routePrefix</code></h3><p>Specifies the URL path to mount the service.</p><p>For example:</p><figure class="highlight json"><table><tr><td class="gutter"><pre><span class="line">1</span><br></pre></td><td class="code"><pre><span class="line"><span class="attr">&quot;routePrefix&quot;</span><span class="punctuation">:</span> <span class="string">&quot;/api&quot;</span></span><br></pre></td></tr></table></figure><p>This specifies that the service will handle requests directed to <code>/api</code>.</p><h3 id="framework"><a href="#framework" class="headerlink" title="framework"></a><code>framework</code></h3><p>An optional field to specify the framework type, such as:</p><figure class="highlight json"><table><tr><td class="gutter"><pre><span class="line">1</span><br></pre></td><td class="code"><pre><span class="line"><span class="attr">&quot;framework&quot;</span><span class="punctuation">:</span> <span class="string">&quot;nextjs&quot;</span></span><br></pre></td></tr></table></figure><p>Or:</p><figure class="highlight json"><table><tr><td class="gutter"><pre><span class="line">1</span><br></pre></td><td class="code"><pre><span class="line"><span class="attr">&quot;framework&quot;</span><span class="punctuation">:</span> <span class="string">&quot;fastapi&quot;</span></span><br></pre></td></tr></table></figure><p>If not configured, <strong>Vercel</strong> will automatically detect it during build time.</p><h3 id="memory-and-maxDuration"><a href="#memory-and-maxDuration" class="headerlink" title="memory and maxDuration"></a><code>memory</code> and <code>maxDuration</code></h3><p>If a service has higher resource requirements, you can configure memory limits and execution timeout limits.</p><p>For example:</p><figure class="highlight json"><table><tr><td class="gutter"><pre><span class="line">1</span><br><span class="line">2</span><br><span class="line">3</span><br><span class="line">4</span><br><span class="line">5</span><br><span class="line">6</span><br><span class="line">7</span><br><span class="line">8</span><br><span class="line">9</span><br><span class="line">10</span><br><span class="line">11</span><br></pre></td><td class="code"><pre><span class="line"><span class="punctuation">&#123;</span></span><br><span class="line">  <span class="attr">&quot;experimentalServices&quot;</span><span class="punctuation">:</span> <span class="punctuation">&#123;</span></span><br><span class="line">    <span class="attr">&quot;api&quot;</span><span class="punctuation">:</span> <span class="punctuation">&#123;</span></span><br><span class="line">      <span class="attr">&quot;entrypoint&quot;</span><span class="punctuation">:</span> <span class="string">&quot;backend/main.py&quot;</span><span class="punctuation">,</span></span><br><span class="line">      <span class="attr">&quot;routePrefix&quot;</span><span class="punctuation">:</span> <span class="string">&quot;/api&quot;</span><span class="punctuation">,</span></span><br><span class="line">      <span class="attr">&quot;framework&quot;</span><span class="punctuation">:</span> <span class="string">&quot;fastapi&quot;</span><span class="punctuation">,</span></span><br><span class="line">      <span class="attr">&quot;memory&quot;</span><span class="punctuation">:</span> <span class="number">1024</span><span class="punctuation">,</span></span><br><span class="line">      <span class="attr">&quot;maxDuration&quot;</span><span class="punctuation">:</span> <span class="number">60</span></span><br><span class="line">    <span class="punctuation">&#125;</span></span><br><span class="line">  <span class="punctuation">&#125;</span></span><br><span class="line"><span class="punctuation">&#125;</span></span><br></pre></td></tr></table></figure><p>This is suitable for AI APIs, image processing, data transformation, or other resource-intensive services.</p><h2 id="Which-Projects-Benefit-Most"><a href="#Which-Projects-Benefit-Most" class="headerlink" title="Which Projects Benefit Most?"></a>Which Projects Benefit Most?</h2><p><strong>Vercel Services</strong> is ideal for:</p><h3 id="Monorepo-Projects"><a href="#Monorepo-Projects" class="headerlink" title="Monorepo Projects"></a>Monorepo Projects</h3><p>For example:</p><figure class="highlight txt"><table><tr><td class="gutter"><pre><span class="line">1</span><br><span class="line">2</span><br><span class="line">3</span><br><span class="line">4</span><br><span class="line">5</span><br></pre></td><td class="code"><pre><span class="line">apps/web</span><br><span class="line">apps/admin</span><br><span class="line">packages/ui</span><br><span class="line">packages/db</span><br><span class="line">backend/api</span><br></pre></td></tr></table></figure><p>If you are already using pnpm workspaces, <strong>Turborepo</strong>, <strong>Nx</strong>, or similar mono-repo setups, Services will fit perfectly.</p><h3 id="Split-Frontend-Backend-Projects"><a href="#Split-Frontend-Backend-Projects" class="headerlink" title="Split Frontend-Backend Projects"></a>Split Frontend-Backend Projects</h3><p>For projects where the frontend uses <strong>Next.js</strong> and the backend uses <strong>FastAPI</strong>:</p><figure class="highlight txt"><table><tr><td class="gutter"><pre><span class="line">1</span><br><span class="line">2</span><br></pre></td><td class="code"><pre><span class="line">frontend/</span><br><span class="line">backend/</span><br></pre></td></tr></table></figure><p>Deploying this structure on <strong>Vercel</strong> was previously cumbersome, but can now be housed in a single Project via Services.</p><h3 id="Multi-Service-Architectures"><a href="#Multi-Service-Architectures" class="headerlink" title="Multi-Service Architectures"></a>Multi-Service Architectures</h3><p>For projects that require more than a single API endpoint:</p><figure class="highlight txt"><table><tr><td class="gutter"><pre><span class="line">1</span><br><span class="line">2</span><br><span class="line">3</span><br><span class="line">4</span><br></pre></td><td class="code"><pre><span class="line">services/auth</span><br><span class="line">services/payment</span><br><span class="line">services/webhook</span><br><span class="line">services/image</span><br></pre></td></tr></table></figure><p>Each can be mounted under a distinct path:</p><figure class="highlight txt"><table><tr><td class="gutter"><pre><span class="line">1</span><br><span class="line">2</span><br><span class="line">3</span><br><span class="line">4</span><br></pre></td><td class="code"><pre><span class="line">/auth</span><br><span class="line">/payment</span><br><span class="line">/webhook</span><br><span class="line">/image</span><br></pre></td></tr></table></figure><h3 id="Static-Site-Backend-API-Combinations"><a href="#Static-Site-Backend-API-Combinations" class="headerlink" title="Static Site + Backend API Combinations"></a>Static Site + Backend API Combinations</h3><p>For example:</p><figure class="highlight txt"><table><tr><td class="gutter"><pre><span class="line">1</span><br><span class="line">2</span><br></pre></td><td class="code"><pre><span class="line">apps/site      -&gt; Static site built with Astro / Vite / Hexo</span><br><span class="line">backend/api    -&gt; Python / Node.js API</span><br></pre></td></tr></table></figure><p>This combination is highly attractive for personal projects, utility tools, lightweight SaaS, or documentation portals with interactive APIs.</p><h2 id="What-Does-It-Mean-for-Hexo-Users"><a href="#What-Does-It-Mean-for-Hexo-Users" class="headerlink" title="What Does It Mean for Hexo Users?"></a>What Does It Mean for Hexo Users?</h2><p><strong>Hexo</strong> is a static blog generator that is already very easy to deploy on platforms like <strong>Vercel</strong>, <strong>Cloudflare Pages</strong>, or <strong>GitHub Pages</strong>.</p><p>For a standard, purely static blog, Vercel Services is not necessary.</p><p>However, if your <strong>Hexo</strong> blog starts incorporating dynamic capabilities, such as:</p><ul><li>A custom comment system API</li><li>A link exchange request backend</li><li>Newsletter subscription interfaces</li><li>AI-powered article summary APIs</li><li>Image processing endpoints</li><li>A private admin panel</li><li>Standalone tools or widgets</li></ul><p>In these cases, Services becomes highly valuable.</p><p>You can organize your project as:</p><figure class="highlight txt"><table><tr><td class="gutter"><pre><span class="line">1</span><br><span class="line">2</span><br><span class="line">3</span><br></pre></td><td class="code"><pre><span class="line">blog/        -&gt; Hexo static blog</span><br><span class="line">admin/       -&gt; Vite admin dashboard</span><br><span class="line">api/         -&gt; FastAPI / Express backend</span><br></pre></td></tr></table></figure><p>And deploy them unified in one Vercel Project:</p><figure class="highlight txt"><table><tr><td class="gutter"><pre><span class="line">1</span><br><span class="line">2</span><br><span class="line">3</span><br></pre></td><td class="code"><pre><span class="line">/            -&gt; Hexo blog</span><br><span class="line">/admin       -&gt; Admin dashboard</span><br><span class="line">/api         -&gt; Backend API</span><br></pre></td></tr></table></figure><p>For personal site owners, this unified deployment structure is much more organized and easier to maintain than managing multiple projects.</p><h2 id="It-is-Not-Docker-Compose"><a href="#It-is-Not-Docker-Compose" class="headerlink" title="It is Not Docker Compose"></a>It is Not Docker Compose</h2><details class="flatpaper-note flatpaper-note--info"><summary class="flatpaper-note__title"><span class="flatpaper-note__icon" aria-hidden="true"></span><span class="flatpaper-note__label">Difference from Docker Compose</span><span class="flatpaper-note__chevron" aria-hidden="true"></span></summary><div class="flatpaper-note__body"><p>It is important to note that <strong>Vercel Services</strong> is not a replacement for <strong>Docker Compose</strong>.</p><p><strong>Docker Compose</strong> is designed for orchestrating multiple long-running services (such as databases, Redis, background workers) in a single virtualized server environment:</p><figure class="highlight txt"><table><tr><td class="gutter"><pre><span class="line">1</span><br><span class="line">2</span><br><span class="line">3</span><br><span class="line">4</span><br><span class="line">5</span><br></pre></td><td class="code"><pre><span class="line">web</span><br><span class="line">api</span><br><span class="line">postgres</span><br><span class="line">redis</span><br><span class="line">worker</span><br></pre></td></tr></table></figure><p>In contrast, <strong>Vercel Services</strong> is focused on multi-service builds and routing organization on the <strong>Vercel</strong> platform. It is suitable for web applications, APIs, frontend projects, and lightweight backends, but it is not intended to run a full, traditional server environment. If your project relies on persistent databases, Redis, queues, or background processes, you still need to use external managed services or opt for <strong>VPS</strong>, <strong>Docker</strong>, or <strong>Kubernetes</strong> deployments.</p></div></details><h2 id="Caveats-and-Limitations"><a href="#Caveats-and-Limitations" class="headerlink" title="Caveats and Limitations"></a>Caveats and Limitations</h2><details class="flatpaper-note flatpaper-note--warning"><summary class="flatpaper-note__title"><span class="flatpaper-note__icon" aria-hidden="true"></span><span class="flatpaper-note__label">Attention</span><span class="flatpaper-note__chevron" aria-hidden="true"></span></summary><div class="flatpaper-note__body"><p>Currently, the configuration field remains named <code>experimentalServices</code>, indicating that the feature is still in the experimental phase. Before using it in production, it is highly recommended to verify builds, routing, logs, environment variables, and resource limits in a test project.</p><p>Additionally, if your project consists of a single <strong>Next.js</strong> app and the APIs can be handled via Next.js API Routes or Route Handlers, Services is likely unnecessary. Services is designed specifically for projects that have multiple distinct build units.</p></div></details><h2 id="Summary"><a href="#Summary" class="headerlink" title="Summary"></a>Summary</h2><p>The true value of <strong>Vercel Services</strong> is that it transitions Vercel from &quot;one project, one framework&quot; to &quot;one project, multiple frameworks and services&quot;.</p><p>For modern web projects, this is a highly practical evolution.</p><p>Previously, we had to switch back and forth between multiple Vercel Projects, domains, and Preview URLs. Now, the frontend, backend, admin panel, documentation, and tools can all be deployed collectively as services in a single project.</p><p>It is particularly suited for:</p><ul><li><strong>Monorepos</strong></li><li>Split frontend-backend applications</li><li><strong>Python</strong> + <strong>JavaScript</strong> hybrid stacks</li><li>Multi-framework applications</li><li>Personal utility sites</li><li>Small SaaS products</li><li>Static site + API combinations</li></ul><p>If you have been looking to clean up the deployment structure of a complex project, Vercel Services is definitely worth checking out.</p>]]>
    </content>
    <id>https://ooo.run/en/post/vercel-services-multiple-frameworks-one-project.html</id>
    <link href="https://ooo.run/en/post/vercel-services-multiple-frameworks-one-project.html"/>
    <published>2026-06-30T16:09:42.000Z</published>
    <summary>
      <![CDATA[<p>Welcome to my world! This is Mr. O. When you have a complex project with Next.js for the frontend, FastAPI for the backend, and Astro for documentation, does managing their deployment on Vercel give you a headache? Vercel recently launched <strong>Vercel Services</strong>, which officially supports running multiple independently built services within a single project. In this post, we will discuss how it works, its configuration details, and the pain points it solves.</p>]]>
    </summary>
    <title>Vercel Services Released: Deploying Next.js, FastAPI, Go, and Astro in a Single Project</title>
    <updated>2026-06-30T16:42:21.550Z</updated>
  </entry>
  <entry>
    <author>
      <name>Mr. O</name>
    </author>
    <category term="News" scheme="https://ooo.run/en/categories/News/"/>
    <category term="Vercel" scheme="https://ooo.run/en/tags/Vercel/"/>
    <category term="Dockerfile" scheme="https://ooo.run/en/tags/Dockerfile/"/>
    <category term="Serverless" scheme="https://ooo.run/en/tags/Serverless/"/>
    <category term="Cloud" scheme="https://ooo.run/en/tags/Cloud/"/>
    <content>
      <![CDATA[<p>Welcome to my world! This is Mr. O. Have you ever wished you could deploy your backend Docker services on Vercel with the same seamless experience as deploying a frontend? Today, that wish comes true! <strong>Vercel</strong> recently announced official support for running <strong>Dockerfile</strong> directly. This is a game-changer for backend developers. In this post, we will take a deep dive into this major update, its suitable use cases, and the underlying Fluid Compute mechanism.</p><span id="more"></span><p><strong>Vercel</strong> recently announced official support for <a href="https://vercel.com/blog/dockerfile-on-vercel">deploying applications via Dockerfile</a>. Developers can now add <code>Dockerfile.vercel</code> to their projects, allowing <strong>Vercel</strong> to automatically build, store, and deploy the container image, and run the application on <strong>Fluid Compute</strong>.</p><p>This update means that <strong>Vercel</strong> is no longer just a platform optimized for <strong>Next.js</strong>, frontend applications, and <strong>Serverless Functions</strong>. Instead, it is expanding further toward custom backend services and general-purpose web application runtimes.</p><details class="flatpaper-note flatpaper-note--warning"><summary class="flatpaper-note__title"><span class="flatpaper-note__icon" aria-hidden="true"></span><span class="flatpaper-note__label">Note</span><span class="flatpaper-note__chevron" aria-hidden="true"></span></summary><div class="flatpaper-note__body"><p>This does not mean <strong>Vercel</strong> can run <em>any</em> Docker application. More precisely, <strong>Vercel</strong> supports stateless applications that use a <strong>Dockerfile</strong> to describe their build process and run as HTTP services.</p><p>The application must listen to the port injected by the platform, and offload persistent states such as databases, files, and caches to external services.</p></div></details><h2 id="What-is-a-Dockerfile"><a href="#What-is-a-Dockerfile" class="headerlink" title="What is a Dockerfile?"></a>What is a Dockerfile?</h2><p>A <strong>Dockerfile</strong> is a text file that describes &quot;how to build a Docker image.&quot;</p><p>It typically specifies the base OS or runtime image, dependencies to install, files to copy, build commands to run, and the command to execute when the container starts. In short, a <strong>Dockerfile</strong> is not the application itself, but the instruction manual for the application&#39;s runtime environment.</p><p>For example, a <strong>Dockerfile</strong> for a <strong>Node.js</strong> web service might look like this:</p><figure class="highlight dockerfile"><table><tr><td class="gutter"><pre><span class="line">1</span><br><span class="line">2</span><br><span class="line">3</span><br><span class="line">4</span><br><span class="line">5</span><br><span class="line">6</span><br><span class="line">7</span><br><span class="line">8</span><br><span class="line">9</span><br><span class="line">10</span><br><span class="line">11</span><br></pre></td><td class="code"><pre><span class="line"><span class="keyword">FROM</span> node:<span class="number">22</span>-alpine</span><br><span class="line"></span><br><span class="line"><span class="keyword">WORKDIR</span><span class="language-bash"> /app</span></span><br><span class="line"></span><br><span class="line"><span class="keyword">COPY</span><span class="language-bash"> package.json pnpm-lock.yaml ./</span></span><br><span class="line"><span class="keyword">RUN</span><span class="language-bash"> corepack <span class="built_in">enable</span> &amp;&amp; pnpm install --frozen-lockfile</span></span><br><span class="line"></span><br><span class="line"><span class="keyword">COPY</span><span class="language-bash"> . .</span></span><br><span class="line"><span class="keyword">RUN</span><span class="language-bash"> pnpm build</span></span><br><span class="line"></span><br><span class="line"><span class="keyword">CMD</span><span class="language-bash"> [<span class="string">&quot;pnpm&quot;</span>, <span class="string">&quot;start&quot;</span>]</span></span><br></pre></td></tr></table></figure><p>This file instructs the builder to: use <strong>Node.js 22</strong> as the base environment, install dependencies, copy project code, run the build, and finally start the application.</p><p>For developers, the greatest value of a <strong>Dockerfile</strong> is its &quot;reproducibility.&quot; As long as the <strong>Dockerfile</strong> is well-defined, the application can be built into a relatively identical runtime environment, whether locally, in CI&#x2F;CD, on a cloud platform, or on other servers.</p><p>This is exactly why <strong>Vercel</strong> supporting <strong>Dockerfile</strong> is so significant: when the platform cannot automatically detect how a project should be built and run using standard frameworks, developers can now use a <strong>Dockerfile</strong> to tell <strong>Vercel</strong> exactly how to do it.</p><h2 id="What-is-the-Difference-Between-Dockerfile-and-docker-compose-yaml"><a href="#What-is-the-Difference-Between-Dockerfile-and-docker-compose-yaml" class="headerlink" title="What is the Difference Between Dockerfile and docker-compose.yaml?"></a>What is the Difference Between Dockerfile and docker-compose.yaml?</h2><p>Many people get <strong>Dockerfile</strong> and <code>docker-compose.yaml</code> mixed up, but they actually address two different levels of containerization.</p><p>A <strong>Dockerfile</strong> is responsible for &quot;building a single image,&quot; whereas a <code>docker-compose.yaml</code> is responsible for &quot;orchestrating multiple containers.&quot;</p><p>For example, a complete web application might require:</p><ul><li>A <strong>Next.js</strong> frontend;</li><li>An <strong>Express</strong> API;</li><li>A <strong>PostgreSQL</strong> database;</li><li>A <strong>Redis</strong> cache;</li><li>A <strong>MinIO</strong> object storage.</li></ul><p>Within this stack, the <strong>Express</strong> API itself can have a <strong>Dockerfile</strong> describing how to build the API image. The <code>docker-compose.yaml</code> file, on the other hand, is responsible for starting the API, database, Redis, and MinIO services together, configuring their ports, environment variables, volumes, and network relationships.</p><p>Here is a quick comparison:</p><table><thead><tr><th>Project</th><th>Dockerfile</th><th>docker-compose.yaml</th></tr></thead><tbody><tr><td>Primary Role</td><td>Build a single image</td><td>Start and orchestrate multiple containers</td></tr><tr><td>Focus</td><td>How the app is packaged, dependencies installed, and started</td><td>How multiple services work together</td></tr><tr><td>Common Instructions</td><td>FROM, RUN, COPY, CMD</td><td>services, ports, volumes, networks</td></tr><tr><td>Best Suited For</td><td>Defining the runtime environment of a single app</td><td>Local development, multi-container deployments, service orchestration</td></tr><tr><td>Includes Database Orchestration</td><td>Usually not</td><td>Can include PostgreSQL, Redis, etc.</td></tr><tr><td>Vercel&#39;s Focus in This Update</td><td>Yes</td><td>No, this is not traditional Compose deployment</td></tr></tbody></table><details class="flatpaper-note flatpaper-note--info"><summary class="flatpaper-note__title"><span class="flatpaper-note__icon" aria-hidden="true"></span><span class="flatpaper-note__label">Core Difference</span><span class="flatpaper-note__chevron" aria-hidden="true"></span></summary><div class="flatpaper-note__body"><p><strong>Vercel</strong> is supporting <strong>Dockerfile</strong> in this update, not turning <strong>Vercel</strong> into a VPS that can directly run a full <code>docker compose up -d</code> stack.</p><p>You can deploy an HTTP service to <strong>Vercel</strong> via a <strong>Dockerfile</strong>, but you cannot move a whole Compose stack containing databases, Redis, background workers, object storage, and admin panels directly onto <strong>Vercel</strong> without modification.</p></div></details><h2 id="What-Types-of-Docker-Applications-Does-Vercel-Support"><a href="#What-Types-of-Docker-Applications-Does-Vercel-Support" class="headerlink" title="What Types of Docker Applications Does Vercel Support?"></a>What Types of Docker Applications Does Vercel Support?</h2><p>According to Vercel&#39;s official documentation, backend frameworks like <strong>Express</strong> and <strong>Fastify</strong> will run as Vercel Functions and default to <strong>Fluid Compute</strong>, which allows applications to scale automatically based on traffic and support higher concurrency.</p><p>Based on the usage model, a <strong>Dockerfile</strong> application suitable for deployment on <strong>Vercel</strong> typically has the following characteristics:</p><ul><li>It is a web service or API service;</li><li>It exposes its capabilities via HTTP;</li><li>It listens to the port provided by the platform;</li><li>It is stateless;</li><li>It offloads databases, file uploads, caching, queues, etc., to external hosted services.</li></ul><p>Let&#39;s look at a tabbed comparison of what types of applications are suitable and unsuitable for <strong>Vercel</strong>:</p><div class="flatpaper-tabs"><div class="flatpaper-tabs__nav" role="tablist"><button type="button" role="tab" id="tabs-17-tab-0" aria-controls="tabs-17-panel-0" aria-selected="true" class="flatpaper-tabs__nav-item is-active" data-index="0">Suitable Types</button><button type="button" role="tab" id="tabs-17-tab-1" aria-controls="tabs-17-panel-1" aria-selected="false" class="flatpaper-tabs__nav-item" data-index="1">Unsuitable Types</button></div><div class="flatpaper-tabs__panels"><section role="tabpanel" id="tabs-17-panel-0" aria-labelledby="tabs-17-tab-0" class="flatpaper-tabs__panel is-active" data-index="0"><table><thead><tr><th>App Type</th><th>Examples</th></tr></thead><tbody><tr><td>Web Backend API</td><td>Express, Hono, Fastify, FastAPI, Go HTTP Server</td></tr><tr><td>Full-Stack Web App</td><td>Next.js, Nuxt, SvelteKit, TanStack Start</td></tr><tr><td>Content Sites</td><td>Blogs, Documentation sites, Corporate sites, CMS frontends</td></tr><tr><td>Bot &#x2F; Webhook Services</td><td>Slack Bot, GitHub Webhooks, MCP Servers</td></tr><tr><td>AI Tool Backends</td><td>Chatbot APIs, Agent control layers, Image processing entrypoints</td></tr><tr><td>Lightweight Internal Tools</td><td>Dashboards, Admin Panels, Data query interfaces</td></tr></tbody></table></section><section role="tabpanel" id="tabs-17-panel-1" aria-labelledby="tabs-17-tab-1" class="flatpaper-tabs__panel" data-index="1" hidden><table><thead><tr><th>App Type</th><th>Reasons</th></tr></thead><tbody><tr><td>PostgreSQL, MySQL, Redis</td><td>Require persistent state and disk storage</td></tr><tr><td>1Panel, Baota, CasaOS</td><td>Rely on a complete server environment and system-level privileges</td></tr><tr><td>Docker Compose Multi-container Stacks</td><td>Vercel is not a traditional container orchestrator</td></tr><tr><td>BT Downloaders, NAS Tools</td><td>Typically require long-running processes and local persistent storage</td></tr><tr><td>Game Servers, VPNs, Proxies</td><td>Do not fit the standard HTTP web application model</td></tr><tr><td>Apps Heavily Dependent on Local Disk</td><td>Container instances should be treated as stateless</td></tr></tbody></table></section></div></div><p>In other words, while <strong>Vercel</strong> supporting <strong>Dockerfile</strong> expands its deployment scope, it is still not a <strong>VPS</strong> nor a replacement for <strong>Kubernetes</strong>.</p><h2 id="Analyzing-Suitable-Scenarios-via-Vercel-Templates"><a href="#Analyzing-Suitable-Scenarios-via-Vercel-Templates" class="headerlink" title="Analyzing Suitable Scenarios via Vercel Templates"></a>Analyzing Suitable Scenarios via Vercel Templates</h2><p>We can also look at the <strong>Vercel Templates</strong> page to see that the platform still primarily targets web applications, backend APIs, AI applications, and full-stack projects rather than traditional server software. Vercel&#39;s Backend Templates already include <strong>Hono</strong>, <strong>Express</strong>, <strong>Elysia</strong>, <strong>MCP Server</strong>, <strong>Slack Bolt</strong>, and other templates, all of which are lightweight HTTP services, bot backends, webhook services, or AI tool backends.</p><p>Under Starter Templates, you will find <strong>Next.js</strong>, <strong>Nuxt</strong>, <strong>SvelteKit</strong>, <strong>Rust Hello World</strong>, <strong>Rust Axum</strong>, <strong>TanStack Start</strong>, and <strong>Slack Bolt with Hono</strong>. This indicates that Vercel aims to cover not just frontend pages, but also backend programs that expose capabilities via HTTP.</p><p><strong>Payload Website Starter</strong> is another classic example. This template features admin panels, authentication, content publishing, draft previewing, SEO, search, redirects, scheduled publishing, etc., but it pairs with <strong>Neon Database</strong> and <strong>Vercel Blob Storage</strong> to handle database and file storage externally.</p><p>This demonstrates Vercel&#39;s recommended architecture: keep computing on <strong>Vercel</strong>, and offload state to external hosted services.</p><h2 id="Why-is-This-Update-Important"><a href="#Why-is-This-Update-Important" class="headerlink" title="Why is This Update Important?"></a>Why is This Update Important?</h2><p>In the past, Vercel&#39;s best experience was concentrated on Next.js and the frontend ecosystem. Although <strong>Vercel</strong> supported various <strong>Serverless Functions</strong> and backend frameworks, if a project required custom system dependencies, custom startup commands, non-standard frameworks, <strong>FFmpeg</strong>, <strong>Chromium</strong>, <strong>nginx</strong>, or other complex runtime environments, it required extra refactoring.</p><p><strong>Dockerfile</strong> support fills this gap.</p><p>Developers no longer have to adapt entirely to Vercel&#39;s framework detection logic. Instead, they can describe how their application builds and starts using a <strong>Dockerfile</strong>. For traditional backend projects, cross-language services, AI tool backends, and custom web servers, this significantly lowers migration costs.</p><p>Furthermore, once deployed to <strong>Vercel</strong>, applications still benefit from Vercel&#39;s native engineering experience, such as <strong>Git</strong> integration, <strong>Preview Deployments</strong>, automatic scaling, logging, analytics, instant rollbacks, and platform-level security. Vercel&#39;s Functions documentation also highlights that the platform automatically optimizes builds based on the framework, offering a low-maintenance operational experience via CDN and function runtimes.</p><h2 id="Fluid-Compute-Between-Serverless-and-Servers"><a href="#Fluid-Compute-Between-Serverless-and-Servers" class="headerlink" title="Fluid Compute: Between Serverless and Servers"></a>Fluid Compute: Between Serverless and Servers</h2><p>A core pillar behind Vercel&#39;s Dockerfile support is <strong>Fluid Compute</strong>.</p><p>According to Vercel&#39;s documentation, <strong>Fluid Compute</strong> is a compute model positioned between traditional <strong>Serverless</strong> and full servers. It retains the auto-scaling and low-maintenance benefits of Serverless while adding server-like capabilities, such as allowing a single instance to handle multiple concurrent requests.</p><p>This is highly beneficial for AI applications, API services, and I&#x2F;O-intensive tasks. In many cases, a request spends most of its time waiting for a database, vector database, external API, or model service to respond rather than performing heavy CPU computation. Fluid Compute&#39;s concurrency model allows a single instance to handle other tasks during these waiting periods.</p><p>Vercel&#39;s <strong>Fluid Compute</strong> documentation also mentions support for <strong>Node.js</strong>, <strong>Python</strong>, <strong>Edge</strong>, <strong>Bun</strong>, and <strong>Rust</strong> runtimes, making it ideal for scenarios that need to optimize concurrency and mitigate cold-start impacts.</p><h2 id="Pricing-Pay-as-you-go-Based-on-Actual-Resource-Usage"><a href="#Pricing-Pay-as-you-go-Based-on-Actual-Resource-Usage" class="headerlink" title="Pricing: Pay-as-you-go Based on Actual Resource Usage"></a>Pricing: Pay-as-you-go Based on Actual Resource Usage</h2><p>In Vercel&#39;s Fluid Compute billing documentation, resource consumption is calculated using CPU and memory dimensions. For instance, if an instance lives for 10 seconds to handle a request, but the active CPU time is only 4 seconds, the cost is split into CPU usage and memory occupancy.</p><p>This means <strong>Vercel</strong> does not charge based on the traditional VPS model of &quot;buying a machine that runs 24&#x2F;7.&quot; Instead, it is much closer to the pay-as-you-go model of cloud functions based on requests and resource consumption.</p><details class="flatpaper-note flatpaper-note--info"><summary class="flatpaper-note__title"><span class="flatpaper-note__icon" aria-hidden="true"></span><span class="flatpaper-note__label">Cost Considerations</span><span class="flatpaper-note__chevron" aria-hidden="true"></span></summary><div class="flatpaper-note__body"><p>For web services with low-frequency access, traffic spikes, or significant I&#x2F;O waiting time, this pricing model can be much more cost-effective. However, for services requiring 24&#x2F;7 high-load operations or continuous CPU&#x2F;memory utilization, traditional VPS, dedicated servers, or Kubernetes remain more suitable options.</p></div></details><h2 id="Not-a-VPS-but-Makes-Vercel-a-More-Complete-Application-Platform"><a href="#Not-a-VPS-but-Makes-Vercel-a-More-Complete-Application-Platform" class="headerlink" title="Not a VPS, but Makes Vercel a More Complete Application Platform"></a>Not a VPS, but Makes Vercel a More Complete Application Platform</h2><p>With <strong>Vercel</strong> supporting <strong>Dockerfile</strong>, the most common misunderstanding is: &quot;Does this mean any Docker app can be deployed to Vercel?&quot;</p><p>The answer is no.</p><p>It cannot replace a <strong>VPS</strong>, nor can it replace <strong>Docker Compose</strong> or <strong>Kubernetes</strong>. It is designed for deploying single web services, API services, full-stack applications, or AI tool backends—not for running complex, long-running, local-storage-dependent, or system-privilege-heavy server environments.</p><p>Key points are that this update remains incredibly significant because it extends Vercel&#39;s boundaries from &quot;framework-friendly frontend and full-stack apps&quot; to &quot;general HTTP backend services.&quot;</p><p>For developers, the ideal workflow might look like this:</p><ul><li>Frontend pages deployed on <strong>Vercel</strong>;</li><li>Backend API deployed on <strong>Vercel</strong> via a <strong>Dockerfile</strong>;</li><li><strong>PostgreSQL</strong> hosted on <strong>Neon</strong>, <strong>Supabase</strong>, or another managed database;</li><li>File storage using <strong>Vercel Blob</strong>, <strong>S3</strong>, or <strong>R2</strong>;</li><li>Caching and queueing handled by external hosted <strong>Redis</strong> or message queues;</li><li>Automatic Preview environments generated on every Git push.</li></ul><p>This represents a modern way of deploying cloud applications: instead of maintaining servers, the application is divided into managed components for compute, database, object storage, caching, and queuing.</p><h2 id="Conclusion"><a href="#Conclusion" class="headerlink" title="Conclusion"></a>Conclusion</h2><p>Vercel&#39;s support for <strong>Dockerfile</strong> is far more than just &quot;supporting Docker.&quot;</p><p>What it truly changes is how developers can deploy custom HTTP services to <strong>Vercel</strong> in a standardized, universal way. For projects that cannot be automatically recognized by framework detection but are essentially web services at heart, the <strong>Dockerfile</strong> offers a direct path to the cloud.</p><p>However, <strong>Dockerfile on Vercel</strong> is not <strong>Docker Compose on Vercel</strong>, nor is it <strong>VPS on Vercel</strong>.</p><p>It is suited for stateless HTTP applications rather than full server environments.</p><p>If Vercel&#39;s historic strength was its frontend deployment experience, this Dockerfile support brings that same developer experience to backend services: write once, submit, auto-build, auto-preview, auto-scale, and release—all on a single platform.</p>]]>
    </content>
    <id>https://ooo.run/en/post/backends-is-back-vercel-support-dockerfile.html</id>
    <link href="https://ooo.run/en/post/backends-is-back-vercel-support-dockerfile.html"/>
    <published>2026-06-30T15:51:53.000Z</published>
    <summary>
      <![CDATA[<p>Welcome to my world! This is Mr. O. Have you ever wished you could deploy your backend Docker services on Vercel with the same seamless experience as deploying a frontend? Today, that wish comes true! <strong>Vercel</strong> recently announced official support for running <strong>Dockerfile</strong> directly. This is a game-changer for backend developers. In this post, we will take a deep dive into this major update, its suitable use cases, and the underlying Fluid Compute mechanism.</p>]]>
    </summary>
    <title>Backend is Back: Vercel Finally Supports Running Dockerfile Directly</title>
    <updated>2026-06-30T16:41:42.562Z</updated>
  </entry>
  <entry>
    <author>
      <name>Mr. O</name>
    </author>
    <category term="Tutorial" scheme="https://ooo.run/en/categories/Tutorial/"/>
    <category term="Docker" scheme="https://ooo.run/en/tags/Docker/"/>
    <category term="Docker Compose" scheme="https://ooo.run/en/tags/Docker-Compose/"/>
    <category term="Debian" scheme="https://ooo.run/en/tags/Debian/"/>
    <category term="Linux" scheme="https://ooo.run/en/tags/Linux/"/>
    <content>
      <![CDATA[<p>Nowadays, more and more applications can be deployed with one click using <strong>Docker</strong>. This article will introduce how to install <strong>Docker</strong> and <strong>Docker Compose</strong> on the latest Debian 13 (Trixie).</p><p>Verify environment</p><figure class="highlight bash"><table><tr><td class="gutter"><pre><span class="line">1</span><br><span class="line">2</span><br><span class="line">3</span><br><span class="line">4</span><br><span class="line">5</span><br><span class="line">6</span><br></pre></td><td class="code"><pre><span class="line">root@debian:~# lsb_release -a</span><br><span class="line">No LSB modules are available.</span><br><span class="line">Distributor ID:Debian</span><br><span class="line">Description:Debian GNU/Linux 13 (trixie)</span><br><span class="line">Release:13</span><br><span class="line">Codename:trixie</span><br></pre></td></tr></table></figure><p>This installation is equally applicable to Ubuntu 26.04.</p><h2 id="Introduction-to-Docker"><a href="#Introduction-to-Docker" class="headerlink" title="Introduction to Docker"></a>Introduction to Docker</h2><p><strong>Docker</strong> is an open-source containerization platform that can package an application and its dependencies into a lightweight, portable container, allowing it to run consistently in any environment.</p><ul><li><strong>Lightweight</strong>: Containers share the host machine&#39;s OS kernel, enabling fast startup times and low resource footprint.</li><li><strong>Portable</strong>: Containers can run consistently across development, testing, and production environments, solving the &quot;inconsistent environments&quot; problem.</li><li><strong>Isolation</strong>: Each container runs independently without affecting others.</li><li><strong>Rapid Deployment</strong>: Achieves fast packaging, publishing, and deployment of applications through image technology.</li></ul><h2 id="Introduction-to-Docker-Compose"><a href="#Introduction-to-Docker-Compose" class="headerlink" title="Introduction to Docker Compose"></a>Introduction to Docker Compose</h2><p><strong>Docker Compose</strong> is a tool provided by <strong>Docker</strong> for defining and managing multi-container applications. Through a simple YAML file <code>docker-compose.yml</code>, you can define and start multiple service containers, making the deployment and management of applications much more convenient without needing to use long <code>docker run</code> commands.</p><p>Features:</p><ul><li><strong>Multi-container Management</strong>: Start, stop, and manage multiple containers simultaneously.</li><li><strong>Configuration via YAML</strong>: Define services, networks, storage, etc., via <code>docker-compose.yml</code>.</li><li><strong>Simplified Commands</strong>: Manage containers using the single command <code>docker compose</code>.</li></ul><p>This article will cover installing the V2 version, which corresponds to the <code>docker compose</code> command.</p><h2 id="Installing-from-the-Official-Repository"><a href="#Installing-from-the-Official-Repository" class="headerlink" title="Installing from the Official Repository"></a>Installing from the Official Repository</h2><p>The following operations must be completed as the root user. Please use <code>sudo -i</code> or <code>su root</code> to switch to the root user for operation.</p><p>First, install some essential packages:</p><figure class="highlight bash"><table><tr><td class="gutter"><pre><span class="line">1</span><br><span class="line">2</span><br><span class="line">3</span><br></pre></td><td class="code"><pre><span class="line">apt update</span><br><span class="line">apt upgrade -y</span><br><span class="line">apt install curl vim wget gnupg dpkg apt-transport-https lsb-release ca-certificates</span><br></pre></td></tr></table></figure><p>Then add <strong>Docker</strong>&#39;s GPG public key and apt repository:</p><div class="flatpaper-tabs"><div class="flatpaper-tabs__nav" role="tablist"><button type="button" role="tab" id="tabs-18-tab-0" aria-controls="tabs-18-panel-0" aria-selected="true" class="flatpaper-tabs__nav-item is-active" data-index="0">Debian</button><button type="button" role="tab" id="tabs-18-tab-1" aria-controls="tabs-18-panel-1" aria-selected="false" class="flatpaper-tabs__nav-item" data-index="1">Ubuntu</button></div><div class="flatpaper-tabs__panels"><section role="tabpanel" id="tabs-18-panel-0" aria-labelledby="tabs-18-tab-0" class="flatpaper-tabs__panel is-active" data-index="0"><figure class="highlight bash"><table><tr><td class="gutter"><pre><span class="line">1</span><br><span class="line">2</span><br></pre></td><td class="code"><pre><span class="line">curl -sSL https://download.docker.com/linux/debian/gpg | gpg --dearmor &gt; /usr/share/keyrings/docker-ce.gpg</span><br><span class="line"><span class="built_in">echo</span> <span class="string">&quot;deb [arch=<span class="subst">$(dpkg --print-architecture)</span> signed-by=/usr/share/keyrings/docker-ce.gpg] https://download.docker.com/linux/debian <span class="subst">$(lsb_release -sc)</span> stable&quot;</span> &gt; /etc/apt/sources.list.d/docker.list</span><br></pre></td></tr></table></figure></section><section role="tabpanel" id="tabs-18-panel-1" aria-labelledby="tabs-18-tab-1" class="flatpaper-tabs__panel" data-index="1" hidden><figure class="highlight bash"><table><tr><td class="gutter"><pre><span class="line">1</span><br><span class="line">2</span><br></pre></td><td class="code"><pre><span class="line">curl -sSL https://download.docker.com/linux/ubuntu/gpg | gpg --dearmor &gt; /usr/share/keyrings/docker-ce.gpg</span><br><span class="line"><span class="built_in">echo</span> <span class="string">&quot;deb [arch=<span class="subst">$(dpkg --print-architecture)</span> signed-by=/usr/share/keyrings/docker-ce.gpg] https://download.docker.com/linux/ubuntu <span class="subst">$(lsb_release -sc)</span> stable&quot;</span> &gt; /etc/apt/sources.list.d/docker.list</span><br></pre></td></tr></table></figure></section></div></div><p>For machines located in mainland China, you can use the domestic mirror from <a href="https://mirrors.tuna.tsinghua.edu.cn/">Tsinghua TUNA</a>:</p><div class="flatpaper-tabs"><div class="flatpaper-tabs__nav" role="tablist"><button type="button" role="tab" id="tabs-19-tab-0" aria-controls="tabs-19-panel-0" aria-selected="true" class="flatpaper-tabs__nav-item is-active" data-index="0">Debian</button><button type="button" role="tab" id="tabs-19-tab-1" aria-controls="tabs-19-panel-1" aria-selected="false" class="flatpaper-tabs__nav-item" data-index="1">Ubuntu</button></div><div class="flatpaper-tabs__panels"><section role="tabpanel" id="tabs-19-panel-0" aria-labelledby="tabs-19-tab-0" class="flatpaper-tabs__panel is-active" data-index="0"><figure class="highlight bash"><table><tr><td class="gutter"><pre><span class="line">1</span><br><span class="line">2</span><br></pre></td><td class="code"><pre><span class="line">curl -sS https://download.docker.com/linux/debian/gpg | gpg --dearmor &gt; /usr/share/keyrings/docker-ce.gpg</span><br><span class="line"><span class="built_in">echo</span> <span class="string">&quot;deb [arch=<span class="subst">$(dpkg --print-architecture)</span> signed-by=/usr/share/keyrings/docker-ce.gpg] https://mirrors.tuna.tsinghua.edu.cn/docker-ce/linux/debian <span class="subst">$(lsb_release -sc)</span> stable&quot;</span> &gt; /etc/apt/sources.list.d/docker.list</span><br></pre></td></tr></table></figure></section><section role="tabpanel" id="tabs-19-panel-1" aria-labelledby="tabs-19-tab-1" class="flatpaper-tabs__panel" data-index="1" hidden><figure class="highlight bash"><table><tr><td class="gutter"><pre><span class="line">1</span><br><span class="line">2</span><br></pre></td><td class="code"><pre><span class="line">curl -sS https://download.docker.com/linux/ubuntu/gpg | gpg --dearmor &gt; /usr/share/keyrings/docker-ce.gpg</span><br><span class="line"><span class="built_in">echo</span> <span class="string">&quot;deb [arch=<span class="subst">$(dpkg --print-architecture)</span> signed-by=/usr/share/keyrings/docker-ce.gpg] https://mirrors.tuna.tsinghua.edu.cn/docker-ce/linux/ubuntu <span class="subst">$(lsb_release -sc)</span> stable&quot;</span> &gt; /etc/apt/sources.list.d/docker.list</span><br></pre></td></tr></table></figure></section></div></div><p>After updating the system, you can then install Docker CE and the Docker Compose plugin:</p><figure class="highlight bash"><table><tr><td class="gutter"><pre><span class="line">1</span><br><span class="line">2</span><br></pre></td><td class="code"><pre><span class="line">apt update</span><br><span class="line">apt install docker-ce docker-ce-cli containerd.io docker-compose-plugin</span><br></pre></td></tr></table></figure><p>At this point, you can use the <code>docker version</code> command to check if the installation was successful:</p><figure class="highlight bash"><table><tr><td class="gutter"><pre><span class="line">1</span><br><span class="line">2</span><br><span class="line">3</span><br><span class="line">4</span><br><span class="line">5</span><br><span class="line">6</span><br><span class="line">7</span><br><span class="line">8</span><br><span class="line">9</span><br><span class="line">10</span><br><span class="line">11</span><br><span class="line">12</span><br><span class="line">13</span><br><span class="line">14</span><br><span class="line">15</span><br><span class="line">16</span><br><span class="line">17</span><br><span class="line">18</span><br><span class="line">19</span><br><span class="line">20</span><br><span class="line">21</span><br><span class="line">22</span><br><span class="line">23</span><br><span class="line">24</span><br><span class="line">25</span><br><span class="line">26</span><br><span class="line">27</span><br></pre></td><td class="code"><pre><span class="line">Client: Docker Engine - Community</span><br><span class="line"> Version:           29.6.1</span><br><span class="line"> API version:       1.55</span><br><span class="line"> Go version:        go1.26.4</span><br><span class="line"> Git commit:        8900f1d</span><br><span class="line"> Built:             Fri Jun 26 11:40:34 2026</span><br><span class="line"> OS/Arch:           linux/amd64</span><br><span class="line"> Context:           default</span><br><span class="line"></span><br><span class="line">Server: Docker Engine - Community</span><br><span class="line"> Engine:</span><br><span class="line">  Version:          29.6.1</span><br><span class="line">  API version:      1.55 (minimum version 1.40)</span><br><span class="line">  Go version:       go1.26.4</span><br><span class="line">  Git commit:       8ec5ab3</span><br><span class="line">  Built:            Fri Jun 26 11:40:34 2026</span><br><span class="line">  OS/Arch:          linux/amd64</span><br><span class="line">  Experimental:     <span class="literal">false</span></span><br><span class="line"> containerd:</span><br><span class="line">  Version:          v2.2.5</span><br><span class="line">  GitCommit:        e53c7c1516c3b2bff98eb76f1f4117477e6f4e66</span><br><span class="line"> runc:</span><br><span class="line">  Version:          1.3.6</span><br><span class="line">  GitCommit:        v1.3.6-0-g491b69ba</span><br><span class="line"> docker-init:</span><br><span class="line">  Version:          0.19.0</span><br><span class="line">  GitCommit:        de40ad0</span><br></pre></td></tr></table></figure><p>If you need to run <strong>Docker</strong> in non-root mode, you can add specific users to the docker group. For example, let&#39;s add the <code>www-data</code> user:</p><figure class="highlight bash"><table><tr><td class="gutter"><pre><span class="line">1</span><br><span class="line">2</span><br></pre></td><td class="code"><pre><span class="line">apt install docker-ce-rootless-extras</span><br><span class="line"><span class="built_in">sudo</span> usermod -aG docker www-data</span><br></pre></td></tr></table></figure><h2 id="Docker-Compose-V2"><a href="#Docker-Compose-V2" class="headerlink" title="Docker Compose V2"></a>Docker Compose V2</h2><p><strong>Docker</strong> now comes with the Docker Compose V2 version out-of-the-box, which is the <code>docker compose</code> command:</p><figure class="highlight bash"><table><tr><td class="gutter"><pre><span class="line">1</span><br><span class="line">2</span><br></pre></td><td class="code"><pre><span class="line">root@debian:~# docker compose version </span><br><span class="line">Docker Compose version v5.2.0</span><br></pre></td></tr></table></figure><h2 id="Modify-Docker-Configuration"><a href="#Modify-Docker-Configuration" class="headerlink" title="Modify Docker Configuration"></a>Modify Docker Configuration</h2><p>The following configuration will add a custom internal IPv6 subnet, enable IPv6 functionality for containers, and limit log file sizes to prevent <strong>Docker</strong> logs from filling up the hard drive:</p><figure class="highlight bash"><table><tr><td class="gutter"><pre><span class="line">1</span><br><span class="line">2</span><br><span class="line">3</span><br><span class="line">4</span><br><span class="line">5</span><br><span class="line">6</span><br><span class="line">7</span><br><span class="line">8</span><br><span class="line">9</span><br><span class="line">10</span><br><span class="line">11</span><br><span class="line">12</span><br><span class="line">13</span><br></pre></td><td class="code"><pre><span class="line"><span class="built_in">cat</span> &gt; /etc/docker/daemon.json &lt;&lt; <span class="string">EOF</span></span><br><span class="line"><span class="string">&#123;</span></span><br><span class="line"><span class="string">    &quot;log-driver&quot;: &quot;json-file&quot;,</span></span><br><span class="line"><span class="string">    &quot;log-opts&quot;: &#123;</span></span><br><span class="line"><span class="string">        &quot;max-size&quot;: &quot;20m&quot;,</span></span><br><span class="line"><span class="string">        &quot;max-file&quot;: &quot;3&quot;</span></span><br><span class="line"><span class="string">    &#125;,</span></span><br><span class="line"><span class="string">    &quot;ipv6&quot;: true,</span></span><br><span class="line"><span class="string">    &quot;fixed-cidr-v6&quot;: &quot;fd00:dead:beef:c0::/80&quot;,</span></span><br><span class="line"><span class="string">    &quot;experimental&quot;:true,</span></span><br><span class="line"><span class="string">    &quot;ip6tables&quot;:true</span></span><br><span class="line"><span class="string">&#125;</span></span><br><span class="line"><span class="string">EOF</span></span><br></pre></td></tr></table></figure><p>Then restart the <strong>Docker</strong> service:</p><figure class="highlight bash"><table><tr><td class="gutter"><pre><span class="line">1</span><br></pre></td><td class="code"><pre><span class="line">systemctl restart docker</span><br></pre></td></tr></table></figure><h2 id="Guide-to-Common-Docker-Commands"><a href="#Guide-to-Common-Docker-Commands" class="headerlink" title="Guide to Common Docker Commands"></a>Guide to Common Docker Commands</h2><p>Here is a quick overview of common <code>docker</code> commands, though using <code>docker compose</code> for management will be much more convenient.</p><figure class="highlight bash"><table><tr><td class="gutter"><pre><span class="line">1</span><br><span class="line">2</span><br><span class="line">3</span><br><span class="line">4</span><br><span class="line">5</span><br><span class="line">6</span><br><span class="line">7</span><br><span class="line">8</span><br><span class="line">9</span><br><span class="line">10</span><br><span class="line">11</span><br><span class="line">12</span><br><span class="line">13</span><br><span class="line">14</span><br><span class="line">15</span><br><span class="line">16</span><br><span class="line">17</span><br><span class="line">18</span><br><span class="line">19</span><br><span class="line">20</span><br><span class="line">21</span><br><span class="line">22</span><br><span class="line">23</span><br><span class="line">24</span><br><span class="line">25</span><br><span class="line">26</span><br><span class="line">27</span><br><span class="line">28</span><br><span class="line">29</span><br><span class="line">30</span><br><span class="line">31</span><br><span class="line">32</span><br><span class="line">33</span><br></pre></td><td class="code"><pre><span class="line"><span class="comment"># Pull an image</span></span><br><span class="line">docker pull &lt;image_name&gt;:&lt;tag&gt;</span><br><span class="line"></span><br><span class="line"><span class="comment"># View currently running containers</span></span><br><span class="line">docker ps</span><br><span class="line"></span><br><span class="line"><span class="comment"># View all containers (including stopped ones)</span></span><br><span class="line">docker ps -a</span><br><span class="line"></span><br><span class="line"><span class="comment"># View local images</span></span><br><span class="line">docker images</span><br><span class="line"></span><br><span class="line"><span class="comment"># Delete an image</span></span><br><span class="line">docker rmi &lt;image_id_or_name&gt;</span><br><span class="line">docker rmi ubuntu:latest</span><br><span class="line"></span><br><span class="line"><span class="comment"># Run a container </span></span><br><span class="line">docker run -d -p &lt;host_port&gt;:&lt;container_port&gt; --name &lt;container_name&gt; &lt;image_name&gt;</span><br><span class="line"></span><br><span class="line"><span class="comment"># Start, stop, restart, remove</span></span><br><span class="line">docker start / stop / restart / <span class="built_in">rm</span> &lt;container_name_or_id&gt;</span><br><span class="line"></span><br><span class="line"><span class="comment"># Enter a container to execute interactive commands</span></span><br><span class="line">docker <span class="built_in">exec</span> -it &lt;container_name_or_id&gt; /bin/bash</span><br><span class="line"></span><br><span class="line"><span class="comment"># View container logs</span></span><br><span class="line">docker logs &lt;container_name_or_id&gt;</span><br><span class="line"></span><br><span class="line"><span class="comment"># Query disk space used by Docker:</span></span><br><span class="line">docker system <span class="built_in">df</span></span><br><span class="line"></span><br><span class="line"><span class="comment"># Remove all unused images</span></span><br><span class="line">docker image prune -a</span><br></pre></td></tr></table></figure><h2 id="Guide-to-Using-Docker-Compose"><a href="#Guide-to-Using-Docker-Compose" class="headerlink" title="Guide to Using Docker Compose"></a>Guide to Using Docker Compose</h2><p><code>docker compose</code> needs to be executed in the working directory where the <code>docker-compose.yml</code> file is located. It is highly recommended to create a dedicated working directory to centrally store configuration files, for example:</p><figure class="highlight bash"><table><tr><td class="gutter"><pre><span class="line">1</span><br><span class="line">2</span><br><span class="line">3</span><br><span class="line">4</span><br><span class="line">5</span><br><span class="line">6</span><br><span class="line">7</span><br></pre></td><td class="code"><pre><span class="line">docker/</span><br><span class="line">├── nginx/                         </span><br><span class="line">│   └── docker-compose.yml            </span><br><span class="line">├── mysql/                          </span><br><span class="line">│   └── docker-compose.yml          </span><br><span class="line">└── redis/                           </span><br><span class="line">    └── docker-compose.yml   </span><br></pre></td></tr></table></figure><p>Common <code>docker compose</code> commands:</p><figure class="highlight bash"><table><tr><td class="gutter"><pre><span class="line">1</span><br><span class="line">2</span><br><span class="line">3</span><br><span class="line">4</span><br><span class="line">5</span><br><span class="line">6</span><br><span class="line">7</span><br><span class="line">8</span><br><span class="line">9</span><br><span class="line">10</span><br><span class="line">11</span><br><span class="line">12</span><br><span class="line">13</span><br><span class="line">14</span><br><span class="line">15</span><br><span class="line">16</span><br><span class="line">17</span><br><span class="line">18</span><br><span class="line">19</span><br><span class="line">20</span><br><span class="line">21</span><br><span class="line">22</span><br><span class="line">23</span><br><span class="line">24</span><br><span class="line">25</span><br><span class="line">26</span><br><span class="line">27</span><br><span class="line">28</span><br><span class="line">29</span><br><span class="line">30</span><br><span class="line">31</span><br><span class="line">32</span><br></pre></td><td class="code"><pre><span class="line"><span class="comment"># Pull and update images</span></span><br><span class="line">docker compose pull</span><br><span class="line"></span><br><span class="line"><span class="comment"># Start containers</span></span><br><span class="line">docker compose up</span><br><span class="line"></span><br><span class="line"><span class="comment"># Start containers in the background</span></span><br><span class="line">docker compose up -d</span><br><span class="line"></span><br><span class="line"><span class="comment"># Stop containers</span></span><br><span class="line">docker compose stop</span><br><span class="line"></span><br><span class="line"><span class="comment"># Stop containers and remove created networks, volumes, and images</span></span><br><span class="line">docker compose down</span><br><span class="line"></span><br><span class="line"><span class="comment"># Restart containers</span></span><br><span class="line">docker compose restart</span><br><span class="line"></span><br><span class="line"><span class="comment"># View running services</span></span><br><span class="line">docker compose ps</span><br><span class="line"></span><br><span class="line"><span class="comment"># View logs</span></span><br><span class="line">docker compose logs</span><br><span class="line"><span class="comment"># View logs in real-time</span></span><br><span class="line">docker compose logs -f</span><br><span class="line"></span><br><span class="line"><span class="comment"># Enter a container to execute interactive commands</span></span><br><span class="line">docker compose <span class="built_in">exec</span> &lt;service_name&gt; &lt;<span class="built_in">command</span>&gt;</span><br><span class="line">docker compose <span class="built_in">exec</span> nginx /bin/bash</span><br><span class="line"></span><br><span class="line"><span class="comment"># View service statistics, displaying real-time CPU, memory, and other resource usage.</span></span><br><span class="line">docker compose stats</span><br></pre></td></tr></table></figure><p>Still find <code>docker compose</code> too long to type? Execute the commands below, and you&#39;ll be able to use <code>dc</code> as an alternative:</p><div class="flatpaper-note flatpaper-note--info"><span class="flatpaper-note__icon" aria-hidden="true"></span><div class="flatpaper-note__body"><p>Before executing, run <code>dc</code> once to confirm the command is not currently in use. After execution, run <code>dc version</code> to verify.</p></div></div><div class="flatpaper-tabs"><div class="flatpaper-tabs__nav" role="tablist"><button type="button" role="tab" id="tabs-20-tab-0" aria-controls="tabs-20-panel-0" aria-selected="true" class="flatpaper-tabs__nav-item is-active" data-index="0">bash</button><button type="button" role="tab" id="tabs-20-tab-1" aria-controls="tabs-20-panel-1" aria-selected="false" class="flatpaper-tabs__nav-item" data-index="1">zsh</button></div><div class="flatpaper-tabs__panels"><section role="tabpanel" id="tabs-20-panel-0" aria-labelledby="tabs-20-tab-0" class="flatpaper-tabs__panel is-active" data-index="0"><figure class="highlight bash"><table><tr><td class="gutter"><pre><span class="line">1</span><br><span class="line">2</span><br></pre></td><td class="code"><pre><span class="line"><span class="built_in">echo</span> <span class="string">&#x27;alias dc=&quot;docker compose&quot;&#x27;</span> &gt;&gt; ~/.bashrc </span><br><span class="line"><span class="built_in">source</span> ~/.bashrc </span><br></pre></td></tr></table></figure></section><section role="tabpanel" id="tabs-20-panel-1" aria-labelledby="tabs-20-tab-1" class="flatpaper-tabs__panel" data-index="1" hidden><figure class="highlight bash"><table><tr><td class="gutter"><pre><span class="line">1</span><br><span class="line">2</span><br></pre></td><td class="code"><pre><span class="line"><span class="built_in">echo</span> <span class="string">&#x27;alias dc=&quot;docker compose&quot;&#x27;</span> &gt;&gt; ~/.zshrc </span><br><span class="line"><span class="built_in">source</span> ~/.zshrc </span><br></pre></td></tr></table></figure></section></div></div><p>Effect:</p><figure class="highlight bash"><table><tr><td class="gutter"><pre><span class="line">1</span><br><span class="line">2</span><br><span class="line">3</span><br><span class="line">4</span><br><span class="line">5</span><br></pre></td><td class="code"><pre><span class="line">root@debian:~# dc</span><br><span class="line">-bash: dc: <span class="built_in">command</span> not found</span><br><span class="line"></span><br><span class="line">root@debian:~# dc version</span><br><span class="line">Docker Compose version v5.2.0</span><br></pre></td></tr></table></figure><p>Afterward, whenever we create a <code>docker-compose.yml</code> file, starting or updating the service only requires executing:</p><figure class="highlight bash"><table><tr><td class="gutter"><pre><span class="line">1</span><br><span class="line">2</span><br></pre></td><td class="code"><pre><span class="line">dc pull</span><br><span class="line">dc up -d </span><br></pre></td></tr></table></figure><p>Now head over to GitHub or <a href="https://hub.docker.com/">Docker Hub</a> to find some interesting projects!</p>]]>
    </content>
    <id>https://ooo.run/en/post/debian-13-install-docker.html</id>
    <link href="https://ooo.run/en/post/debian-13-install-docker.html"/>
    <published>2026-06-29T20:15:00.000Z</published>
    <summary>
      <![CDATA[<p>Nowadays, more and more applications can be deployed with one click using <strong>Docker</strong>. This article will introduce how to ins]]>
    </summary>
    <title>2026 Debian 13 Tutorial: Installing Docker and Docker Compose</title>
    <updated>2026-06-29T20:36:20.566Z</updated>
  </entry>
  <entry>
    <author>
      <name>Mr. O</name>
    </author>
    <category term="Tools" scheme="https://ooo.run/en/categories/Tools/"/>
    <category term="AI" scheme="https://ooo.run/en/tags/AI/"/>
    <category term="Open Source" scheme="https://ooo.run/en/tags/Open-Source/"/>
    <category term="Frontend" scheme="https://ooo.run/en/tags/Frontend/"/>
    <content>
      <![CDATA[<p>Recently, while browsing GitHub, I came across a highly impressive project—<strong>Open Lovable</strong>, open-sourced by the <strong>Firecrawl</strong> (formerly MendableAI) team. This project has rapidly surged to over <strong>24k+ Stars</strong> on GitHub, proving to be an absolute productivity killer for frontend developers and prototype designers.</p><p>In simple terms, <strong>Open Lovable</strong> has an almost &quot;zero-barrier&quot; usage: you just need to drop in the link of the website you want to &quot;clone&quot;, and it will generate a highly accurate <strong>React</strong> version of the code for you within seconds. Whether it&#39;s the page layout, styling, or interaction details, it attempts to stick as close to the original site as possible, making secondary development a breeze.</p><div class="flatpaper-note flatpaper-note--info"><span class="flatpaper-note__icon" aria-hidden="true"></span><div class="flatpaper-note__body"><p><strong>Project Address</strong>: <a href="http://github.com/mendableai/open-lovable">http://github.com/mendableai/open-lovable</a><br><strong>Open Source License</strong>: MIT</p></div></div><h2 id="Core-Features-at-a-Glance"><a href="#Core-Features-at-a-Glance" class="headerlink" title="Core Features at a Glance"></a>Core Features at a Glance</h2><p>The reason <strong>Open Lovable</strong> has become so popular so quickly is due to its solid functional design that directly addresses developer pain points:</p><h3 id="1-One-Click-Clone-What-You-See-Is-What-You-Get"><a href="#1-One-Click-Clone-What-You-See-Is-What-You-Get" class="headerlink" title="1. One-Click &quot;Clone&quot;, What You See Is What You Get"></a>1. One-Click &quot;Clone&quot;, What You See Is What You Get</h3><p>It can one-click &quot;clone&quot; any website into a modernized <strong>React</strong> application. Whether it&#39;s a simple landing page or a structurally complex page, it holds up under pressure and quickly generates the corresponding component code. It also supports local debugging and deployment, providing a preview simultaneously with the generation, truly achieving &quot;What You See Is What You Get&quot;.</p><h3 id="2-More-Stable-Underlying-Scraping-Based-on-Firecrawl"><a href="#2-More-Stable-Underlying-Scraping-Based-on-Firecrawl" class="headerlink" title="2. More Stable Underlying Scraping: Based on Firecrawl"></a>2. More Stable Underlying Scraping: Based on Firecrawl</h3><p>There are quite a few similar code generation tools on the market, but they often &quot;crash and burn&quot; when reading complex web page structures. <strong>Open Lovable</strong> is backed by their own powerful <strong>Firecrawl</strong> web scraping technology, which accurately extracts the original site&#39;s page structure, DOM tree, and cleaned content. This results in the final code generated by the LLM having a much higher degree of accuracy and more consistent visual representation.</p><h3 id="3-Switch-Models-at-Will-No-Hassle"><a href="#3-Switch-Models-at-Will-No-Hassle" class="headerlink" title="3. Switch Models at Will, No Hassle"></a>3. Switch Models at Will, No Hassle</h3><p>Don&#39;t want to be locked into a single large model? No problem. The project comes with built-in support for multiple mainstream LLMs. You can seamlessly integrate <strong>OpenAI</strong>, <strong>Anthropic</strong>, <strong>Gemini</strong>, <strong>Grok</strong>, and other models based on your API quotas or preferences, switching on demand to suit your budget.</p><h3 id="4-Integrated-E2B-Sandbox-Safer-Execution"><a href="#4-Integrated-E2B-Sandbox-Safer-Execution" class="headerlink" title="4. Integrated E2B Sandbox, Safer Execution"></a>4. Integrated E2B Sandbox, Safer Execution</h3><p>Afraid of the risks of running generated code directly? Environment configuration too troublesome? <strong>Open Lovable</strong> thoughtfully integrates the <strong>E2B</strong> sandbox environment. Code execution and testing can be done within an isolated sandbox, which not only prevents leaks securely but also makes the entire testing process much more worry-free.</p><h2 id="Getting-Started"><a href="#Getting-Started" class="headerlink" title="Getting Started"></a>Getting Started</h2><p>Because it uses the completely free <strong>MIT License</strong>, this tool is completely open-source and free. You simply need to:</p><ol><li>Pull the project locally.</li><li>Configure the related API keys (such as the API for the large model you want to use, and the corresponding keys for Firecrawl, etc.).</li><li>Just run it!</li></ol><figure class="highlight bash"><table><tr><td class="gutter"><pre><span class="line">1</span><br><span class="line">2</span><br><span class="line">3</span><br><span class="line">4</span><br><span class="line">5</span><br></pre></td><td class="code"><pre><span class="line">git <span class="built_in">clone</span> https://github.com/mendableai/open-lovable.git</span><br><span class="line"><span class="built_in">cd</span> open-lovable</span><br><span class="line">npm install</span><br><span class="line"><span class="comment"># Configure the .env file and fill in the corresponding API Keys</span></span><br><span class="line">npm run dev</span><br></pre></td></tr></table></figure><p>If you frequently need to reference excellent designs from other websites, or need to quickly build high-fidelity product prototypes, <strong>Open Lovable</strong> is absolutely worth adding to your productivity toolbox! Go pull the code and experience it for yourself right now!</p>]]>
    </content>
    <id>https://ooo.run/en/post/open-lovable-clone-website-to-react.html</id>
    <link href="https://ooo.run/en/post/open-lovable-clone-website-to-react.html"/>
    <published>2026-06-29T20:15:00.000Z</published>
    <summary>
      <![CDATA[<p>Recently, while browsing GitHub, I came across a highly impressive project—<strong>Open Lovable</strong>, open-sourced by the <strong>Fir]]>
    </summary>
    <title>Open Lovable: A Magical Tool to One-Click &quot;Clone&quot; Any Website into a React App</title>
    <updated>2026-06-29T20:36:35.626Z</updated>
  </entry>
  <entry>
    <author>
      <name>Mr. O</name>
    </author>
    <category term="Tutorial" scheme="https://ooo.run/en/categories/Tutorial/"/>
    <category term="Git" scheme="https://ooo.run/en/tags/Git/"/>
    <category term="Tools" scheme="https://ooo.run/en/tags/Tools/"/>
    <content>
      <![CDATA[<p>Writing code, modifying documents, and working on projects is just like exploring an open-world game. The role of <strong>Git</strong> is not to write code for you, but to help you create savepoints at crucial moments. This allows you to look back at history, undo mistakes, switch between different development paths, and even let multiple people collaborate across different &quot;worldlines&quot;, eventually merging the results back into the main storyline.</p><div class="flatpaper-note flatpaper-note--info"><span class="flatpaper-note__icon" aria-hidden="true"></span><div class="flatpaper-note__body"><p>In a nutshell: <strong>Git</strong> is a tool used to manage the history of a project. Every <code>commit</code> is a savepoint, and every <code>branch</code> is a worldline.</p></div></div><h2 id="1-What-Problem-Does-Git-Actually-Solve"><a href="#1-What-Problem-Does-Git-Actually-Solve" class="headerlink" title="1. What Problem Does Git Actually Solve?"></a>1. What Problem Does Git Actually Solve?</h2><p>Before <strong>Git</strong>, you might have saved files like this:</p><ul><li><code>project-final.zip</code></li><li><code>project-final-v2.zip</code></li><li><code>project-final-v2-real-final.zip</code></li><li><code>project-final-v3-boss-approved.zip</code></li></ul><p>This quickly turns into a disaster. <strong>Git</strong> helps you solve these issues by:</p><ol><li>Recording the changes made at each stage of the project.</li><li>Allowing you to roll back to previous versions.</li><li>Clearly showing who modified what.</li><li>Enabling simultaneous development of multiple features without interference.</li><li>Synchronizing code during multiplayer collaboration.</li><li>Safely undoing things when problems arise.</li></ol><p>For better understanding, we can directly compare <strong>Git</strong> concepts with single-player games:</p><table><thead><tr><th>Git Concept</th><th>English Term</th><th>Game Analogy</th></tr></thead><tbody><tr><td>仓库</td><td>Repository</td><td>The entire game save system</td></tr><tr><td>工作区</td><td>Working Directory</td><td>The current world you are playing in</td></tr><tr><td>暂存区</td><td>Staging Area</td><td>The list of items prepared to be written into the next save</td></tr><tr><td>提交</td><td>Commit</td><td>An official savepoint</td></tr><tr><td>分支</td><td>Branch</td><td>A parallel worldline</td></tr><tr><td>合并</td><td>Merge</td><td>Merging the achievements of one worldline into another</td></tr><tr><td>远程仓库</td><td>Remote</td><td>The cloud save server</td></tr><tr><td>克隆</td><td>Clone</td><td>Downloading a copy of the game world from the cloud</td></tr><tr><td>推送</td><td>Push</td><td>Uploading a local save to the cloud</td></tr><tr><td>拉取</td><td>Pull</td><td>Synchronizing the latest save from the cloud</td></tr></tbody></table><h2 id="2-Getting-Started-Setting-Identity-and-Creating-a-Repository"><a href="#2-Getting-Started-Setting-Identity-and-Creating-a-Repository" class="headerlink" title="2. Getting Started: Setting Identity and Creating a Repository"></a>2. Getting Started: Setting Identity and Creating a Repository</h2><h3 id="1-Set-Your-Identity"><a href="#1-Set-Your-Identity" class="headerlink" title="1. Set Your Identity"></a>1. Set Your Identity</h3><p><strong>Git</strong> needs to know &quot;who created this savepoint&quot;. This doesn&#39;t register an account; it simply signs your commit records.</p><figure class="highlight bash"><table><tr><td class="gutter"><pre><span class="line">1</span><br><span class="line">2</span><br><span class="line">3</span><br><span class="line">4</span><br><span class="line">5</span><br></pre></td><td class="code"><pre><span class="line">git config --global user.name <span class="string">&quot;Your Name&quot;</span></span><br><span class="line">git config --global user.email <span class="string">&quot;your.email@example.com&quot;</span></span><br><span class="line"></span><br><span class="line"><span class="comment"># Check configuration</span></span><br><span class="line">git config --list</span><br></pre></td></tr></table></figure><h3 id="2-Create-Your-First-Git-Repository"><a href="#2-Create-Your-First-Git-Repository" class="headerlink" title="2. Create Your First Git Repository"></a>2. Create Your First Git Repository</h3><p>Suppose you have a project folder, tell <strong>Git</strong> to start managing this folder:</p><figure class="highlight bash"><table><tr><td class="gutter"><pre><span class="line">1</span><br><span class="line">2</span><br><span class="line">3</span><br></pre></td><td class="code"><pre><span class="line"><span class="built_in">mkdir</span> my-project</span><br><span class="line"><span class="built_in">cd</span> my-project</span><br><span class="line">git init</span><br></pre></td></tr></table></figure><p>This step is equivalent to <mark>installing a &quot;save system&quot; into this game world</mark>. After execution, a hidden folder <code>.git/</code> will appear in your project. This is <strong>Git</strong>&#39;s core database, containing history records and branch information. Do not modify it manually under normal circumstances.</p><h2 id="3-Git-s-Three-Areas-Current-World-Staging-Area-Official-Save"><a href="#3-Git-s-Three-Areas-Current-World-Staging-Area-Official-Save" class="headerlink" title="3. Git&#39;s Three Areas: Current World, Staging Area, Official Save"></a>3. Git&#39;s Three Areas: Current World, Staging Area, Official Save</h2><p>The most confusing part of <strong>Git</strong> for beginners is that it doesn&#39;t &quot;automatically save after modifying a file&quot;. It has three important areas: <strong>Working Directory → Staging Area → Local Repository</strong>.</p><h3 id="1-Working-Directory-The-current-world-you-are-playing-in"><a href="#1-Working-Directory-The-current-world-you-are-playing-in" class="headerlink" title="1. Working Directory: The current world you are playing in"></a>1. Working Directory: The current world you are playing in</h3><p>When you modify files in your editor, these changes occur in the working directory. At this point, <strong>Git</strong> sees that you changed something, but it hasn&#39;t put it into the save yet.</p><figure class="highlight bash"><table><tr><td class="gutter"><pre><span class="line">1</span><br><span class="line">2</span><br></pre></td><td class="code"><pre><span class="line"><span class="built_in">echo</span> <span class="string">&quot;Hello Git&quot;</span> &gt; README.md</span><br><span class="line">git status</span><br></pre></td></tr></table></figure><p>It will prompt <code>Untracked files</code>, meaning <strong>Git</strong> found a new file, but it hasn&#39;t been included in the save system.</p><h3 id="2-Staging-Area-The-list-of-items-prepared-for-the-save"><a href="#2-Staging-Area-The-list-of-items-prepared-for-the-save" class="headerlink" title="2. Staging Area: The list of items prepared for the save"></a>2. Staging Area: The list of items prepared for the save</h3><p>Adding a file to the staging area is equivalent to deciding to put this change into the next savepoint:</p><figure class="highlight bash"><table><tr><td class="gutter"><pre><span class="line">1</span><br></pre></td><td class="code"><pre><span class="line">git add README.md</span><br></pre></td></tr></table></figure><h3 id="3-Local-Repository-Creating-the-official-savepoint"><a href="#3-Local-Repository-Creating-the-official-savepoint" class="headerlink" title="3. Local Repository: Creating the official savepoint"></a>3. Local Repository: Creating the official savepoint</h3><p>Submitting is the real &quot;saving&quot; process:</p><figure class="highlight bash"><table><tr><td class="gutter"><pre><span class="line">1</span><br></pre></td><td class="code"><pre><span class="line">git commit -m <span class="string">&quot;Create README file&quot;</span></span><br></pre></td></tr></table></figure><p>Once successfully submitted, <strong>Git</strong> will generate a <code>commit</code> with a unique ID, such as <code>a1b2c3d Create README file</code>. This is a complete, official savepoint.</p><details class="flatpaper-note flatpaper-note--warning"><summary class="flatpaper-note__title"><span class="flatpaper-note__icon" aria-hidden="true"></span><span class="flatpaper-note__label">Note</span><span class="flatpaper-note__chevron" aria-hidden="true"></span></summary><div class="flatpaper-note__body"><p>Beginners are advised to first use <code>git status</code> to confirm the state before running <code>git commit</code>. Although <code>git add .</code> can stage all changes in the current directory at once, you must be clear about what you are adding to avoid saving redundant files by mistake.</p></div></details><h2 id="4-Viewing-History-and-Changes"><a href="#4-Viewing-History-and-Changes" class="headerlink" title="4. Viewing History and Changes"></a>4. Viewing History and Changes</h2><h3 id="1-View-Commit-History-Git-Log"><a href="#1-View-Commit-History-Git-Log" class="headerlink" title="1. View Commit History (Git Log)"></a>1. View Commit History (Git Log)</h3><p>This is like bringing up the save list in a game, with newer saves at the top:</p><figure class="highlight bash"><table><tr><td class="gutter"><pre><span class="line">1</span><br><span class="line">2</span><br><span class="line">3</span><br></pre></td><td class="code"><pre><span class="line">git <span class="built_in">log</span></span><br><span class="line"><span class="comment"># Or use the cleaner single-line output</span></span><br><span class="line">git <span class="built_in">log</span> --oneline</span><br></pre></td></tr></table></figure><h3 id="2-View-File-Changes-Git-Diff"><a href="#2-View-File-Changes-Git-Diff" class="headerlink" title="2. View File Changes (Git Diff)"></a>2. View File Changes (Git Diff)</h3><p>Before creating a savepoint, you need to confirm exactly what you&#39;ve changed:</p><div class="flatpaper-tabs"><div class="flatpaper-tabs__nav" role="tablist"><button type="button" role="tab" id="tabs-22-tab-0" aria-controls="tabs-22-panel-0" aria-selected="true" class="flatpaper-tabs__nav-item is-active" data-index="0">Compare Working Directory</button><button type="button" role="tab" id="tabs-22-tab-1" aria-controls="tabs-22-panel-1" aria-selected="false" class="flatpaper-tabs__nav-item" data-index="1">Compare Staging Area</button></div><div class="flatpaper-tabs__panels"><section role="tabpanel" id="tabs-22-panel-0" aria-labelledby="tabs-22-tab-0" class="flatpaper-tabs__panel is-active" data-index="0"><p>What changed in my current world compared to the last save?</p><figure class="highlight bash"><table><tr><td class="gutter"><pre><span class="line">1</span><br></pre></td><td class="code"><pre><span class="line">git diff</span><br></pre></td></tr></table></figure></section><section role="tabpanel" id="tabs-22-panel-1" aria-labelledby="tabs-22-tab-1" class="flatpaper-tabs__panel" data-index="1" hidden><p>What are the contents that I&#39;ve added to the staging area, ready to be written to the next savepoint?</p><figure class="highlight bash"><table><tr><td class="gutter"><pre><span class="line">1</span><br></pre></td><td class="code"><pre><span class="line">git diff --staged</span><br></pre></td></tr></table></figure></section></div></div><h2 id="5-Branch-and-Merge-Multiverses"><a href="#5-Branch-and-Merge-Multiverses" class="headerlink" title="5. Branch and Merge: Multiverses"></a>5. Branch and Merge: Multiverses</h2><p>One of <strong>Git</strong>&#39;s most powerful features is branching.</p><h3 id="1-Open-a-New-Worldline"><a href="#1-Open-a-New-Worldline" class="headerlink" title="1. Open a New Worldline"></a>1. Open a New Worldline</h3><p>Suppose your main storyline is called <code>main</code>. You want to develop a new feature but aren&#39;t sure if it will succeed. To avoid contaminating the main line, you can create a new worldline:</p><p>Create and switch to the new branch in one step:</p><figure class="highlight bash"><table><tr><td class="gutter"><pre><span class="line">1</span><br></pre></td><td class="code"><pre><span class="line">git switch -c new-feature</span><br></pre></td></tr></table></figure><p>Committing code in this new branch will not affect the <code>main</code> storyline. You are free to experiment.</p><h3 id="2-Switch-Worldlines"><a href="#2-Switch-Worldlines" class="headerlink" title="2. Switch Worldlines"></a>2. Switch Worldlines</h3><p>You can switch between different branches at any time, and the file contents will change accordingly because different branches represent different historical states.</p><figure class="highlight bash"><table><tr><td class="gutter"><pre><span class="line">1</span><br><span class="line">2</span><br><span class="line">3</span><br><span class="line">4</span><br><span class="line">5</span><br></pre></td><td class="code"><pre><span class="line"><span class="comment"># View all branches; the current branch is marked with an *</span></span><br><span class="line">git branch</span><br><span class="line"></span><br><span class="line"><span class="comment"># Switch back to the main world</span></span><br><span class="line">git switch main</span><br></pre></td></tr></table></figure><h3 id="3-Merge-Branches-and-Resolve-Conflicts"><a href="#3-Merge-Branches-and-Resolve-Conflicts" class="headerlink" title="3. Merge Branches and Resolve Conflicts"></a>3. Merge Branches and Resolve Conflicts</h3><p>When the side quest is completed and you&#39;ve acquired top-tier equipment, you want to bring the achievements back to the main line:</p><figure class="highlight bash"><table><tr><td class="gutter"><pre><span class="line">1</span><br><span class="line">2</span><br><span class="line">3</span><br></pre></td><td class="code"><pre><span class="line">git switch main</span><br><span class="line"><span class="comment"># Merge the achievements of new-feature into the main line</span></span><br><span class="line">git merge new-feature</span><br></pre></td></tr></table></figure><p>If two branches modified the same line of code, it will prompt a <strong>Conflict</strong> when merging. Marks like <code>&lt;&lt;&lt;&lt;&lt;&lt;&lt; HEAD</code> will appear in the file. A conflict is not scary; it&#39;s just <strong>Git</strong> telling you: &quot;These two worldlines have undergone different changes at the same location, and I need you to decide the final plot.&quot; Manually modify and keep the code you want, then re-run <code>git add</code> and <code>git commit</code>.</p><h2 id="6-Remote-Repository-Cloud-Synchronized-Saves"><a href="#6-Remote-Repository-Cloud-Synchronized-Saves" class="headerlink" title="6. Remote Repository: Cloud Synchronized Saves"></a>6. Remote Repository: Cloud Synchronized Saves</h2><p>The local repository only exists on your computer. For backups or multiplayer collaboration, we typically use remote servers like <strong>GitHub</strong> or <strong>GitLab</strong> as cloud save servers.</p><figure class="highlight bash"><table><tr><td class="gutter"><pre><span class="line">1</span><br><span class="line">2</span><br><span class="line">3</span><br><span class="line">4</span><br><span class="line">5</span><br><span class="line">6</span><br><span class="line">7</span><br><span class="line">8</span><br><span class="line">9</span><br><span class="line">10</span><br><span class="line">11</span><br></pre></td><td class="code"><pre><span class="line"><span class="comment"># Clone repository: Download a complete game world from the cloud server</span></span><br><span class="line">git <span class="built_in">clone</span> https://github.com/example/my-project.git</span><br><span class="line"></span><br><span class="line"><span class="comment"># View the currently configured remote address (usually called origin)</span></span><br><span class="line">git remote -v</span><br><span class="line"></span><br><span class="line"><span class="comment"># Push: Upload the local main line to the origin cloud</span></span><br><span class="line">git push -u origin main</span><br><span class="line"></span><br><span class="line"><span class="comment"># Pull: Synchronize the latest world state from the cloud</span></span><br><span class="line">git pull</span><br></pre></td></tr></table></figure><div class="flatpaper-note flatpaper-note--info"><span class="flatpaper-note__icon" aria-hidden="true"></span><div class="flatpaper-note__body"><p><strong>Golden Rule of Collaboration</strong>: Before starting your daily work or committing code, it is strongly recommended to first run <code>git pull</code> to synchronize the latest state from the server. This can significantly reduce the probability of merge conflicts.</p></div></div><h2 id="7-Undo-and-Temporary-Pocket-Stash"><a href="#7-Undo-and-Temporary-Pocket-Stash" class="headerlink" title="7. Undo and Temporary Pocket (Stash)"></a>7. Undo and Temporary Pocket (Stash)</h2><h3 id="1-Safe-Undo-and-Rollback"><a href="#1-Safe-Undo-and-Rollback" class="headerlink" title="1. Safe Undo and Rollback"></a>1. Safe Undo and Rollback</h3><p>If you break your code or commit the wrong content, you can safely &quot;load a save&quot; through the following commands:</p><div class="flatpaper-tabs"><div class="flatpaper-tabs__nav" role="tablist"><button type="button" role="tab" id="tabs-23-tab-0" aria-controls="tabs-23-panel-0" aria-selected="true" class="flatpaper-tabs__nav-item is-active" data-index="0">Discard Working Directory Changes</button><button type="button" role="tab" id="tabs-23-tab-1" aria-controls="tabs-23-panel-1" aria-selected="false" class="flatpaper-tabs__nav-item" data-index="1">Unstage</button><button type="button" role="tab" id="tabs-23-tab-2" aria-controls="tabs-23-panel-2" aria-selected="false" class="flatpaper-tabs__nav-item" data-index="2">Revert Commit</button><button type="button" role="tab" id="tabs-23-tab-3" aria-controls="tabs-23-panel-3" aria-selected="false" class="flatpaper-tabs__nav-item" data-index="3">Hard Reset</button></div><div class="flatpaper-tabs__panels"><section role="tabpanel" id="tabs-23-panel-0" aria-labelledby="tabs-23-tab-0" class="flatpaper-tabs__panel is-active" data-index="0"><p>Discard current un-added changes, returning to the state of the last official savepoint:</p><figure class="highlight bash"><table><tr><td class="gutter"><pre><span class="line">1</span><br></pre></td><td class="code"><pre><span class="line">git restore README.md</span><br></pre></td></tr></table></figure></section><section role="tabpanel" id="tabs-23-panel-1" aria-labelledby="tabs-23-tab-1" class="flatpaper-tabs__panel" data-index="1" hidden><p>Regret running git add; take the file out of the staging area (does not delete actual modifications):</p><figure class="highlight bash"><table><tr><td class="gutter"><pre><span class="line">1</span><br></pre></td><td class="code"><pre><span class="line">git restore --staged README.md</span><br></pre></td></tr></table></figure></section><section role="tabpanel" id="tabs-23-panel-2" aria-labelledby="tabs-23-tab-2" class="flatpaper-tabs__panel" data-index="2" hidden><p>Create a new &quot;reverse commit&quot; to undo the effects of a specified commit. This is the safest practice in collaboration!</p><figure class="highlight bash"><table><tr><td class="gutter"><pre><span class="line">1</span><br></pre></td><td class="code"><pre><span class="line">git revert a1b2c3d</span><br></pre></td></tr></table></figure></section><section role="tabpanel" id="tabs-23-panel-3" aria-labelledby="tabs-23-tab-3" class="flatpaper-tabs__panel" data-index="3" hidden><p>Dangerous! Forcibly move the timeline back to an old savepoint, discarding all subsequent commits:</p><figure class="highlight bash"><table><tr><td class="gutter"><pre><span class="line">1</span><br></pre></td><td class="code"><pre><span class="line">git reset --hard a1b2c3d</span><br></pre></td></tr></table></figure></section></div></div><h3 id="2-Stash-The-Temporary-Pocket-Save"><a href="#2-Stash-The-Temporary-Pocket-Save" class="headerlink" title="2. Stash: The Temporary Pocket Save"></a>2. Stash: The Temporary Pocket Save</h3><p>Sometimes you are half-way through developing a feature but need to switch branches temporarily to fix a Bug, yet the code isn&#39;t ready for a commit. You can use the temporary pocket:</p><figure class="highlight bash"><table><tr><td class="gutter"><pre><span class="line">1</span><br><span class="line">2</span><br><span class="line">3</span><br><span class="line">4</span><br><span class="line">5</span><br><span class="line">6</span><br></pre></td><td class="code"><pre><span class="line"><span class="comment"># Stuff current unfinished modifications into the temporary pocket</span></span><br><span class="line">git stash</span><br><span class="line"></span><br><span class="line"><span class="comment"># Now the working directory is clean, you can switch branches to do your task...</span></span><br><span class="line"><span class="comment"># After finishing the task and switching back, take out the temporary modifications:</span></span><br><span class="line">git stash pop</span><br></pre></td></tr></table></figure><h2 id="Conclusion-The-Mental-Model-Beginners-Should-Master-Most"><a href="#Conclusion-The-Mental-Model-Beginners-Should-Master-Most" class="headerlink" title="Conclusion: The Mental Model Beginners Should Master Most"></a>Conclusion: The Mental Model Beginners Should Master Most</h2><p>The core of <strong>Git</strong> is not rote memorization of commands, but understanding the following mental models:</p><ol><li><strong><code>commit</code> is a savepoint</strong>: Not every <code>Ctrl+S</code> file save will be recorded; only running <code>commit</code> formally generates a save.</li><li><strong><code>branch</code> is a worldline</strong>: A branch is not a clunky copy of a folder, but a lightweight pointer on the historical timeline, allowing for stress-free switching.</li><li><strong><code>HEAD</code> is your eyes</strong>: It represents the specific worldline position you are currently observing and occupying.</li><li><strong><code>push</code> &#x2F; <code>pull</code> is cloud synchronization</strong>: A local commit does not mean it&#39;s uploaded.</li></ol><p>Remember this phrase: <strong>You are not managing a bunch of file copies; you are managing a historical universe of a project constantly splitting, evolving, and converging.</strong> When in doubt, type <code>git status</code> at any time to take a look at the map, and then let loose to explore the coding world!</p>]]>
    </content>
    <id>https://ooo.run/en/post/learn-git-understanding-version-ontrol-via-savepoint.html</id>
    <link href="https://ooo.run/en/post/learn-git-understanding-version-ontrol-via-savepoint.html"/>
    <published>2026-06-29T19:49:04.000Z</published>
    <summary>
      <![CDATA[<p>Writing code, modifying documents, and working on projects is just like exploring an open-world game. The role of <strong>Git</strong> is]]>
    </summary>
    <title>Git Beginner's Guide: Understanding Version Control via &quot;Savepoints&quot; and &quot;Multiverses&quot;</title>
    <updated>2026-06-29T20:08:36.543Z</updated>
  </entry>
  <entry>
    <author>
      <name>Mr. O</name>
    </author>
    <category term="Notes" scheme="https://ooo.run/en/categories/Notes/"/>
    <category term="OpenAI" scheme="https://ooo.run/en/tags/OpenAI/"/>
    <category term="Codex" scheme="https://ooo.run/en/tags/Codex/"/>
    <content>
      <![CDATA[<p>In June, Codex&#39;s reset mechanism was changed to stackable reset credits. Due to some bugs, three free reset credits were granted in June. Additionally, you can get extra reset credits by inviting friends (up to three times). However, these reset credits are only valid for 30 days, and the Codex interface does not display the specific expiration date for each reset credit.</p><p>Here is a simple method to check it.</p><h2 id="Ask-Codex-to-Check-It-Directly"><a href="#Ask-Codex-to-Check-It-Directly" class="headerlink" title="Ask Codex to Check It Directly"></a>Ask Codex to Check It Directly</h2><p>The method is very simple: just send the following <strong>prompt</strong> to Codex, asking it to use the local credentials to query it itself. Setting the thinking level to medium is sufficient.</p><figure class="highlight txt"><table><tr><td class="gutter"><pre><span class="line">1</span><br><span class="line">2</span><br><span class="line">3</span><br><span class="line">4</span><br><span class="line">5</span><br><span class="line">6</span><br><span class="line">7</span><br><span class="line">8</span><br><span class="line">9</span><br><span class="line">10</span><br><span class="line">11</span><br></pre></td><td class="code"><pre><span class="line">Please use the local Codex credentials to check the rate-limit reset credits:</span><br><span class="line"></span><br><span class="line">Read `tokens.access_token` from `~/.codex/auth.json` and request the following endpoint:</span><br><span class="line">https://chatgpt.com/backend-api/wham/rate-limit-reset-credits</span><br><span class="line"></span><br><span class="line">Requirements:</span><br><span class="line"></span><br><span class="line">1. Do not print access_token, refresh_token, cookie, or the full unique ID.</span><br><span class="line">2. Only summarize available_count and the status/title/granted_at/expires_at for each credit.</span><br><span class="line">3. Convert granted_at/expires_at from UTC to local time.</span><br><span class="line">4. If a 401 status code is returned, it means the credentials are invalid or the Authorization header is incorrect.</span><br></pre></td></tr></table></figure><details class="flatpaper-note flatpaper-note--info"><summary class="flatpaper-note__title"><span class="flatpaper-note__icon" aria-hidden="true"></span><span class="flatpaper-note__label">Example Reply</span><span class="flatpaper-note__chevron" aria-hidden="true"></span></summary><div class="flatpaper-note__body"><p>A total of three credits were granted in June. I have already used one, so it shows two remaining.</p><figure class="highlight txt"><table><tr><td class="gutter"><pre><span class="line">1</span><br><span class="line">2</span><br><span class="line">3</span><br><span class="line">4</span><br><span class="line">5</span><br><span class="line">6</span><br><span class="line">7</span><br><span class="line">8</span><br><span class="line">9</span><br><span class="line">10</span><br><span class="line">11</span><br><span class="line">12</span><br></pre></td><td class="code"><pre><span class="line">Request successful, status code 200.</span><br><span class="line">available_count: 2</span><br><span class="line">Credits:</span><br><span class="line">1. status: available</span><br><span class="line">    title: Full reset (Weekly + 5 hr)</span><br><span class="line">    granted_at: 2026-06-18 08:42:00 </span><br><span class="line">    expires_at: 2026-07-18 08:42:00 </span><br><span class="line"></span><br><span class="line">2. status: available</span><br><span class="line">    title: Full reset (Weekly + 5 hr)</span><br><span class="line">    granted_at: 2026-06-27 07:52:00 </span><br><span class="line">    expires_at: 2026-07-27 07:52:00 </span><br></pre></td></tr></table></figure></div></details><h2 id="Reset-Credits-Granted-by-OpenAI"><a href="#Reset-Credits-Granted-by-OpenAI" class="headerlink" title="Reset Credits Granted by OpenAI"></a>Reset Credits Granted by OpenAI</h2><h3 id="A-Total-of-Four-Times-in-June"><a href="#A-Total-of-Four-Times-in-June" class="headerlink" title="A Total of Four Times in June"></a>A Total of Four Times in June</h3><ol><li>Granted when the stackable reset mechanism launched: June 12, 2026. Expiration date: <strong>July 12, 2026</strong>.</li><li>Granted due to a bug: June 18, 2026. Expiration date: <strong>July 18, 2026</strong>.</li><li>Granted due to a bug: June 27, 2026. Expiration date: <strong>July 27, 2026</strong>.</li></ol><p>My query results match this record.</p><ol start="4"><li>Granted due to a bug: July 2, 2026. Expiration date: <strong>August 1, 2026</strong>.</li></ol><p>Check when your reset credits will expire now. For Plus users, the weekly quota is worth about $100, so be sure not to waste it!</p>]]>
    </content>
    <id>https://ooo.run/en/post/how-to-check-codex-reset-expiration.html</id>
    <link href="https://ooo.run/en/post/how-to-check-codex-reset-expiration.html"/>
    <published>2026-06-29T07:48:09.000Z</published>
    <summary>
      <![CDATA[<p>In June, Codex&#39;s reset mechanism was changed to stackable reset credits. Due to some bugs, three free reset credits were granted in J]]>
    </summary>
    <title>How to Check the Expiration Date of Granted Codex Reset Credits</title>
    <updated>2026-07-02T01:53:46.326Z</updated>
  </entry>
  <entry>
    <author>
      <name>Mr. O</name>
    </author>
    <category term="Commentary" scheme="https://ooo.run/en/categories/Commentary/"/>
    <category term="AI" scheme="https://ooo.run/en/tags/AI/"/>
    <category term="OpenAI" scheme="https://ooo.run/en/tags/OpenAI/"/>
    <category term="Claude Fable 5" scheme="https://ooo.run/en/tags/Claude-Fable-5/"/>
    <content>
      <![CDATA[<p>In the summer of 2026, the tech world experienced a massive &quot;AI earthquake&quot;. An export control order from the US Department of Commerce instantly hit the pause button globally on Anthropic&#39;s flagship model, <strong>Claude Fable 5</strong>, and its underlying twin model, Mythos 5, which had just been released and were dominating major model benchmarks. Shortly after, following closed-door negotiations between government and business, select <strong>trusted entities</strong> and specific whitelisted organizations gradually regained their access privileges.</p><p>This historic event not only overturned developers&#39; perceptions of cloud API stability but also declared a cruel truth to the world: a <strong>new cyber privileged class</strong>, chartered by the US government and intertwined with technology and power, has officially been born.</p><p>This also dealt a heavy blow to the entire AI industry — OpenAI&#39;s original utopian vision of <strong>democratizing technology and benefiting all of humanity</strong> has been thoroughly declared a failure.</p><h2 id="1-The-New-Cyber-Privileged-Class-Under-the-Whitelist"><a href="#1-The-New-Cyber-Privileged-Class-Under-the-Whitelist" class="headerlink" title="1. The New Cyber Privileged Class Under the &quot;Whitelist&quot;"></a>1. The New Cyber Privileged Class Under the &quot;Whitelist&quot;</h2><p>In the past, gold, oil, and land were the core factors of production. Today, in 2026, top-tier Artificial General Intelligence (AGI) reasoning compute has become the most scarce strategic resource.</p><p>The formidable power of Fable 5 and Mythos 5 goes without saying — in cutting-edge benchmarks like TerminalBench 2.1, they demonstrated terrifying intelligence. Payments giant Stripe used it to complete a massive migration of 50 million lines of Ruby code in just one day, a task that would originally take an entire engineering team two full months; in the fields of biopharmaceuticals and cybersecurity, they even exhibited &quot;near-godlike&quot; abilities to bypass safety restrictions and autonomously run design tools.</p><p>However, precisely because of this &quot;disruptive power&quot;, it attracted the iron fist of authority. The US government, citing national security, prevention of jailbreaks, and technology leakage, forcibly severed the connection for the public and overseas developers. The subsequently introduced &quot;whitelist mechanism&quot; corralled this power into the hands of a narrow privileged class:</p><ul><li><strong>State Apparatus and Military-Industrial Giants</strong>: Possess absolute immunity and can make unlimited calls to the uncensored Mythos 5 without safety interceptors.</li><li><strong>Compliant Wall Street Plutocrats and Giant Multinational Corporations</strong>: Leveraging powerful lobbying capabilities and nationality screening, they have joined the &quot;trusted compliance whitelist&quot;.</li></ul><p>A Matthew effect of technological monopoly is forming: enterprises within the whitelist use Fable 5 to achieve efficiency leaps of hundreds or thousands of times, monopolizing industry wealth; meanwhile, small and medium-sized entrepreneurs, research institutions, and even the general public outside the whitelist can only watch helplessly as the technological generation gap is infinitely widened. The once egalitarian internet API ecosystem has turned into &quot;rations&quot; allocated by power, nationality, and capital. The US government&#39;s &quot;charter&quot; has officially carved out a new, superior cyber nobility in the global tech community.</p><h2 id="2-The-Entry-of-Power-The-Agony-of-Fable-5-s-Nationalization"><a href="#2-The-Entry-of-Power-The-Agony-of-Fable-5-s-Nationalization" class="headerlink" title="2. The Entry of Power: The Agony of Fable 5&#39;s &quot;Nationalization&quot;"></a>2. The Entry of Power: The Agony of Fable 5&#39;s &quot;Nationalization&quot;</h2><p>The Fable 5 whitelist storm marks the formal transition of AI technology from a &quot;commercial competition phase&quot; to a &quot;geopolitical and national security phase&quot;.</p><p>&quot;We don&#39;t believe this kind of government admission process should become the long-term default.&quot; — Facing strong government intervention, even OpenAI, which is preparing for its IPO, issued a feeble warning during the limited preview release of GPT-5.6 Sol.</p><p>But the struggles of capital and corporations seem insignificant in the face of the powerful state apparatus. In the past, Silicon Valley&#39;s tech elites always believed they could change the world through code, overriding geopolitics. But when the White House executes executive orders and the Department of Defense and NSA directly intervene in reviews, even a giant as strong as Anthropic can only choose to &quot;actively cooperate with the government,&quot; to the extent that even its non-US citizen employees must be stripped of access rights.</p><p>Fable 5 is no longer just a commodity; it has become a <strong>strategic munition</strong> conscripted by the state.</p><h2 id="3-Ideals-in-the-Ruins-Shattered-Dreams-and-Longing-Amidst-the-Commercial-Torrent"><a href="#3-Ideals-in-the-Ruins-Shattered-Dreams-and-Longing-Amidst-the-Commercial-Torrent" class="headerlink" title="3. Ideals in the Ruins: Shattered Dreams and Longing Amidst the Commercial Torrent"></a>3. Ideals in the Ruins: Shattered Dreams and Longing Amidst the Commercial Torrent</h2><p>Looking back at the Fable 5 whitelist privileges, the restricted review of OpenAI&#39;s GPT-5.6, and OpenAI&#39;s own IPO application, history completes a massive irony at this moment.</p><p>In 2015, when Elon Musk, Sam Altman, and others founded OpenAI, its core mission was:</p><div class="flatpaper-note flatpaper-note--info"><span class="flatpaper-note__icon" aria-hidden="true"></span><div class="flatpaper-note__body"><p>To act as a non-profit organization, unconstrained by financial return, ensuring that AGI technology is open to all, preventing the technology from being monopolized by a single country or giant plutocracy, thereby benefiting all of humanity.</p></div></div><p>Today, this vision has been shattered into rubble:</p><p>From non-profit to capital darling: OpenAI has long since transformed into a profit-seeking entity, moving towards an IPO to cater to the capital market; its original non-profit utopian ideals have long been swallowed by commercial logic.</p><p>From &quot;Open&quot; to &quot;Closed&quot;: The once open-source promises have become the most closely guarded commercial secrets, and now, under government directives, have evolved into a fractured ecosystem of &quot;whitelist admission&quot;.</p><p>From benefiting all of humanity to serving a privileged class: Top-tier large models are no longer tools that universally benefit humanity, but have become private property used to strengthen the hegemony of specific countries and enhance the productivity of a few monopolistic giants.</p><p><strong>However, that initial glimmer of light still fills us with longing</strong></p><p>Even if the reality is so cold, and even if OpenAI has now substantially transformed into a profit-seeking entity, when we brush away the commercial noise and look back at its original vision, that grand blueprint of &quot;universal access to technology&quot; still radiates a soul-stirring idealistic glow.</p><p>It was a rare and great attempt in the history of human technology to transcend national boundaries and class barriers. It promised the world a possibility: the highest dimension of intelligence does not need to be subservient to power, and cutting-edge technology can become a weapon for every ordinary person to fight fate and bridge the digital divide.</p><p>It is precisely because this original vision was once so beautiful, even offering us a fleeting glimpse of a cyber utopia&#39;s dawn, that the sense of loss and pain in the hearts of global developers feels so acute today when facing the &quot;whitelist high wall&quot; of Fable 5. People&#39;s yearning for OpenAI&#39;s original intention is not out of naive commercial fantasies, but stems from humanity&#39;s deep-rooted desire for fairness, openness, and borderless knowledge. This very yearning has become the most resilient spiritual spark in fighting technological monopoly and calling upon the power of open source today.</p><h2 id="Conclusion"><a href="#Conclusion" class="headerlink" title="Conclusion"></a>Conclusion</h2><p>The &quot;whitelist storm&quot; of Fable 5 reveals the future landscape of the AI era: technology is no longer flat, but fragmented by high walls built by power.</p><p>OpenAI&#39;s original humanist vision has failed, replaced by a colder, more Darwinian reality. In this new cyber order chartered by the government and built on whitelists, whoever can get that &quot;special pass&quot; to top-tier computing power will hold the power to rewrite the world in the next era. The remaining vast majority are inevitably being reduced to <strong>&quot;digital commoners&quot;</strong> under this technological collusion.</p><p>However, the situation is not entirely without a turning point. Top Chinese open-source models, represented by <strong>GLM 5.2</strong>, are showing increasingly strong competitiveness. If they can continue to catch up or even surpass closed-source whitelisted models in key capabilities such as coding, reasoning, tool calling, and long context, global developers will at least not be forced to completely rely on a few US APIs. Their strong performance is expected to alleviate, to some extent, this technological class polarization jointly created by computing power, capital, and state power.</p>]]>
    </content>
    <id>https://ooo.run/en/post/fable-5-whitelist-new-privileged-class-ai-monopoly.html</id>
    <link href="https://ooo.run/en/post/fable-5-whitelist-new-privileged-class-ai-monopoly.html"/>
    <published>2026-06-29T07:06:15.000Z</published>
    <summary>
      <![CDATA[<p>In the summer of 2026, the tech world experienced a massive &quot;AI earthquake&quot;. An export control order from the US Department of]]>
    </summary>
    <title>The Birth of the Cyber Privileged Class: The End of the AI Non-Profit Utopia Seen from the Fable 5 Whitelist</title>
    <updated>2026-06-29T07:29:36.184Z</updated>
  </entry>
  <entry>
    <author>
      <name>Mr. O</name>
    </author>
    <category term="Notes" scheme="https://ooo.run/en/categories/Notes/"/>
    <category term="Electron" scheme="https://ooo.run/en/tags/Electron/"/>
    <content>
      <![CDATA[<h2 id="Problem-Reproduction"><a href="#Problem-Reproduction" class="headerlink" title="Problem Reproduction"></a>Problem Reproduction</h2><p>When developing or cloning an Electron 42 app, after installing dependencies, you might encounter an <code>Error: Electron uninstall</code> error message when running <code>pnpm dev</code> for the first time:</p><figure class="highlight bash"><table><tr><td class="gutter"><pre><span class="line">1</span><br><span class="line">2</span><br><span class="line">3</span><br><span class="line">4</span><br></pre></td><td class="code"><pre><span class="line">pnpm install --frozen-lockfile</span><br><span class="line">pnpm approve-builds</span><br><span class="line"></span><br><span class="line">pnpm dev </span><br></pre></td></tr></table></figure><p>Error Message</p><figure class="highlight text"><table><tr><td class="gutter"><pre><span class="line">1</span><br><span class="line">2</span><br><span class="line">3</span><br><span class="line">4</span><br><span class="line">5</span><br></pre></td><td class="code"><pre><span class="line">error during start dev server and electron app:</span><br><span class="line">Error: Electron uninstall</span><br><span class="line">    at getElectronPath</span><br><span class="line">...</span><br><span class="line">...</span><br></pre></td></tr></table></figure><h2 id="Solution"><a href="#Solution" class="headerlink" title="Solution"></a>Solution</h2><p>You need to manually run the following command:</p><figure class="highlight bash"><table><tr><td class="gutter"><pre><span class="line">1</span><br></pre></td><td class="code"><pre><span class="line">npx install-electron</span><br></pre></td></tr></table></figure><h2 id="Cause-of-the-Problem"><a href="#Cause-of-the-Problem" class="headerlink" title="Cause of the Problem"></a>Cause of the Problem</h2><p>This is because, to mitigate supply chain attacks, Electron 42 no longer downloads itself via <code>postinstall</code>.</p><p><a href="https://www.electronjs.org/blog/electron-42-0#electron-no-longer-downloads-itself-via-postinstall-script">Electron 42: electron no longer downloads itself via postinstall script</a></p><p>You can run the following commands:</p><figure class="highlight bash"><table><tr><td class="gutter"><pre><span class="line">1</span><br><span class="line">2</span><br></pre></td><td class="code"><pre><span class="line">npm install electron --save-dev --ignore-scripts</span><br><span class="line">npx install-electron</span><br></pre></td></tr></table></figure>]]>
    </content>
    <id>https://ooo.run/en/post/fix-electron-42-app-cannot-run.html</id>
    <link href="https://ooo.run/en/post/fix-electron-42-app-cannot-run.html"/>
    <published>2026-06-27T02:28:34.000Z</published>
    <summary>
      <![CDATA[<h2 id="Problem-Reproduction"><a href="#Problem-Reproduction" class="headerlink" title="Problem Reproduction"></a>Problem Reproduction</h2><]]>
    </summary>
    <title>Fix Electron 42 App Error on First Run of pnpm dev</title>
    <updated>2026-06-27T02:41:49.854Z</updated>
  </entry>
  <entry>
    <author>
      <name>Mr. O</name>
    </author>
    <category term="News" scheme="https://ooo.run/en/categories/News/"/>
    <category term="OpenAI" scheme="https://ooo.run/en/tags/OpenAI/"/>
    <category term="ChatGPT" scheme="https://ooo.run/en/tags/ChatGPT/"/>
    <category term="GPT-5.6" scheme="https://ooo.run/en/tags/GPT-5-6/"/>
    <content>
      <![CDATA[<p><strong>Date: US Time, June 26, 2026</strong></p><p>OpenAI has officially announced the preview of its next-generation GPT-5.6 model series, opening it first in a limited preview format to select trusted partners. This release includes three models: the flagship model <strong>GPT-5.6 Sol</strong>, the balanced model for everyday tasks <strong>GPT-5.6 Terra</strong>, and <strong>GPT-5.6 Luna</strong>, which focuses on speed and cost efficiency. This marks another rapid iteration following GPT-5.5 (released in April 2026), continuing OpenAI&#39;s cadence of releasing a flagship model roughly every six weeks.</p><h3 id="Three-Variants-Targeting-Different-Needs"><a href="#Three-Variants-Targeting-Different-Needs" class="headerlink" title="Three Variants Targeting Different Needs"></a>Three Variants Targeting Different Needs</h3><ul><li><strong>Sol:</strong> The most powerful flagship model, with significant improvements in agentic capabilities, particularly excelling in coding, biology, and cybersecurity. It introduces new <strong>Max</strong> reasoning mode and <strong>Ultra</strong> mode (which can coordinate multiple sub-agents to handle highly complex tasks).</li><li><strong>Terra:</strong> Performance comparable to GPT-5.5, but at approximately half the cost (reportedly offering more competitive pricing for input&#x2F;output tokens), suitable for everyday tasks.</li><li><strong>Luna:</strong> The fastest and lowest-cost option, providing strong capabilities while achieving the highest cost-effectiveness.</li></ul><p>According to OpenAI&#39;s announcement, GPT-5.6 Sol is currently their most capable model, demonstrating outstanding performance in real-world coding debugging, vulnerability discovery, and patching. It also features further optimizations in context window and token efficiency (previous rumors suggested it might support up to a <strong>1.5 million</strong> token context). The model has also been reinforced with reasoning training, enabling longer internal chains of thought before responding.</p><h3 id="Security-and-Access-Restrictions-Influenced-by-the-US-Government"><a href="#Security-and-Access-Restrictions-Influenced-by-the-US-Government" class="headerlink" title="Security and Access Restrictions: Influenced by the US Government"></a>Security and Access Restrictions: Influenced by the US Government</h3><p>Although OpenAI emphasizes its &quot;belief in broad access&quot; and plans to fully open it to ChatGPT, Codex, and the API in the coming weeks, this release takes the form of a limited preview, initially restricted to about 20 trusted partners (the participant list has been shared with the government). This decision stems from the security concerns of the US government (the Trump administration), particularly regarding the review of cybersecurity capabilities of advanced AI models.</p><p>OpenAI stated in its system card and announcement that it has built its most robust safety stack to date, including reinforcement training, activation classifiers, and real-time monitoring. The model was evaluated under the Preparedness Framework at a &quot;High&quot; level for cybersecurity and biological&#x2F;chemical risks, but did not reach the &quot;Critical&quot; threshold. Tests showed that Sol&#39;s ability to help defenders find and fix vulnerabilities is stronger than its ability to autonomously execute end-to-end attacks. The company also acknowledged a certain tendency to act &quot;outside user intent&quot; in agentic coding tasks, though the absolute occurrence rate remains low.</p><p>OpenAI made it clear that such government reviews should not become the long-term default practice, and is working with the government to establish a repeatable review framework to achieve broader availability as soon as possible.</p><h3 id="Outlook"><a href="#Outlook" class="headerlink" title="Outlook"></a>Outlook</h3><p>From an industry perspective, the release of GPT-5.6 marks a new phase in the AI competition. On the one hand, model capabilities continue to advance towards stronger agents, code execution, and long-term task planning; on the other hand, attention from governments, enterprises, and society regarding the risks of frontier models is rapidly increasing. In the future, the release cadence of frontier AI models may no longer be determined solely by technological maturity, but will also be jointly influenced by safety evaluations, regulatory requirements, and the international competitive environment.</p><p>Currently, the GPT-5.6 series is not yet fully available. According to media reports, OpenAI plans to gradually expand access in the coming weeks after completing initial evaluations. For regular users and developers, the true impact of GPT-5.6 may not become clear until it is officially integrated into product lines such as the API, ChatGPT, or Codex.</p>]]>
    </content>
    <id>https://ooo.run/en/post/openai-gpt-5-6-limited-preview.html</id>
    <link href="https://ooo.run/en/post/openai-gpt-5-6-limited-preview.html"/>
    <published>2026-06-26T20:42:03.000Z</published>
    <summary>
      <![CDATA[<p><strong>Date: US Time, June 26, 2026</strong></p>
<p>OpenAI has officially announced the preview of its next-generation GPT-5.6 model ser]]>
    </summary>
    <title>OpenAI Releases GPT-5.6 Model Series: Sol, Terra, and Luna Enter Limited Preview, Initial Access Restricted by US Government Requirements</title>
    <updated>2026-06-26T21:08:58.148Z</updated>
  </entry>
  <entry>
    <author>
      <name>Mr. O</name>
    </author>
    <category term="News" scheme="https://ooo.run/en/categories/News/"/>
    <category term="Google" scheme="https://ooo.run/en/tags/Google/"/>
    <category term="Gmail" scheme="https://ooo.run/en/tags/Gmail/"/>
    <content>
      <![CDATA[<p>There&#39;s a famous internet meme about an 8-year-old user sitting in front of a computer, registering the email account that will accompany them for life.</p><p>At 8 years old, we didn&#39;t know what a <strong>digital identity</strong> was, nor did we know that this email would be used in the future to register for GitHub, link bank cards, submit resumes, receive verification codes, and log into all sorts of services. We simply thought: adding our birthday, nickname, favorite anime character, or a few cool-looking numbers to the email prefix would be awesome.</p><p><img src="https://img.nep.me/ooo/change-gmail-meme.webp" alt="change-gmail-meme.png"></p><p>And then twenty years passed.</p><p>You&#39;ve grown up, changed your avatar, changed your screen name, changed your phone, and even changed your aesthetic several times, but that email address is still there. Every time you need to fill in your email address in a formal setting, you have to pretend it is perfectly normal.</p><p>The good news is: Google has finally started allowing users to change their Gmail addresses.</p><h2 id="Why-Was-This-So-Painful-Before"><a href="#Why-Was-This-So-Painful-Before" class="headerlink" title="Why Was This So Painful Before?"></a>Why Was This So Painful Before?</h2><p>In the past, if you registered a Gmail address, it basically meant that this address would stick with your Google account for a very long time.</p><p>You could change your username, your avatar, your recovery email, and various personal details, but the email address itself was usually very difficult to change. For many people, the most realistic way to get a more formal, easier-to-remember, and less embarrassing Gmail address was often:</p><p><strong>Registering a new Google account.</strong></p><p>But problems followed.</p><p>The old account might contain Gmail emails, Google Drive files, Google Photos, YouTube data, Google Play records, and login records for various third-party websites. Registering a new account isn&#39;t just about changing an email address; it&#39;s almost like reorganizing your entire internet life.</p><p>So many people finally chose to put up with it.</p><p>Putting up with the email registered at age 8 continuing to appear on resumes, contracts, project backends, and login pages.</p><h2 id="How-Can-You-Change-It-Now"><a href="#How-Can-You-Change-It-Now" class="headerlink" title="How Can You Change It Now?"></a>How Can You Change It Now?</h2><p>According to Google&#39;s instructions, users can now change their original Google account email ending in @gmail.com to a new @gmail.com address.</p><p>On the Gmail page, click your avatar in the upper right corner, then click <strong>Manage your Google Account</strong> to open the Google account settings page. Click Personal info on the left, and you can make the change in the Contact info -&gt; Email section on the right.</p><p>After the change, the original Gmail address won&#39;t disappear completely; instead, it will become an alternate email for the account. You can still receive emails sent to the old address, and the data in your account won&#39;t be lost due to the email change, including historical emails, photos, files, and other content.</p><p>Simply put:</p><p>You can finally get a new Gmail house number, but your old house number can still receive mail for you.</p><p>This is very important for long-time users. Because it doesn&#39;t require you to abandon your old account and start over, but rather gives you a chance to rename yourself while keeping your account assets.</p><h2 id="Some-Websites-Have-Encountered-Problems"><a href="#Some-Websites-Have-Encountered-Problems" class="headerlink" title="Some Websites Have Encountered Problems"></a>Some Websites Have Encountered Problems</h2><p>Although this sounds great, I don&#39;t recommend rushing in to change it right after seeing the option.</p><p>Since the old email can still receive emails normally, for accounts registered on other websites using this email, you actually don&#39;t need to make any adjustments and can continue using it.</p><p>After the Gmail address becomes modifiable this time, the most notable issue is not Google itself, <strong>but the one-click logins of third-party websites</strong>. Current feedback shows that after changing the email, using the Google account to one-click login to websites like V2EX and Spotify again will directly create a new account.</p><p>Theoretically, when logging in with a Google account, Google returns a set of user information. The truly stable part suitable for identifying account identity should be the Google account&#39;s <code>Provider ID</code>, which is the unique identifier of this Google user in Google&#39;s identity system.</p><p><strong>Email is just an email address.</strong></p><p>But in reality, some website developers might conveniently use the Email directly as the user&#39;s unique ID. This seemed fine in an era when emails could never be changed; but once the email can be modified, the problem will be exposed.</p><p>For example:</p><p>You originally used <code>oldname@gmail.com</code> to log into a certain website via Google.<br>Later you changed your Gmail address to <code>newname@gmail.com</code>.<br>If this website uses the <code>Provider ID</code> returned by Google to identify you, then the next time you log in, it will still know you are the original account.</p><p>But if this website takes a shortcut and directly uses the Email to identify users, then it might think:</p><p><mark>&quot;This is a new email, so this is a new user.&quot;</mark></p><p>As a result, even though you are clearly using the same Google account, you might log into a completely new, empty account, or even encounter issues like account loss, unassociated data, and abnormal subscription status.</p><p>Even worse, if some systems improperly handle the logic of old email release, reuse, or binding, it could lead to more complex security issues.</p><p>Known popular websites that will encounter such issues include <strong>V2EX</strong>, <strong>Spotify</strong>, etc.</p><h3 id="Checklist-for-Confirming-the-Scope-of-Changes"><a href="#Checklist-for-Confirming-the-Scope-of-Changes" class="headerlink" title="Checklist for Confirming the Scope of Changes"></a>Checklist for Confirming the Scope of Changes</h3><p>If you wish to change the bound email for other websites, it is recommended to at least check these categories of places before changing, to confirm whether the account is associated via email registration or one-click login:</p><ul><li><strong>1. Commonly used third-party login services:</strong><br>Such as GitHub, Notion, Figma, Cloudflare, Vercel, various forums, blog backends, developer platforms, etc.</li><li><strong>2. Financial, payment, and billing services:</strong><br>Such as bank notifications, subscription services, cloud service bills, domain registrars, server providers, etc.</li><li><strong>3. Important account recovery channels:</strong><br>Some websites use your email as the core channel for password recovery, identity verification, and receiving security notifications.</li><li><strong>4. Work and public profiles:</strong><br>Such as resumes, personal websites, business cards, Git commit information, project READMEs, blog About pages, etc.</li></ul><p>Although Google will let the old email continue to receive mail, it&#39;s not guaranteed that third-party websites will correctly recognize &quot;this is the same person.&quot;</p><h2 id="Advice-for-General-Users"><a href="#Advice-for-General-Users" class="headerlink" title="Advice for General Users"></a>Advice for General Users</h2><p>If you plan to change your Gmail address, you can first sort out your most commonly used and important websites, and confirm on which sites you have used the <strong>Sign in with Google</strong> service. After changing your email, prioritize testing whether these services can still be logged into normally and whether the account data is still there.</p><p>For particularly important services, it&#39;s best to confirm in advance whether they support changing the login email, or whether alternative login methods can be bound, such as <strong>passwords, passkeys, alternate emails, phone numbers</strong>, etc.</p><p>If you encounter a website that identifies you as a new user after the change, you can try contacting customer service or the developer, explaining that you are using the same Google account and only the Gmail address has changed.</p><h2 id="Advice-for-Developers"><a href="#Advice-for-Developers" class="headerlink" title="Advice for Developers"></a>Advice for Developers</h2><p>If your website supports Google one-click login, please do not use Email as the user&#39;s unique identity identifier.</p><p>You should use the stable user ID returned by Google OAuth &#x2F; OpenID Connect to bind the user account, rather than treating the Email as the primary key.</p><p>Email can serve as display information, contact information, and notification address, but it should not serve as the sole identity basis for third-party login accounts.</p><p>The correct practice should be:</p><ul><li>Use <code>Provider ID</code> to identify the user&#39;s identity</li><li>Save Email only as a <strong>mutable attribute</strong></li><li>When the user&#39;s email changes, update the email field instead of creating a new account</li><li>Ensure good compatibility for historical account binding logic</li><li>Provide clear prompts for email changes, account merging, and login anomalies</li></ul><p>Previously, many developers used Email as the unique ID because emails seemed immutable. But now this premise is disappearing.</p><h2 id="Use-a-Password-Manager"><a href="#Use-a-Password-Manager" class="headerlink" title="Use a Password Manager"></a>Use a Password Manager</h2><p>When many people registered accounts in their early years, not only were their emails chosen casually, but their passwords might also have been the same set: a common password, combined with the website name, birthday, and a few symbols, slightly deformed and reused everywhere. It seemed very convenient before, but as soon as one of the websites leaks, other accounts might suffer together.</p><p>So if you haven&#39;t used a password manager yet, now is a great juncture to tidy things up.</p><p>The core value of a password manager isn&#39;t simply to &quot;help you remember passwords&quot;, but rather:</p><ul><li>Use <strong>independent random passwords</strong> for every website</li><li>You don&#39;t need to remember <strong>dozens or hundreds</strong> of passwords yourself</li><li>It can <strong>auto-fill</strong>, reducing typing errors and phishing risks</li><li>It can <strong>uniformly check for weak, reused, and compromised passwords</strong></li><li>It can more conveniently store recovery codes, keys, bank cards, server info, and other sensitive content</li></ul><p>Common choices include 1Password, Bitwarden, KeePassXC, iCloud Keychain, etc.</p><p>If you are just a regular user and primarily use Apple devices, iCloud Keychain is sufficient; if you want a more complete cross-platform experience, you can consider 1Password or Bitwarden; if you care more about open source, self-hosting, and data control, I would recommend Bitwarden more.</p><div class="flatpaper-note flatpaper-note--info"><span class="flatpaper-note__icon" aria-hidden="true"></span><div class="flatpaper-note__body"><p>Read: <a href="https://ooo.run/en/post/use-docker-run-bitwarden.html">Deploy Bitwarden Server Easily with Docker, Build Your Own Password Manager</a></p></div></div><p>If you are just a regular user who doesn&#39;t want to maintain a server, directly using 1Password or Bitwarden&#39;s official service is fine. Bitwarden&#39;s pricing is quite friendly, with a Premium annual fee of only <strong>$19.80</strong> USD.<br>If you have your own server, NAS, Homelab, or are already using Docker to deploy services, then self-deploying Bitwarden is well worth a try.</p><p>Regardless of which one you choose, these things are the most important:</p><ul><li>The master password must be long enough, preferably a passphrase only you know</li><li>Enable two-step verification, prioritizing <strong>Passkeys, hardware security keys, or TOTP</strong></li><li><strong>Regularly export encrypted backups</strong>, and ensure you can genuinely restore them</li><li>Don&#39;t put your password vault, backup files, and 2FA all in the same place</li><li>Before changing your Gmail address, sort out the login and recovery methods of your important websites</li></ul><p>Email addresses can be changed, passwords can be reset, but if your password vault and 2FA are lost together, that&#39;s real trouble.</p><h2 id="Conclusion"><a href="#Conclusion" class="headerlink" title="Conclusion"></a>Conclusion</h2><p>Google opening up Gmail address modification is something very worth celebrating for many long-time users.</p><p>It gives us a chance to reconcile with our childhood cringe history, and also gives those emails casually registered in early years a chance to finally become more formal, easier to remember, and more suitable for long-term use.</p><p>Before starting the change, make sure to check your important accounts, especially third-party one-click logins, to reduce the chances of encountering problems.</p>]]>
    </content>
    <id>https://ooo.run/en/post/google-finally-lets-you-change-gmail-address.html</id>
    <link href="https://ooo.run/en/post/google-finally-lets-you-change-gmail-address.html"/>
    <published>2026-06-25T03:30:04.000Z</published>
    <summary>
      <![CDATA[<p>There&#39;s a famous internet meme about an 8-year-old user sitting in front of a computer, registering the email account that will accom]]>
    </summary>
    <title>Google Finally Allows Gmail Address Changes: Say Goodbye to the Cringe Email You Registered at Age 8</title>
    <updated>2026-06-25T10:23:22.669Z</updated>
  </entry>
  <entry>
    <author>
      <name>Mr. O</name>
    </author>
    <category term="Tutorial" scheme="https://ooo.run/en/categories/Tutorial/"/>
    <category term="Docker" scheme="https://ooo.run/en/tags/Docker/"/>
    <category term="Fizzy" scheme="https://ooo.run/en/tags/Fizzy/"/>
    <content>
      <![CDATA[<h2 id="Fizzy-Introduction"><a href="#Fizzy-Introduction" class="headerlink" title="Fizzy Introduction"></a>Fizzy Introduction</h2><p>Fizzy (<a href="https://fizzy.do/">https://fizzy.do</a>) is a brand new <strong>Kanban</strong> task management tool released by the famous software company <mark>37signals</mark> (the team that developed Basecamp and HEY). It focuses on speed, simplicity, and vibrant colors, making it highly suitable for tracking bugs, ideas, small projects, and content workflows.</p><p>Unlike bloated project management tools like Jira, ClickUp, and Asana, Fizzy uses a <strong>card + column</strong> UI. To use it, you just need to create boards, add cards, move statuses, assign tasks, and receive notifications—perfect for small, lightweight, and clearly defined workflows.</p><p>Fizzy interface preview:</p><p><img src="https://img.nep.me/ooo/fizzy-board.webp" alt="Fizzy Interface Preview"></p><h2 id="Advantages-of-Fizzy"><a href="#Advantages-of-Fizzy" class="headerlink" title="Advantages of Fizzy"></a>Advantages of Fizzy</h2><ul><li><strong>Minimalism and Speed:</strong> No complex menu hierarchies, AI summaries, or redundant analytical charts. The interface is colorful and intuitive, focusing on the Kanban experience of cards and columns.</li><li><strong>User-Friendly Defaults:</strong> It supports features like automatically closing cards that have had no updates for a long time, Webhooks, browser notifications, public board links, card activity logs, etc. This keeps the board clean and fits human working habits perfectly.</li><li><strong>Self-Hostable Support:</strong> Fizzy&#39;s <a href="https://github.com/basecamp/fizzy">code</a> is fully open-source and supports self-hosting. The official team provides pre-built <a href="https://ghcr.io/basecamp/fizzy:main">Docker images</a>, making it perfect for self-hosting enthusiasts.</li><li><strong>Affordable Pricing:</strong> If you don&#39;t want to self-host, using the official service is free for the first 1,000 cards; the paid plan beyond that is a flat $20 per month (including unlimited users and unlimited cards), without head-ache inducing per-user pricing tiers.</li></ul><h2 id="Deploying-with-Docker"><a href="#Deploying-with-Docker" class="headerlink" title="Deploying with Docker"></a>Deploying with Docker</h2><p>Below, we will introduce how to deploy the Fizzy application using Docker and access it via Caddy or Nginx reverse proxy.</p><h3 id="Verify-Docker-Environment"><a href="#Verify-Docker-Environment" class="headerlink" title="Verify Docker Environment"></a>Verify Docker Environment</h3><p>Docker environment verification commands:</p><figure class="highlight bash"><table><tr><td class="gutter"><pre><span class="line">1</span><br><span class="line">2</span><br></pre></td><td class="code"><pre><span class="line">docker --version</span><br><span class="line">docker compose version</span><br></pre></td></tr></table></figure><div class="flatpaper-note flatpaper-note--info"><span class="flatpaper-note__icon" aria-hidden="true"></span><div class="flatpaper-note__body"><p>If you don&#39;t have it installed, you can check: <a href="https://ooo.run/en/post/debian-install-docker.html">Installing Docker and Docker Compose on Debian</a></p></div></div><h3 id="Create-docker-compose-yaml-File"><a href="#Create-docker-compose-yaml-File" class="headerlink" title="Create docker-compose.yaml File"></a>Create docker-compose.yaml File</h3><p>In this article, we choose to deploy the container under the <code>/opt/fizzy</code> directory, and save the data directory in the same path to make it easy to <mark>package and backup with one click</mark>.</p><figure class="highlight shell"><table><tr><td class="gutter"><pre><span class="line">1</span><br><span class="line">2</span><br><span class="line">3</span><br><span class="line">4</span><br><span class="line">5</span><br><span class="line">6</span><br><span class="line">7</span><br><span class="line">8</span><br><span class="line">9</span><br><span class="line">10</span><br><span class="line">11</span><br></pre></td><td class="code"><pre><span class="line"><span class="meta prompt_"># </span><span class="language-bash">Create container directory</span></span><br><span class="line">sudo mkdir -p /opt/fizzy</span><br><span class="line"><span class="meta prompt_"></span></span><br><span class="line"><span class="meta prompt_"># </span><span class="language-bash">Enter container directory</span></span><br><span class="line">cd /opt/fizzy</span><br><span class="line"><span class="meta prompt_"></span></span><br><span class="line"><span class="meta prompt_"># </span><span class="language-bash">Create data directory</span></span><br><span class="line">sudo mkdir storage</span><br><span class="line"><span class="meta prompt_"></span></span><br><span class="line"><span class="meta prompt_"># </span><span class="language-bash">Adjust data directory permissions</span></span><br><span class="line">sudo chown 1000:1000 storage</span><br></pre></td></tr></table></figure><p>Then create the <code>compose.yaml</code> file:</p><figure class="highlight yaml"><table><tr><td class="gutter"><pre><span class="line">1</span><br><span class="line">2</span><br><span class="line">3</span><br><span class="line">4</span><br><span class="line">5</span><br><span class="line">6</span><br><span class="line">7</span><br><span class="line">8</span><br><span class="line">9</span><br><span class="line">10</span><br><span class="line">11</span><br><span class="line">12</span><br><span class="line">13</span><br><span class="line">14</span><br><span class="line">15</span><br><span class="line">16</span><br><span class="line">17</span><br><span class="line">18</span><br><span class="line">19</span><br><span class="line">20</span><br><span class="line">21</span><br><span class="line">22</span><br><span class="line">23</span><br><span class="line">24</span><br><span class="line">25</span><br><span class="line">26</span><br></pre></td><td class="code"><pre><span class="line"><span class="attr">services:</span></span><br><span class="line">  <span class="attr">fizzy:</span></span><br><span class="line">    <span class="attr">image:</span> <span class="string">ghcr.io/basecamp/fizzy:main</span></span><br><span class="line">    <span class="attr">container_name:</span> <span class="string">fizzy</span></span><br><span class="line">    <span class="attr">restart:</span> <span class="string">unless-stopped</span></span><br><span class="line">    <span class="attr">ports:</span></span><br><span class="line">      <span class="bullet">-</span> <span class="string">&quot;127.0.0.1:3080:80&quot;</span></span><br><span class="line">      <span class="comment"># - &quot;443:443&quot;</span></span><br><span class="line">    <span class="attr">environment:</span></span><br><span class="line">      <span class="comment"># Required: Rails secret</span></span><br><span class="line">      <span class="attr">SECRET_KEY_BASE:</span> <span class="string">&quot;&lt;SECRET_KEY_BASE&gt;&quot;</span></span><br><span class="line">      <span class="comment"># Access domain</span></span><br><span class="line">      <span class="attr">BASE_URL:</span> <span class="string">&quot;https://fizzy.example.com&quot;</span></span><br><span class="line"></span><br><span class="line">      <span class="comment"># SMTP (used for magic link login emails)</span></span><br><span class="line">      <span class="comment"># SMTP_ADDRESS: &quot;mail.example.com&quot;</span></span><br><span class="line">      <span class="comment"># SMTP_USERNAME: &quot;user&quot;</span></span><br><span class="line">      <span class="comment"># SMTP_PASSWORD: &quot;pass&quot;</span></span><br><span class="line">      <span class="comment"># MAILER_FROM_ADDRESS: &quot;Fizzy &lt;fizzy@example.com&gt;&quot;</span></span><br><span class="line"></span><br><span class="line">      <span class="comment"># Optional: Web Push (if you want browser push notifications)</span></span><br><span class="line">      <span class="comment"># VAPID_PUBLIC_KEY: &quot;...&quot;</span></span><br><span class="line">      <span class="comment"># VAPID_PRIVATE_KEY: &quot;...&quot;</span></span><br><span class="line"></span><br><span class="line">    <span class="attr">volumes:</span></span><br><span class="line">      <span class="bullet">-</span> <span class="string">./storage:/rails/storage</span></span><br></pre></td></tr></table></figure><p>Parts that need to be configured:</p><ul><li><code>SECRET_KEY_BASE:</code> Generate it using the command <code>openssl rand -hex 32</code>, or generate it online using a web tool like <a href="https://tools.ooo.run/zh/session-secret/">Simple Tool - Session Secret</a>.</li><li><code>BASE_URL:</code> Set the domain used to access it. Fizzy emphasizes secure design and requires <strong>https</strong> for access.</li></ul><div class="flatpaper-note flatpaper-note--default"><span class="flatpaper-note__icon" aria-hidden="true"></span><div class="flatpaper-note__body"><p>Fizzy uses email <mark>verification codes</mark> for login. If you want to send emails, you need to configure the SMTP section, but this is not mandatory. If SMTP is not configured, you can use the appended <code>docker</code> command in the next section to query the code.</p></div></div><h3 id="Start-the-Docker-Container"><a href="#Start-the-Docker-Container" class="headerlink" title="Start the Docker Container"></a>Start the Docker Container</h3><p>Run a single Docker Compose command to start the container in the background:</p><figure class="highlight bash"><table><tr><td class="gutter"><pre><span class="line">1</span><br></pre></td><td class="code"><pre><span class="line">docker compose up -d</span><br></pre></td></tr></table></figure><h2 id="Accessing-Fizzy"><a href="#Accessing-Fizzy" class="headerlink" title="Accessing Fizzy"></a>Accessing Fizzy</h2><p>First, we set up the web server proxy to point to <code>3080</code>.</p><h3 id="Nginx-Reverse-Proxy-Configuration"><a href="#Nginx-Reverse-Proxy-Configuration" class="headerlink" title="Nginx Reverse Proxy Configuration"></a>Nginx Reverse Proxy Configuration</h3><p>If you use Nginx as a reverse proxy, you can create a new site configuration, for example:</p><figure class="highlight nginx"><table><tr><td class="gutter"><pre><span class="line">1</span><br><span class="line">2</span><br><span class="line">3</span><br><span class="line">4</span><br><span class="line">5</span><br><span class="line">6</span><br><span class="line">7</span><br><span class="line">8</span><br><span class="line">9</span><br><span class="line">10</span><br><span class="line">11</span><br><span class="line">12</span><br><span class="line">13</span><br><span class="line">14</span><br><span class="line">15</span><br><span class="line">16</span><br><span class="line">17</span><br><span class="line">18</span><br><span class="line">19</span><br><span class="line">20</span><br><span class="line">21</span><br><span class="line">22</span><br><span class="line">23</span><br><span class="line">24</span><br><span class="line">25</span><br><span class="line">26</span><br><span class="line">27</span><br><span class="line">28</span><br><span class="line">29</span><br><span class="line">30</span><br><span class="line">31</span><br></pre></td><td class="code"><pre><span class="line"><span class="section">server</span> &#123;</span><br><span class="line">    <span class="attribute">listen</span> <span class="number">80</span>;</span><br><span class="line">    <span class="attribute">server_name</span> fizzy.example.com;</span><br><span class="line"></span><br><span class="line">    <span class="comment"># Automatically redirect HTTP to HTTPS</span></span><br><span class="line">    <span class="attribute">return</span> <span class="number">301</span> https://<span class="variable">$host</span><span class="variable">$request_uri</span>;</span><br><span class="line">&#125;</span><br><span class="line"></span><br><span class="line"><span class="section">server</span> &#123;</span><br><span class="line">    <span class="attribute">listen</span> <span class="number">443</span> ssl http2;</span><br><span class="line">    <span class="attribute">server_name</span> fizzy.example.com;</span><br><span class="line"></span><br><span class="line">    <span class="attribute">ssl_certificate</span> /etc/nginx/ssl/fizzy.example.com/fullchain.pem;</span><br><span class="line">    <span class="attribute">ssl_certificate_key</span> /etc/nginx/ssl/fizzy.example.com/privkey.pem;</span><br><span class="line"></span><br><span class="line">    <span class="attribute">client_max_body_size</span> <span class="number">50M</span>;</span><br><span class="line"></span><br><span class="line">    <span class="section">location</span> / &#123;</span><br><span class="line">        <span class="attribute">proxy_pass</span> http://127.0.0.1:3080;</span><br><span class="line"></span><br><span class="line">        <span class="attribute">proxy_http_version</span> <span class="number">1</span>.<span class="number">1</span>;</span><br><span class="line">        <span class="attribute">proxy_set_header</span> Host <span class="variable">$host</span>;</span><br><span class="line">        <span class="attribute">proxy_set_header</span> X-Real-IP <span class="variable">$remote_addr</span>;</span><br><span class="line">        <span class="attribute">proxy_set_header</span> X-Forwarded-For <span class="variable">$proxy_add_x_forwarded_for</span>;</span><br><span class="line">        <span class="attribute">proxy_set_header</span> X-Forwarded-Proto https;</span><br><span class="line"></span><br><span class="line">        <span class="comment"># WebSocket support</span></span><br><span class="line">        <span class="attribute">proxy_set_header</span> Upgrade <span class="variable">$http_upgrade</span>;</span><br><span class="line">        <span class="attribute">proxy_set_header</span> Connection <span class="string">&quot;upgrade&quot;</span>;</span><br><span class="line">    &#125;</span><br><span class="line">&#125;</span><br></pre></td></tr></table></figure><p>If you are using Certbot to obtain SSL certificates, you can configure the HTTP site first, and then run:</p><figure class="highlight bash"><table><tr><td class="gutter"><pre><span class="line">1</span><br></pre></td><td class="code"><pre><span class="line"><span class="built_in">sudo</span> certbot --nginx -d fizzy.example.com</span><br></pre></td></tr></table></figure><p>After configuring the certificate, visit <code>https://fizzy.example.com</code> to open Fizzy.</p><h3 id="Caddy-Reverse-Proxy-Configuration"><a href="#Caddy-Reverse-Proxy-Configuration" class="headerlink" title="Caddy Reverse Proxy Configuration"></a>Caddy Reverse Proxy Configuration</h3><p>If you use Caddy, the configuration will be even simpler. Edit the Caddyfile:</p><figure class="highlight plaintext"><table><tr><td class="gutter"><pre><span class="line">1</span><br><span class="line">2</span><br><span class="line">3</span><br></pre></td><td class="code"><pre><span class="line">fizzy.example.com &#123;</span><br><span class="line">    reverse_proxy 127.0.0.1:3080</span><br><span class="line">&#125;</span><br></pre></td></tr></table></figure><p>Caddy will automatically apply for and renew HTTPS certificates. Just make sure the domain name is correctly pointed to the server, and the server&#39;s <code>80</code> and <code>443</code> ports are open.</p><p>After editing is complete, reload Caddy:</p><figure class="highlight bash"><table><tr><td class="gutter"><pre><span class="line">1</span><br></pre></td><td class="code"><pre><span class="line"><span class="built_in">sudo</span> systemctl reload caddy</span><br></pre></td></tr></table></figure><p>Then visit:</p><figure class="highlight bash"><table><tr><td class="gutter"><pre><span class="line">1</span><br></pre></td><td class="code"><pre><span class="line">https://fizzy.example.com</span><br></pre></td></tr></table></figure><p>to enter the Fizzy login page.</p><h3 id="Register-and-Login"><a href="#Register-and-Login" class="headerlink" title="Register and Login"></a>Register and Login</h3><p>Open your browser and navigate to the <code>BASE_URL</code> domain to open the login page:</p><p><img src="https://img.nep.me/ooo/fizzy-login.webp" alt="fizzy-login.png"></p><p>Fizzy only supports logging in by receiving verification codes via email. If you have set up SMTP correctly, check your inbox for the code.</p><h3 id="Getting-the-Verification-Code-via-Docker-Command"><a href="#Getting-the-Verification-Code-via-Docker-Command" class="headerlink" title="Getting the Verification Code via Docker Command"></a>Getting the Verification Code via Docker Command</h3><p>If you think this is only for personal use and don&#39;t want to configure SMTP, you can manually query the last generated verification code using the following command:</p><figure class="highlight bash"><table><tr><td class="gutter"><pre><span class="line">1</span><br></pre></td><td class="code"><pre><span class="line">docker compose <span class="built_in">exec</span> fizzy bin/rails runner <span class="string">&#x27;p MagicLink.column_names; p MagicLink.last&amp;.attributes&#x27;</span></span><br></pre></td></tr></table></figure><p>Output:</p><figure class="highlight json"><table><tr><td class="gutter"><pre><span class="line">1</span><br></pre></td><td class="code"><pre><span class="line"><span class="punctuation">&#123;</span><span class="string">&quot;id&quot;</span> =&gt; <span class="string">&quot;abcdefg.....&quot;</span><span class="punctuation">,</span> <span class="string">&quot;code&quot;</span> =&gt; <span class="string">&quot;ABCEFG&quot;</span><span class="punctuation">,</span></span><br></pre></td></tr></table></figure><p>Just use the six characters after <code>code</code> to log in.</p><h3 id="Adding-a-Passkey"><a href="#Adding-a-Passkey" class="headerlink" title="Adding a Passkey"></a>Adding a Passkey</h3><p>However, you can&#39;t open the server to query it every time you log in. Fizzy supports adding Passkeys.</p><p>Click on the top or press <code>J</code> to open the settings panel, then click <code>My Profile</code>. In the bottom left corner, there is a <code>Manage passkey</code> button. Click it to add a Passkey. After that, you can log in quickly and conveniently.</p><img src="https://img.nep.me/ooo/fizzy-add-passkey.webp" alt="fizzy-add-passkey.png" style="width:75%;max-width:100%;height:auto" /><div class="flatpaper-note flatpaper-note--info"><span class="flatpaper-note__icon" aria-hidden="true"></span><div class="flatpaper-note__body"><p>Recommended: <a href="https://ooo.run/en/post/use-docker-run-bitwarden.html">Easily Deploy Bitwarden Server with Docker, Build Your Own Password Manager</a></p></div></div><h2 id="Usage-Guide"><a href="#Usage-Guide" class="headerlink" title="Usage Guide"></a>Usage Guide</h2><p>After entering the verification code and logging in, you will enter Fizzy&#39;s Playground main board. Currently, Fizzy only supports an English interface.</p><p><img src="https://img.nep.me/ooo/fizzy-playgroud.webp" alt="fizzy-playgroud.png"></p><p>In Fizzy, each column represents a board, which can be used to indicate the state or attributes of a task. The built-in cards explain how to use Fizzy. Briefly speaking, for the three default boards:</p><ul><li><strong>NotNow:</strong> Tasks that don&#39;t need to be processed right now. Cards that have not been updated for over 30 days will be automatically moved here.</li><li><strong>MAYBE?:</strong> Tasks that might need to be processed.</li><li><strong>DONE:</strong> Completed tasks.</li></ul><p>You can click the <code>+</code> on the right side of <code>DONE</code> to create custom boards as needed.</p><p>Start planning and organizing your tasks now!</p><h2 id="Security-Warning"><a href="#Security-Warning" class="headerlink" title="Security Warning"></a>Security Warning</h2><div class="flatpaper-note flatpaper-note--danger"><span class="flatpaper-note__icon" aria-hidden="true"></span><div class="flatpaper-note__body"><p>If you deploy Fizzy on a cloud server, do not use <code>&quot;3080:80&quot;</code> to expose the Docker container port directly to the public network. It is recommended to use <code>&quot;127.0.0.1:3080:80&quot;</code> and provide HTTPS access via an Nginx or Caddy reverse proxy.</p></div></div>]]>
    </content>
    <id>https://ooo.run/en/post/docker-run-fizzy-kanban.html</id>
    <link href="https://ooo.run/en/post/docker-run-fizzy-kanban.html"/>
    <published>2026-06-23T09:00:00.000Z</published>
    <summary>
      <![CDATA[<h2 id="Fizzy-Introduction"><a href="#Fizzy-Introduction" class="headerlink" title="Fizzy Introduction"></a>Fizzy Introduction</h2><p>Fizzy]]>
    </summary>
    <title>Deploying Fizzy with Docker: A Lightweight, Beautiful, Self-Hostable Kanban Tool</title>
    <updated>2026-06-27T01:59:20.699Z</updated>
  </entry>
  <entry>
    <author>
      <name>Mr. O</name>
    </author>
    <category term="Notes" scheme="https://ooo.run/en/categories/Notes/"/>
    <category term="OpenAI" scheme="https://ooo.run/en/tags/OpenAI/"/>
    <category term="Codex" scheme="https://ooo.run/en/tags/Codex/"/>
    <content>
      <![CDATA[<h2 id="Bug-Information"><a href="#Bug-Information" class="headerlink" title="Bug Information"></a>Bug Information</h2><div class="flatpaper-note flatpaper-note--primary"><span class="flatpaper-note__icon" aria-hidden="true"></span><div class="flatpaper-note__body"><p>Good news: OpenAI has fixed this issue in Codex version 0.142.0. You can now use it without concern.</p></div></div><p>Recently, with its powerful features and smooth user experience, Codex&#39;s weekly active users have surpassed the <strong>5 million</strong> milestone. More and more developers and tech enthusiasts have adopted it as a go-to assistant for high-frequency daily use.</p><p>However, as the user base grows, some users have reported that under certain streaming output or automated task scenarios, Codex continuously writes TRACE-level logs to the local disk.</p><p>An <a href="https://github.com/openai/codex/issues/28224">ISSUE</a> on GitHub claims that this bug can generate <strong>640GB&#x2F;year</strong> of write operations, which is lethal for consumer-grade SSDs. For mainstream 1TB or 2TB consumer-grade SSDs (with rated lifespans typically around 600TBW to 1200TBW), this is indeed quite severe.</p><p><strong>Furthermore, because the AI boom is at an unprecedented peak, the global demand for high-bandwidth, high-performance storage has erupted. This has driven up SSD prices, making storage costs quite expensive—especially on Mac devices where drives cannot be replaced. During this period when every gigabyte counts, we must be extra meticulous about every bit of wear and every gigabyte of space on our hard drives.</strong></p><hr><h2 id="1-Minute-Self-Check-Are-You-Affected"><a href="#1-Minute-Self-Check-Are-You-Affected" class="headerlink" title="1-Minute Self-Check: Are You Affected?"></a>1-Minute Self-Check: Are You Affected?</h2><p>If you are on Linux or macOS, you can run a couple of terminal commands to check your status.</p><p>First, check the log file size:</p><figure class="highlight bash"><table><tr><td class="gutter"><pre><span class="line">1</span><br></pre></td><td class="code"><pre><span class="line"><span class="built_in">ls</span> -lh ~/.codex/logs_2.sqlite</span><br></pre></td></tr></table></figure><p>Then, analyze the distribution of log levels:</p><figure class="highlight bash"><table><tr><td class="gutter"><pre><span class="line">1</span><br></pre></td><td class="code"><pre><span class="line">sqlite3 ~/.codex/logs_2.sqlite <span class="string">&quot;SELECT level, COUNT(*) FROM logs GROUP BY level ORDER BY COUNT(*) DESC&quot;</span></span><br></pre></td></tr></table></figure><p><strong>How to judge:</strong><br>If TRACE-level logs dominate the query results and the <code>logs_2.sqlite</code> file is quite large, it means Codex is indeed aggressively logging trivial tracking information in the background.</p><p><strong>Reference Data:</strong><br>My file size was <strong>468MB</strong>:</p><figure class="highlight bash"><table><tr><td class="gutter"><pre><span class="line">1</span><br><span class="line">2</span><br></pre></td><td class="code"><pre><span class="line">&gt; <span class="built_in">ls</span> -lh ~/.codex/logs_2.sqlite Jun 23</span><br><span class="line">-rw-r--r--@ 1 mro  staff   468M</span><br></pre></td></tr></table></figure><figure class="highlight bash"><table><tr><td class="gutter"><pre><span class="line">1</span><br><span class="line">2</span><br><span class="line">3</span><br><span class="line">4</span><br><span class="line">5</span><br></pre></td><td class="code"><pre><span class="line">&gt; sqlite3 ~/.codex/logs_2.sqlite <span class="string">&quot;SELECT level, COUNT(*) FROM logs GROUP BY level ORDER BY COUNT(*) DESC&quot;</span></span><br><span class="line">TRACE|39961</span><br><span class="line">INFO|39919</span><br><span class="line">DEBUG|7307</span><br><span class="line">WARN|177</span><br></pre></td></tr></table></figure><p>As we can see, <code>TRACE|39961</code> account for nearly half of the logs, confirming the existence of the reported issue, mainly because OpenAI has not officially released a fix response at the time of writing.</p><h2 id="A-Permanent-Solution-Intercept-Directly-in-the-Database"><a href="#A-Permanent-Solution-Intercept-Directly-in-the-Database" class="headerlink" title="A Permanent Solution: Intercept Directly in the Database"></a>A Permanent Solution: Intercept Directly in the Database</h2><p><mark>OpenAI has already fixed this issue, so no action is required anymore.</mark></p><p>Here is a rather aggressive but most direct workaround: add an SQLite trigger to the log table to ignore new log writes. After all, this file only contains diagnostic logs and no conversation history.</p><p>It is recommended to exit Codex and backup the log database before executing:</p><figure class="highlight bash"><table><tr><td class="gutter"><pre><span class="line">1</span><br></pre></td><td class="code"><pre><span class="line"><span class="built_in">cp</span> ~/.codex/logs_2.sqlite ~/.codex/logs_2.sqlite.bak</span><br></pre></td></tr></table></figure><p>Then execute:</p><figure class="highlight bash"><table><tr><td class="gutter"><pre><span class="line">1</span><br></pre></td><td class="code"><pre><span class="line">sqlite3 ~/.codex/logs_2.sqlite <span class="string">&quot;CREATE TRIGGER IF NOT EXISTS block_log_inserts BEFORE INSERT ON logs BEGIN SELECT RAISE(IGNORE); END;&quot;</span></span><br></pre></td></tr></table></figure><p>Once set up, new log entries will be intercepted, thereby reducing subsequent write operations.</p><p>Note that this method will affect Codex&#39;s ability to generate diagnostic logs. If you need to report issues to the official support later or are concerned about compatibility with future versions, you should avoid this workaround and opt for periodic cleanups instead.</p><details class="flatpaper-note flatpaper-note--info"><summary class="flatpaper-note__title"><span class="flatpaper-note__icon" aria-hidden="true"></span><span class="flatpaper-note__label">How to Restore</span><span class="flatpaper-note__chevron" aria-hidden="true"></span></summary><div class="flatpaper-note__body"><p>If you want to restore logging, simply drop the trigger. Exit Codex first, then run:</p><figure class="highlight bash"><table><tr><td class="gutter"><pre><span class="line">1</span><br></pre></td><td class="code"><pre><span class="line">sqlite3 ~/.codex/logs_2.sqlite <span class="string">&quot;DROP TRIGGER IF EXISTS block_log_inserts;&quot;</span></span><br></pre></td></tr></table></figure><p>After executing, check if it still exists:</p><figure class="highlight bash"><table><tr><td class="gutter"><pre><span class="line">1</span><br></pre></td><td class="code"><pre><span class="line">sqlite3 ~/.codex/logs_2.sqlite <span class="string">&quot;.schema block_log_inserts&quot;</span></span><br></pre></td></tr></table></figure><p>If there is no output, the trigger has been successfully deleted.</p><p>You can also run this command to inspect all current triggers:</p><figure class="highlight bash"><table><tr><td class="gutter"><pre><span class="line">1</span><br></pre></td><td class="code"><pre><span class="line">sqlite3 ~/.codex/logs_2.sqlite <span class="string">&quot;SELECT name, tbl_name, sql FROM sqlite_master WHERE type=&#x27;trigger&#x27;;&quot;</span></span><br></pre></td></tr></table></figure></div></details><h2 id="Summary"><a href="#Summary" class="headerlink" title="Summary"></a>Summary</h2><p>The numbers in the GitHub issue are somewhat exaggerated; Codex&#39;s logging issue is not as scary as rumored on the web. Nonetheless, we are grateful that OpenAI has fixed the bug. Happy coding with Codex!</p>]]>
    </content>
    <id>https://ooo.run/en/post/codex-is-buring-your-ssd.html</id>
    <link href="https://ooo.run/en/post/codex-is-buring-your-ssd.html"/>
    <published>2026-06-22T18:00:00.000Z</published>
    <summary>
      <![CDATA[<h2 id="Bug-Information"><a href="#Bug-Information" class="headerlink" title="Bug Information"></a>Bug Information</h2><div class="flatpaper]]>
    </summary>
    <title>Does Codex Logging Shorten SSD Lifespan? OpenAI Has Fixed It</title>
    <updated>2026-06-24T13:21:55.202Z</updated>
  </entry>
  <entry>
    <author>
      <name>Mr. O</name>
    </author>
    <category term="Notes" scheme="https://ooo.run/en/categories/Notes/"/>
    <category term="Claude" scheme="https://ooo.run/en/tags/Claude/"/>
    <category term="ChatGPT" scheme="https://ooo.run/en/tags/ChatGPT/"/>
    <content>
      <![CDATA[<p>For high-frequency users, the pay-as-you-go API pricing of Anthropic (Claude) and OpenAI (ChatGPT) is often astronomical—typically affordable only for enterprise-level users. Therefore, their monthly subscription plans are the most cost-effective choice for the vast majority of regular users.</p><p>Currently, both platforms offer three tiers of subscription plans: the basic version ($20), the 5x version ($100), and the 20x version ($200). However, to prevent abuse, these plans are restricted in practice by time windows (e.g., every 5 hours) and total weekly usage limits.</p><p>You might be curious: <strong>If we completely max out the quota of a $20 subscription account, how much API consumption is it equivalent to?</strong></p><h2 id="API-Cost-Equivalence-for-Claude-and-ChatGPT-Subscriptions"><a href="#API-Cost-Equivalence-for-Claude-and-ChatGPT-Subscriptions" class="headerlink" title="API Cost Equivalence for Claude and ChatGPT Subscriptions"></a>API Cost Equivalence for Claude and ChatGPT Subscriptions</h2><h3 id="Core-Conclusion"><a href="#Core-Conclusion" class="headerlink" title="Core Conclusion"></a>Core Conclusion</h3><p>To start with the conclusion: <strong>A $20 Claude Pro weekly quota is equivalent to approximately $100 in API value, whereas ChatGPT Plus is equivalent to $140.</strong></p><h3 id="Price-Comparison-Chart"><a href="#Price-Comparison-Chart" class="headerlink" title="Price Comparison Chart"></a>Price Comparison Chart</h3><p>A chart that recently went viral on X (formerly Twitter) visually demonstrates the massive price difference between Anthropic&#39;s and OpenAI&#39;s subscription plans versus their pay-as-you-go API pricing:</p><p><img src="https://img.nep.me/ooo/ai-sub-vs-api.webp" alt="price"></p><p>Claude Subscription vs. API Value Comparison Table:</p><table><thead><tr><th align="left">Subscription Type</th><th align="center">Monthly Fee</th><th align="right">Equivalent API Cost</th></tr></thead><tbody><tr><td align="left">claude-pro</td><td align="center">$20</td><td align="right"><strong>$400 &#x2F; month</strong></td></tr><tr><td align="left">claude-max-5x</td><td align="center">$100</td><td align="right"><strong>$2,000 &#x2F; month</strong></td></tr><tr><td align="left">claude-max-20x</td><td align="center">$200</td><td align="right"><strong>$8,000 &#x2F; month</strong></td></tr></tbody></table><h3 id="ChatGPT-Codex-Subscription-vs-API-Value-Comparison-Table"><a href="#ChatGPT-Codex-Subscription-vs-API-Value-Comparison-Table" class="headerlink" title="ChatGPT &#x2F; Codex Subscription vs. API Value Comparison Table"></a>ChatGPT &#x2F; Codex Subscription vs. API Value Comparison Table</h3><table><thead><tr><th align="left">Subscription Type</th><th align="center">Monthly Fee</th><th align="right">Equivalent API Cost</th></tr></thead><tbody><tr><td align="left">chatgpt-pro-5x</td><td align="center">$20</td><td align="right">$700 &#x2F; month</td></tr><tr><td align="left">chatgpt-pro-5x</td><td align="center">$100</td><td align="right">$3,500 &#x2F; month</td></tr><tr><td align="left">chatgpt-pro-20x</td><td align="center">$200</td><td align="right">$14,000 &#x2F; month</td></tr></tbody></table><h3 id="Theoretical-vs-Real-world-Data"><a href="#Theoretical-vs-Real-world-Data" class="headerlink" title="Theoretical vs. Real-world Data"></a>Theoretical vs. Real-world Data</h3><p>While the theoretical data in the chart is staggering, the equivalent API value here is estimated based on official API unit prices when subscription accounts reach their actual usage limits. It does not represent the platform&#39;s actual costs or profits that users can stably replicate.</p><p>According to real-world tests tracked by users in the Linux.do community, a $20 ChatGPT Plus plan&#39;s <strong>weekly consumption limit is around $140, translating to about $560 per month</strong>. The reason the chart shows a more exaggerated $700 theoretical value is largely because some Plus accounts have a chance of being allocated higher limits by the system.</p><p>In contrast, Claude&#39;s data has been corroborated by multiple sources. Based on actual feedback from a large number of individual developers and API proxies, the high-tier $200 subscription indeed consistently yields about $7,000 of equivalent API value.</p><div class="flatpaper-note flatpaper-note--info"><span class="flatpaper-note__icon" aria-hidden="true"></span><div class="flatpaper-note__body"><p><strong>Note:</strong> Following its partnership with xAI, Anthropic has temporarily increased Claude&#39;s weekly limit by 50% until July 13.</p></div></div><hr><h2 id="Additional-Discussion-Is-ChatGPT-Teams-Worth-It"><a href="#Additional-Discussion-Is-ChatGPT-Teams-Worth-It" class="headerlink" title="Additional Discussion: Is ChatGPT Teams Worth It?"></a>Additional Discussion: Is ChatGPT Teams Worth It?</h2><p>In addition to ChatGPT Plus for individuals, OpenAI offers ChatGPT Teams for teams. Recently, ChatGPT Teams has been running a continuous <strong>Buy One, Get One Free</strong> promotion: a team of two Teams seats only needs to pay for one seat. When calculated, the total cost is almost the same as buying a single Plus subscription, and depending on regional exchange rates, the final cost might even be under $20.</p><p>Regarding quotas, officially Teams accounts have the same conversation limits as Plus, but real-world tests by users reveal some <strong>unspoken rules</strong>:</p><ol><li><strong>Slightly reduced daily quota:</strong> Generally, a normal Team account has a weekly equivalent API limit of about <strong>$105</strong> (lower than the $140&#x2F;week of a full-limit Plus account). However, if you participate in the buy-one-get-one promotion, the combined total availability of the two accounts is still greater than that of a single Plus account.  </li><li><strong>5H window limit is lower than Plus:</strong> According to feedback from Linux.do users, the total weekly limit of Teams is currently somewhat controversial; however, in a single 5-hour window, Plus&#39;s limit is typically higher than Teams&#39;. In community testing, the equivalent API consumption for a single 5H window on Teams was about $16.</li><li><strong>Beware of &quot;throttled&quot; accounts under risk control:</strong> Some Team accounts are downgraded to <strong>throttled versions</strong> due to triggering risk control mechanisms. The weekly limit (Codex) of these accounts is only about 0.5x that of a Plus account. In comparison, regular Plus accounts are actually more stable in terms of limits.<br>Compared to Plus, Teams&#39; own advantage is that it allows using the GPT 5.5 Pro model in the web version with a limited number of monthly queries, and data is <a href="https://chatgpt.com/zh-Hans-CN/pricing/?type=team">not used</a> for model training by default.</li></ol><div class="flatpaper-note flatpaper-note--info"><span class="flatpaper-note__icon" aria-hidden="true"></span><div class="flatpaper-note__body"><p>Personally, I purchased the Teams 1+1. The 5H limit balance for one account is $16-$18. A single 5H session consumes about 16% of the weekly quota, so the weekly limit is around $100-$110.</p></div></div><h3 id="Summary"><a href="#Summary" class="headerlink" title="Summary:"></a>Summary:</h3><p>If a high-frequency user can continuously max out their subscription limits, a $20-tier AI subscription plan typically yields hundreds of dollars in API call value. Claude Pro&#39;s monthly equivalent API value is in the range of $400, while ChatGPT Plus can range around $560 to $700 depending on account types, models, and risk control status.</p>]]>
    </content>
    <id>https://ooo.run/en/post/how-much-can-you-save-with-subscription-vs-api.html</id>
    <link href="https://ooo.run/en/post/how-much-can-you-save-with-subscription-vs-api.html"/>
    <published>2026-06-21T11:00:00.000Z</published>
    <summary>
      <![CDATA[<p>For high-frequency users, the pay-as-you-go API pricing of Anthropic (Claude) and OpenAI (ChatGPT) is often astronomical—typically afford]]>
    </summary>
    <title>Maximizing AI Subscriptions: How Much Do Claude Pro and ChatGPT Plus Really Save?</title>
    <updated>2026-06-24T13:25:47.119Z</updated>
  </entry>
  <entry>
    <author>
      <name>Mr. O</name>
    </author>
    <category term="Tools &amp; Resources" scheme="https://ooo.run/en/categories/Tools-Resources/"/>
    <category term="AI" scheme="https://ooo.run/en/tags/AI/"/>
    <category term="Apple" scheme="https://ooo.run/en/tags/Apple/"/>
    <category term="Darkbloom" scheme="https://ooo.run/en/tags/Darkbloom/"/>
    <category term="MacBook" scheme="https://ooo.run/en/tags/MacBook/"/>
    <content>
      <![CDATA[<p>Once, countless people frantically hoarded graphics cards for Bitcoin and Ethereum, turning their homes into roaring mining farms. As the era of traditional cryptocurrency GPU mining gradually cooled down, many assumed the days of earning passive income using personal computers were over. However, with the explosion of the generative AI era, a brand-new &quot;mining&quot; model is quietly emerging—AI node inference power sharing.</p><p>Recently, along with advances in local model capabilities, the emergence of the <a href="https://www.darkbloom.dev/#nodes">Darkbloom</a> platform has revealed this potential path. In this new era, instead of calculating meaningless hashes, you turn your computer into a piece of AI infrastructure, earning revenue by running Large Language Models (like <code>Gemma 4 26B</code>) for real users. In this new game, Apple&#39;s Mac computers, powered by their high-bandwidth unified memory architecture, have unexpectedly become the perfect &quot;mining rigs.&quot;</p><h2 id="Introduction-to-Darkbloom"><a href="#Introduction-to-Darkbloom" class="headerlink" title="Introduction to Darkbloom"></a>Introduction to Darkbloom</h2><p><a href="https://www.darkbloom.dev/">Darkbloom.dev</a> can turn your MacBook into a revenue-generating private hardware node network. Users simply install a command-line interface (CLI) on their Mac, and the device will automatically receive and process AI inference requests when idle. Developers can call this distributed computing power through an OpenAI-compatible API. For every token generated by the device, node operators earn dollar-denominated revenue. </p><p>The technology behind this project comes from Eigen Labs, and the related paper and code have been open-sourced. Its key selling point is allowing consumer Apple Silicon devices to participate in the AI inference market while preserving the privacy of user requests.<br>Link: <a href="https://github.com/Layr-Labs/d-inference/blob/master/papers/dginf-private-inference.pdf">https://github.com/Layr-Labs/d-inference/blob/master/papers/dginf-private-inference.pdf</a></p><h2 id="Turning-a-Mac-into-an-AI-Server-How-Much-Can-You-Actually-Earn"><a href="#Turning-a-Mac-into-an-AI-Server-How-Much-Can-You-Actually-Earn" class="headerlink" title="Turning a Mac into an AI Server: How Much Can You Actually Earn?"></a>Turning a Mac into an AI Server: How Much Can You Actually Earn?</h2><p>According to the creators, node operators receive 95% of the inference revenue, with the platform taking a 5% cut.</p><p>Aside from the hardware itself, the only operational cost is electricity, and Apple Silicon consumes very little power. Even under full inference load, it costs only $0.01 to $0.03 per hour. It&#39;s like leaving a single lightbulb on.</p><p>Let&#39;s look at the earnings estimates provided by Darkbloom:</p><h3 id="1-The-Top-Tier-Money-Machine-MacBook-Pro-M5-Max-128GB-Unified-Memory"><a href="#1-The-Top-Tier-Money-Machine-MacBook-Pro-M5-Max-128GB-Unified-Memory" class="headerlink" title="1. The Top-Tier Money Machine: MacBook Pro (M5 Max, 128GB Unified Memory)"></a>1. The Top-Tier Money Machine: MacBook Pro (M5 Max, 128GB Unified Memory)</h3><p>If you own a high-end MacBook Pro configured with an M5 Max chip and 128GB of RAM, this machine is practically built for running LLMs. Its massive memory pool can easily accommodate and even concurrently process large models.</p><ul><li><strong>Operating State</strong>: Running 18 hours a day (e.g., idle time after work).</li><li><strong>Processing Speed</strong>: Batch decoding speed reaches a staggering <code>1326.2</code> tok&#x2F;s.</li><li><strong>Monthly Earnings</strong>: Estimated gross monthly revenue is around <strong>$425.40</strong>. After deducting electricity costs, the net monthly earnings are about $423!</li></ul><p>Over a year, that adds up to <strong>$5,076</strong>. Since an <strong>M5 Max + 128GB RAM + 2TB</strong> version currently retails for <strong>$5,399</strong> on the official Apple store, this revenue is not only enough to recoup the cost of purchasing the computer, it&#39;s essentially equivalent to the Mac working to pay off its own loan.</p><p><img src="https://img.nep.me/ooo/darkbloom-m5max.webp" alt="Darkbloom M5 Max Earnings Estimates"></p><h3 id="2-The-Mid-Range-Workhorse-MacBook-Pro-M4-Pro-48GB-Unified-Memory"><a href="#2-The-Mid-Range-Workhorse-MacBook-Pro-M4-Pro-48GB-Unified-Memory" class="headerlink" title="2. The Mid-Range Workhorse: MacBook Pro (M4 Pro, 48GB Unified Memory)"></a>2. The Mid-Range Workhorse: MacBook Pro (M4 Pro, 48GB Unified Memory)</h3><p>If you are using a mainstream workstation setup, such as the version configured with an M4 Pro chip and 48GB of RAM:</p><ul><li><strong>Operating State</strong>: Also running 18 hours a day.</li><li><strong>Processing Speed</strong>: <code>589.7</code> tok&#x2F;s.</li><li><strong>Monthly Earnings</strong>: You can still earn a net income of approximately <strong>$188</strong> per month.</li></ul><p>That&#39;s $2,252 a year. For passive income generated purely by utilizing the computer&#39;s idle time, this is an excellent stream of extra pocket money.</p><p><img src="https://img.nep.me/ooo/darkbloom-m4pro.webp" alt="Darkbloom M4 Pro Earnings Estimates"></p><h2 id="The-Mind-Blowing-Energy-Efficiency-of-Apple-Silicon"><a href="#The-Mind-Blowing-Energy-Efficiency-of-Apple-Silicon" class="headerlink" title="The Mind-Blowing Energy Efficiency of Apple Silicon"></a>The Mind-Blowing Energy Efficiency of Apple Silicon</h2><p>The biggest headaches of traditional mining are high electricity bills and the noise of fans spinning at full blast. In this new era of AI mining, however, Apple&#39;s M-series chips display a truly mind-blowing energy efficiency ratio.</p><p>Assuming an electricity rate of $0.15&#x2F;kWh, the M5 Max MacBook Pro that earns you $425 a month consumes only $2.43 in power over the entire month; the monthly power bill for the M4 Pro version is even lower at $1.46. The electricity cost represents less than 1% of the total revenue. There are no screaming fans, no sky-high utility bills—only the elegant silence of running large models in the background to generate income.</p><p>Compute demand in the AI era is practically infinite, and decentralized consumer computing networks might just be the next gold mine. Your Mac is no longer just an expensive productivity tool—it has full potential to become your &quot;digital employee.&quot;</p><h2 id="Summary-Risk-Warnings"><a href="#Summary-Risk-Warnings" class="headerlink" title="Summary &amp; Risk Warnings"></a>Summary &amp; Risk Warnings</h2><p>Naturally, as with any emerging domain, we should maintain realistic expectations. Currently, platforms like Darkbloom have sparked open discussions across developer communities like Hacker News, Reddit, and LinkedIn. The good news is that there are no reports of scams; however, according to feedback from early node testers, the tasks allocated in the network are still predominantly &quot;Health Checks,&quot; meaning actual commercial inference demand remains low. Consequently, the high predictions provided by the official calculator are relatively optimistic.</p><p>More importantly, the pace of advancement in LLMs is blistering. The open-source community has already iterated to massive yet efficient models like Gemma 4 26B. Architectural algorithms, quantization methods, and throughput optimizations are updated almost monthly. While today&#39;s hardware configuration might be perfectly aligned to reap the benefits, in three months, the launch of even larger and more powerful models could completely redefine the bandwidth and hardware requirements across the network.</p><p>This is bound to be a race against technological evolution. Future actual earnings will be heavily dependent on the growth of real-world commercial request volume, the speed of model updates, and the platform&#39;s ongoing operations.</p><div class="flatpaper-note flatpaper-note--warning"><span class="flatpaper-note__icon" aria-hidden="true"></span><div class="flatpaper-note__body"><p>Please remember that the data above is for reference only. You can look at these estimated figures as an interesting reference.</p></div></div>]]>
    </content>
    <id>https://ooo.run/en/post/darkbloom-nodes-macbook-ai-mining-earnings.html</id>
    <link href="https://ooo.run/en/post/darkbloom-nodes-macbook-ai-mining-earnings.html"/>
    <published>2026-06-19T07:58:25.000Z</published>
    <summary>
      <![CDATA[<p>Once, countless people frantically hoarded graphics cards for Bitcoin and Ethereum, turning their homes into roaring mining farms. As the]]>
    </summary>
    <title>A New Era of Mining: See How Much Your Mac Can Earn per Month</title>
    <updated>2026-06-27T18:42:05.266Z</updated>
  </entry>
  <entry>
    <author>
      <name>Mr. O</name>
    </author>
    <category term="Open Source" scheme="https://ooo.run/en/categories/Open-Source/"/>
    <category term="GitHub" scheme="https://ooo.run/en/tags/GitHub/"/>
    <category term="Open Source" scheme="https://ooo.run/en/tags/Open-Source/"/>
    <category term="Three.js" scheme="https://ooo.run/en/tags/Three-js/"/>
    <content>
      <![CDATA[<h2 id="Project-Introduction"><a href="#Project-Introduction" class="headerlink" title="Project Introduction"></a>Project Introduction</h2><p>In this era where everything can run on the Web, we have seen countless stunning browser-based applications. But if you are a developer who is passionate about <strong>world building</strong>, loves <strong>sandbox games</strong>, or is excited by modern frontend and 3D rendering technologies, today&#39;s open-source project will definitely catch your eye: <strong>Tiny World Builder</strong>.</p><ul><li>Live Demo: <a href="https://tinyworld.build/tiny-world-builder">https://tinyworld.build/tiny-world-builder</a></li><li>Repository: <a href="https://github.com/jasonkneen/tiny-world-builder">https://github.com/jasonkneen/tiny-world-builder</a></li></ul><p>Preview:</p><p><img src="https://img.nep.me/ooo/project-tinyworldbuilder.webp" alt="project-tinyworldbuilder.webp"></p><h2 id="What-is-this-project"><a href="#What-is-this-project" class="headerlink" title="What is this project?"></a>What is this project?</h2><p><strong>Tiny World Builder</strong> is a browser-based 3D mini-world builder created by developer Jason Kneen. Open the webpage, and you will get an 8x8 grid plot floating in the void. With simple clicks and drag shortcuts, you can place grasslands, rivers, snowfields, or build staggered houses, farmlands, and bridges to your heart&#39;s content.</p><p>It features a voxel style and fresh isometric view similar to <em>Minecraft</em>, but focuses more on building miniature landscapes from a macro &quot;god-eye view.&quot; No need to download any clients—just open your browser and start creating immediately.</p><h2 id="Core-Highlights-More-Than-Just-Stacking-Blocks"><a href="#Core-Highlights-More-Than-Just-Stacking-Blocks" class="headerlink" title="Core Highlights: More Than Just &quot;Stacking Blocks&quot;"></a>Core Highlights: More Than Just &quot;Stacking Blocks&quot;</h2><h3 id="1-Smart-Adjacent-Logic"><a href="#1-Smart-Adjacent-Logic" class="headerlink" title="1. Smart Adjacent Logic"></a>1. Smart Adjacent Logic</h3><p>This is definitely one of the coolest features of the project. When building, you don&#39;t need to manually select models for &quot;house corners&quot; or &quot;T-intersections.&quot; The underlying rendering logic automatically calculates layout based on the adjacent blocks you place:</p><ul><li><strong>Roads and Rivers</strong>: Water surfaces automatically generate riverbanks, and roads automatically connect to form complex road networks.</li><li><strong>Building Clusters</strong>: When you place houses in adjacent grids, they automatically merge into L-shaped, T-shaped, or large square connected structures.</li><li><strong>Ecological Integration</strong>: Bridges automatically align to the direction of the water, and crops automatically convert the underlying ground blocks into soil. This &quot;what you see is what you get&quot; smooth feeling greatly enhances the building experience.</li></ul><h3 id="2-Lively-Vehicle-AI-Dynamic-Ecosystem"><a href="#2-Lively-Vehicle-AI-Dynamic-Ecosystem" class="headerlink" title="2. Lively Vehicle AI &amp; Dynamic Ecosystem"></a>2. Lively Vehicle AI &amp; Dynamic Ecosystem</h3><p>This world is not static! The system has a complete built-in runtime vehicle AI.</p><p>When you place pathfinding robots or vehicles on the roads, they automatically navigate through the road network to search for targets. What&#39;s even more interesting is its dynamic obstacle avoidance and re-routing mechanism: if you suddenly place a large rock or plant a tree in the middle of the road, the vehicle will determine that the path ahead is blocked, attempt to plan a new route, or patiently line up and wait if it is impassable. Combined with swaying trees and dynamic cloud shadows, the entire miniature world is full of life.</p><h3 id="3-Powerful-Terrain-Sculpting"><a href="#3-Powerful-Terrain-Sculpting" class="headerlink" title="3. Powerful Terrain Sculpting"></a>3. Powerful Terrain Sculpting</h3><p>In addition to simply laying down blocks, the project also offers an advanced &quot;grid terrain sculpting&quot; mode. Once enabled, you can use your mouse like stretching modeling clay to raise or lower specific areas of the terrain. Combined with smooth tension decay, this lets you easily shape cliffs, basins, or rolling mountains.</p><h3 id="4-Day-Night-Cycle-Dynamic-Weather-System"><a href="#4-Day-Night-Cycle-Dynamic-Weather-System" class="headerlink" title="4. Day-Night Cycle &amp; Dynamic Weather System"></a>4. Day-Night Cycle &amp; Dynamic Weather System</h3><p>How can a living world be complete without changing weather and shifting seasons? Tiny World Builder doesn&#39;t stop at just displaying &quot;static models&quot;; it provides you with an extremely detailed environmental control panel.</p><img src="https://img.nep.me/ooo/project-twb-01.webp?version=1" style="width:50%;" alt="project-twb-01.jpg" /><p>As shown in the screenshot, clicking the &quot;sun&quot; icon on the left calls up the powerful Time &amp; Weather settings menu, turning you into a creator who controls nature:</p><ul><li><strong>Precise Day-Night Cycle</strong>: Through the &quot;Time of day&quot; slider, you can freely change the world&#39;s clock (e.g., 10:55 in the image). As you drag the slider, you can visually watch the shifting of light and shadow, the changing angle of the sun, and the lighting up of night lamps, instantly elevating the atmosphere.</li><li><strong>One-Click Seasonal Change</strong>: Provides tabs for four seasons: Spring, Summer, Autumn, and Winter. With a single click, your world seamlessly transitions between vibrant spring, lush summer, golden autumn leaves, and white winter snow.</li><li><strong>Diverse Weather Presets</strong>: Whether you want a sunny day, cloudy skies perfect for a stroll, drizzling rain, lightning-filled thunderstorms, or beautiful snowy scenes, they are all at your disposal.</li><li><strong>Fine-Tuning of Effects</strong>: The system does not just apply a filter; it gives you the power to control particle physics properties:<ul><li>Weather Intensity: Sliding this (e.g., 25% in the image) directly controls the density of falling particles in the sky and the intensity of the storm.</li><li>Splashes &#x2F; Accumulation: Sliding this (e.g., 150% in the image) controls the splashback of raindrops hitting the ground, the accumulation rate of surface water, and even the snow thickness on roofs and trees in winter!</li></ul></li></ul><p>In short, whether you want to build a cozy, quiet afternoon town or a cyber outpost in a heavy downpour, this dynamic weather system perfectly meets your visual needs.</p><h2 id="Geek-Time-Hardcore-Underlying-Tech"><a href="#Geek-Time-Hardcore-Underlying-Tech" class="headerlink" title="Geek Time: Hardcore Underlying Tech"></a>Geek Time: Hardcore Underlying Tech</h2><p>For full-stack developers, the source code of this project is a goldmine:</p><ul><li><strong>Ultimate Purity &amp; Performance</strong>: The core logic is built with nearly 30,000 lines of Vanilla JS (native JavaScript), and the rendering layer is powered by <strong>Three.js</strong>. It adopts object animation queues and render-on-demand mechanisms, ensuring a highly fluid frame rate even in large, complex urban road networks.</li><li><strong>Rich Feature Stack</strong>: Supports local browser storage, and import&#x2F;export of standard JSON Schema data. What&#39;s even more exciting is its integration of PartyKit for real-time multi-user collaborative building, along with Netlify Identity for authentication.</li></ul><h2 id="Who-is-this-tool-for"><a href="#Who-is-this-tool-for" class="headerlink" title="Who is this tool for?"></a>Who is this tool for?</h2><ul><li><strong>Game Designers &amp; World-Builders</strong>: Whether you are brainstorming a fantasy cultivation world or a cyberpunk mech outpost, it helps you rapidly build terrain prototypes and level blockouts, instantly visualizing abstract text requirements.</li><li><strong>WebGL &#x2F; Frontend Learners</strong>: Curious about how to write a 3D rendering engine and dynamic pathfinding system from scratch in a browser? Cloning its GitHub repository and reading the pure code architecture is the best way to advance.</li><li><strong>Stress-Relief &amp; Idle-Gaming Enthusiasts</strong>: Simply want to relax your brain during work breaks? Listening to ambient sounds, molding a small island, and watching little cars drive around is the ultimate digital Zen garden.</li></ul><h2 id="Conclusion"><a href="#Conclusion" class="headerlink" title="Conclusion"></a>Conclusion</h2><p>Tiny World Builder perfectly exemplifies the concept of &quot;small but beautiful&quot; on the Web. It is not only an excellent open-source project showing off frontend 3D capabilities, but also a miniature sandbox for creativity.</p><p>Go ahead and click the <a href="https://tinyworld.build/tiny-world-builder">Official Website Link</a> to sculpt your own mini-archipelago! If you are a developer, don&#39;t forget to head over to <a href="https://github.com/jasonkneen/tiny-world-builder">GitHub</a> and give the author a 🌟 Star to support this amazing personal open-source project.</p>]]>
    </content>
    <id>https://ooo.run/en/post/project-tiny-world-builder.html</id>
    <link href="https://ooo.run/en/post/project-tiny-world-builder.html"/>
    <published>2026-06-16T06:36:23.000Z</published>
    <summary>
      <![CDATA[<h2 id="Project-Introduction"><a href="#Project-Introduction" class="headerlink" title="Project Introduction"></a>Project Introduction</h2><]]>
    </summary>
    <title>Open Source Treasure: Tiny World Builder - Create Mini Worlds in Your Browser</title>
    <updated>2026-06-24T13:21:55.198Z</updated>
  </entry>
  <entry>
    <author>
      <name>Mr. O</name>
    </author>
    <category term="News" scheme="https://ooo.run/en/categories/News/"/>
    <category term="Claude Fable 5" scheme="https://ooo.run/en/tags/Claude-Fable-5/"/>
    <content>
      <![CDATA[<h2 id="AI-s-Digital-Iron-Curtain-Falls-Claude-Fable-5-Restricted-by-Export-Control"><a href="#AI-s-Digital-Iron-Curtain-Falls-Claude-Fable-5-Restricted-by-Export-Control" class="headerlink" title="AI&#39;s &#39;Digital Iron Curtain&#39; Falls: Claude Fable 5 Restricted by Export Control"></a>AI&#39;s &#39;Digital Iron Curtain&#39; Falls: Claude Fable 5 Restricted by Export Control</h2><p>On June 13, 2026, Beijing time, just three days after Claude Fable 5 went online, Anthropic posted a shocking <a href="https://x.com/AnthropicAI/status/2065597531644743999">statement</a> on its social media platform: <strong>due to an export control directive issued by the US government citing national security authorities, which suspends access to Fable 5 and Mythos 5 by any foreign nationals</strong>, the company had to abruptly disable these two models for all customers to ensure compliance.</p><blockquote><p>The US government, citing national security authorities, has issued an export control directive to suspend all access to Fable 5 and Mythos 5 by any foreign national, whether inside or outside the United States, including foreign national Anthropic employees.</p><p>The net effect of this order is that we must abruptly disable Fable 5 and Mythos 5 for all our customers to ensure compliance.</p><p>Access to all other Claude models is not affected.</p></blockquote><p>In Anthropic&#39;s official website <a href="https://www.anthropic.com/news/fable-mythos-access">statement</a>, they indicated that the US government issued the ban based on the discovery of a method to bypass or crack Fable 5&#39;s constraints (commonly known as LLM <strong>jailbreaking</strong>).</p><p>Although other Claude models remain unaffected for now, this brief statement is nothing short of a bombshell in the generative AI space. It not only marks the deprecation of a specific model, but also signals a fundamental shift in the underlying logic of the entire industry.</p><h2 id="Core-Shift-From-Compute-Hegemony-to-Model-Sovereignty"><a href="#Core-Shift-From-Compute-Hegemony-to-Model-Sovereignty" class="headerlink" title="Core Shift: From &#39;Compute Hegemony&#39; to &#39;Model Sovereignty&#39;"></a>Core Shift: From &#39;Compute Hegemony&#39; to &#39;Model Sovereignty&#39;</h2><p>In the past, the focus of geopolitical rivalry and industry competition remained heavily on the hardware layer—whoever controlled the most advanced GPUs and semiconductor manufacturing processes held the lifeline of AI development.</p><p>However, the Fable 5 incident demonstrates that by 2026, the core value of state-of-the-art AI has officially shifted from &#39;training infrastructure&#39; to &#39;the model itself.&#39; When a cutting-edge model possesses the following traits, it is no longer just commercial software, but a veritable national strategic technology asset:</p><ul><li>Top-tier scientific research and discovery capabilities</li><li>Deep autonomous programming and debugging capabilities</li><li>Long-horizon planning and execution for complex tasks</li><li>Automated cyber offensive&#x2F;defensive operations and security penetration</li></ul><p>The US government&#39;s logic in blocking Fable 5 is identical to its previous approach to restricting high-end semiconductor exports. Through the lens of national security, software possessing these capabilities shares the same potential impact and strategic significance as advanced military hardware.</p><h2 id="Fatal-Paradox-Anthropic-Bitten-by-Its-Own-Safety-Card"><a href="#Fatal-Paradox-Anthropic-Bitten-by-Its-Own-Safety-Card" class="headerlink" title="Fatal Paradox: Anthropic Bitten by Its Own &#39;Safety Card&#39;"></a>Fatal Paradox: Anthropic Bitten by Its Own &#39;Safety Card&#39;</h2><p>The most dramatic aspect of this incident lies in Anthropic&#39;s long-established brand. As the industry&#39;s most prominent advocate for the &#39;AI safety roadmap,&#39; Anthropic has frequently showcased in public the powerful and even &#39;dangerous&#39; capabilities of its models in cybersecurity, biological sciences assistance, and autonomous agents.</p><p>This strategy was highly successful commercially:</p><ul><li>To investors: It proved they possessed technical capabilities closing in on AGI.</li><li>To regulators: It demonstrated the company&#39;s transparency and commitment to addressing potential risks.</li></ul><p><strong>Yet, this is a fatal paradox</strong>:<br>To prove a model is sufficiently powerful, a company must fully demonstrate its potential destructiveness. But once this risk is repeatedly highlighted and widely accepted, it inevitably triggers regulatory alarm bells. Anthropic&#39;s recent spotlight on the hazardous capabilities of Fable 5 and Mythos 5 ultimately served as the key justification for regulators to step in.</p><h2 id="The-New-Normal-The-End-of-the-Internet-s-Borderless-Era"><a href="#The-New-Normal-The-End-of-the-Internet-s-Borderless-Era" class="headerlink" title="The New Normal: The End of the Internet&#39;s &#39;Borderless Era&#39;"></a>The New Normal: The End of the Internet&#39;s &#39;Borderless Era&#39;</h2><p>The deprecation of Fable 5 is just the beginning; the real cause for concern is the policy precedent it sets. If governments can intervene directly to restrict global access to specific AI models, we are likely heading toward a new era of heavily fortified &#39;technological borders.&#39;</p><p>In the future, the globally unified SaaS model for AI software may collapse, replaced by highly fragmented access mechanisms:</p><ul><li><strong>Nationality-Based Segregation</strong>: Users from different countries might only be allowed to access neutered or completely different versions of the models.</li><li><strong>Modular Permission Control</strong>: Access to critical capability modules, such as scientific research or programming, will be subject to strict licensing limitations.</li><li><strong>Hierarchical Access Levels</strong>: Individual consumers, ordinary enterprises, and highly credentialed research or government organizations will get vastly different access privileges.</li></ul><p>While the focus in the past was on <strong>data sovereignty</strong>, the core battleground of the future will be <strong>model sovereignty</strong>.</p><h2 id="The-Unresolved-Question-Will-GPT-5-5-Suffer-the-Same-Fate"><a href="#The-Unresolved-Question-Will-GPT-5-5-Suffer-the-Same-Fate" class="headerlink" title="The Unresolved Question: Will GPT-5.5 Suffer the Same Fate?"></a>The Unresolved Question: Will GPT-5.5 Suffer the Same Fate?</h2><p>Witnessing Claude&#39;s situation, user anxiety quickly spread to its rivals: Will OpenAI&#39;s GPT-5.5 become the next target of export controls? This is particularly relevant given that Anthropic&#39;s official website <a href="https://www.anthropic.com/news/fable-mythos-access">statement</a> included the following:</p><blockquote><p>We have reviewed a report believed to be the basis of the government&#39;s directive. We have verified that the level of capability demonstrated in the report is widely present in other models (including OpenAI&#39;s GPT-5.5) and is used daily by defenders maintaining system security.</p></blockquote><p>Anthropic argues that this situation is essentially a misunderstanding. The so-called &#39;jailbreaks&#39; do not reflect general, high-risk capabilities, but rather narrow, non-generalizable vulnerabilities. They claim similar capabilities are widespread in other publicly available models and should not be singled out as a basis for export control.</p><p>From the full text of the statement, Anthropic clearly opposes the export control policies. Its core objective is obviously self-preservation, rather than dragging its competitors down with it. What they truly hope to achieve is a re-evaluation of the risks associated with Claude Fable 5 by regulators, ultimately lifting the access restrictions.</p><p>After all, if the flagship models of both AI giants are restricted in sequence, it won&#39;t just be a crisis for a single company—it could mark a dark moment for the entire open technology ecosystem.</p><h2 id="Conclusion-The-End-of-the-AI-Open-Era"><a href="#Conclusion-The-End-of-the-AI-Open-Era" class="headerlink" title="Conclusion: The End of the AI &#39;Open Era&#39;"></a>Conclusion: The End of the AI &#39;Open Era&#39;</h2><p>Looking back at the past three years, the LLM industry has enjoyed a hyper-speed, globalized feast. Model capabilities leaped exponentially, costs consistently plummeted toward rock bottom, and global users could seamlessly access humanity&#39;s most advanced intellectual achievements, virtually ignoring geographical boundaries.</p><p>But the Fable 5 incident on June 13 marks a cold, historic watershed.</p><p>It signals that advanced AI has officially transcended the realm of simple &#39;consumer technology&#39; and is now placed on the strategic chessboard alongside nuclear weapons, aerospace tech, and advanced semiconductor fabrication. For ordinary people, the biggest shock is not the temporary unavailability of a single chat interface, but the stark realization of a harsh future:</p><p>The &#39;Inclusive AI&#39; utopia built on technological globalization is fading. In its place, we are entering an era of a digital iron curtain, where the intelligent world is strictly partitioned by power, nationality, and security policies.</p>]]>
    </content>
    <id>https://ooo.run/en/post/us-government-ban-claude-fable-5.html</id>
    <link href="https://ooo.run/en/post/us-government-ban-claude-fable-5.html"/>
    <published>2026-06-13T03:22:24.000Z</published>
    <summary>
      <![CDATA[<h2 id="AI-s-Digital-Iron-Curtain-Falls-Claude-Fable-5-Restricted-by-Export-Control"><a href="#AI-s-Digital-Iron-Curtain-Falls-Claude-Fable-]]>
    </summary>
    <title>Breaking: US Government Issues Ban on Claude Fable 5</title>
    <updated>2026-06-24T13:21:55.198Z</updated>
  </entry>
  <entry>
    <author>
      <name>Mr. O</name>
    </author>
    <category term="Tutorial" scheme="https://ooo.run/en/categories/Tutorial/"/>
    <category term="Nginx" scheme="https://ooo.run/en/tags/Nginx/"/>
    <category term="Caddy" scheme="https://ooo.run/en/tags/Caddy/"/>
    <content>
      <![CDATA[<p>If you are selecting a reverse proxy or Web server for a website, API, or a group of containers, you will likely hesitate between Nginx and Caddy in 2026. This article does not take sides; instead, it breaks down the differences between the two in terms of configuration experience, HTTPS, performance, ecosystem, and extensibility, followed by clear recommendation guidelines.</p><h2 id="A-Quick-Introduction-to-the-Contenders"><a href="#A-Quick-Introduction-to-the-Contenders" class="headerlink" title="A Quick Introduction to the Contenders"></a>A Quick Introduction to the Contenders</h2><ul><li><strong>Nginx</strong>: Born in 2004, written in C, and a pioneer of event-driven architecture. It holds a dominant share of the global Web server market and is practically synonymous with &quot;reverse proxy.&quot;</li><li><strong>Caddy</strong>: Released in 2015, written in Go, and features &quot;HTTPS by default&quot; and minimalist configuration. Rewritten for Caddy 2, it is built around a modular architecture and a JSON configuration API.</li></ul><h2 id="Configuration-Experience-The-Most-Obvious-Difference"><a href="#Configuration-Experience-The-Most-Obvious-Difference" class="headerlink" title="Configuration Experience: The Most Obvious Difference"></a>Configuration Experience: The Most Obvious Difference</h2><p>Let&#39;s look at the most common requirement: reverse proxying <code>example.com</code> to port 8080 locally, with HTTPS enabled.</p><p><strong>Caddy (Caddyfile, 3 lines):</strong></p><figure class="highlight plaintext"><table><tr><td class="gutter"><pre><span class="line">1</span><br><span class="line">2</span><br><span class="line">3</span><br></pre></td><td class="code"><pre><span class="line">example.com &#123;</span><br><span class="line">    reverse_proxy localhost:8080</span><br><span class="line">&#125;</span><br></pre></td></tr></table></figure><p>Automatic certificate requests, automatic renewal, and automatic HTTP-to-HTTPS redirect—all configured by default.</p><p><strong>Nginx (approx. 25 lines + certbot):</strong></p><figure class="highlight nginx"><table><tr><td class="gutter"><pre><span class="line">1</span><br><span class="line">2</span><br><span class="line">3</span><br><span class="line">4</span><br><span class="line">5</span><br><span class="line">6</span><br><span class="line">7</span><br><span class="line">8</span><br><span class="line">9</span><br><span class="line">10</span><br><span class="line">11</span><br><span class="line">12</span><br><span class="line">13</span><br><span class="line">14</span><br><span class="line">15</span><br><span class="line">16</span><br><span class="line">17</span><br><span class="line">18</span><br><span class="line">19</span><br><span class="line">20</span><br><span class="line">21</span><br></pre></td><td class="code"><pre><span class="line"><span class="section">server</span> &#123;</span><br><span class="line">    <span class="attribute">listen</span> <span class="number">80</span>;</span><br><span class="line">    <span class="attribute">server_name</span> example.com;</span><br><span class="line">    <span class="attribute">return</span> <span class="number">301</span> https://<span class="variable">$host</span><span class="variable">$request_uri</span>;</span><br><span class="line">&#125;</span><br><span class="line"></span><br><span class="line"><span class="section">server</span> &#123;</span><br><span class="line">    <span class="attribute">listen</span> <span class="number">443</span> ssl http2;</span><br><span class="line">    <span class="attribute">server_name</span> example.com;</span><br><span class="line"></span><br><span class="line">    <span class="attribute">ssl_certificate</span>     /etc/letsencrypt/live/example.com/fullchain.pem;</span><br><span class="line">    <span class="attribute">ssl_certificate_key</span> /etc/letsencrypt/live/example.com/privkey.pem;</span><br><span class="line"></span><br><span class="line">    <span class="section">location</span> / &#123;</span><br><span class="line">        <span class="attribute">proxy_pass</span> http://localhost:8080;</span><br><span class="line">        <span class="attribute">proxy_set_header</span> Host <span class="variable">$host</span>;</span><br><span class="line">        <span class="attribute">proxy_set_header</span> X-Real-IP <span class="variable">$remote_addr</span>;</span><br><span class="line">        <span class="attribute">proxy_set_header</span> X-Forwarded-For <span class="variable">$proxy_add_x_forwarded_for</span>;</span><br><span class="line">        <span class="attribute">proxy_set_header</span> X-Forwarded-Proto <span class="variable">$scheme</span>;</span><br><span class="line">    &#125;</span><br><span class="line">&#125;</span><br></pre></td></tr></table></figure><p>Additionally, you have to run <code>certbot</code> manually to request certificates and configure a cron job for renewal.</p><p>To be fair, however, Nginx&#39;s verbosity brings <strong>explicitness and precision</strong>. Every single line of <code>proxy_set_header</code> is visible and customizable, whereas Caddy&#39;s operations are hidden in defaults, requiring you to understand its underlying behavior when troubleshooting. For large-scale configurations where precise control over headers, buffers, and timeouts is necessary, Nginx&#39;s configuration language, though verbose, offers dominant expressiveness and a massive collection of community examples.</p><h2 id="HTTPS-Certificate-Management"><a href="#HTTPS-Certificate-Management" class="headerlink" title="HTTPS &amp; Certificate Management"></a>HTTPS &amp; Certificate Management</h2><p>This is Caddy&#39;s home turf:</p><ul><li><strong>Automatic HTTPS</strong>: Automatically issues, renews, and rotates certificates via ACME (Let&#39;s Encrypt &#x2F; ZeroSSL), including OCSP stapling, out of the box with zero configuration.</li><li><strong>On-Demand TLS</strong>: Issues certificates for new hostnames during TLS handshake, which is a killer feature for SaaS custom domains (when customers point their own domains to your service). Achieving the same in the Nginx ecosystem usually requires OpenResty + lua-resty-auto-ssl, which is in a completely different tier of complexity.</li><li><strong>Internal CA</strong>: Includes a built-in local CA, allowing you to use trusted HTTPS even in your <code>localhost</code> development environment.</li></ul><p>On Nginx&#39;s side, certificate management relies on external tools (like certbot, acme.sh, lego). While this works maturely, it is fundamentally a &quot;glue solution&quot;: an extra process, a cron job, a reload hook, and another potential point of failure.</p><h2 id="Performance-The-Gap-is-Smaller-Than-You-Think"><a href="#Performance-The-Gap-is-Smaller-Than-You-Think" class="headerlink" title="Performance: The Gap is Smaller Than You Think"></a>Performance: The Gap is Smaller Than You Think</h2><p>There is a common belief that &quot;what is written in C is always faster than Go.&quot; In real-world tests:</p><ul><li><strong>Static Files &amp; Regular Reverse Proxy</strong>: Both servers perform in the same order of magnitude under most real-world workloads. Nginx still holds an advantage in peak RPS and memory footprint (C with precise memory management vs Go runtime and GC), particularly in extreme scenarios with hundreds of thousands of concurrent connections.</li><li><strong>Tail Latency</strong>: Go&#39;s garbage collection (GC) may introduce minor P99 latency spikes under high pressure, though this is imperceptible to the vast majority of applications.</li><li><strong>HTTP&#x2F;3</strong>: Both support QUIC&#x2F;HTTP3, with Caddy enabling it by default and Nginx requiring explicit configuration.</li></ul><p>Conclusion: <strong>Unless you are building CDN edge nodes or handling hundreds of thousands of concurrent connections on a single machine, performance should not be your deciding factor.</strong> The bottleneck is almost always in the upstream application, not the proxy layer.</p><h2 id="Operations-Ecosystem"><a href="#Operations-Ecosystem" class="headerlink" title="Operations &amp; Ecosystem"></a>Operations &amp; Ecosystem</h2><table><thead><tr><th>Aspect</th><th>Nginx</th><th>Caddy</th></tr></thead><tbody><tr><td>Configuration Reload</td><td><code>nginx -s reload</code>, mature and reliable</td><td>Admin API graceful reload, zero downtime</td></tr><tr><td>Dynamic Configuration</td><td>Not natively supported, requires reload, commercial version, or OpenResty</td><td>Built-in JSON Admin API for programmatic runtime configuration changes</td></tr><tr><td>Docs &amp; Community Support</td><td>20 years of accumulation, ready answers for almost any problem</td><td>High-quality documentation but a much smaller community</td></tr><tr><td>Container&#x2F;K8s Ecosystem</td><td>Time-tested ingress-nginx and others</td><td>Ingress controller available but with lower maturity and adoption rates</td></tr><tr><td>Extensibility</td><td>C modules (requires recompilation), OpenResty&#x2F;Lua, or njs</td><td>Go plugin ecosystem, custom versions compiled with a single <code>xcaddy</code> command</td></tr><tr><td>Binary Distribution</td><td>Package managers, modules depend on OS distribution</td><td>Single static binary, hassle-free cross-platform deployment</td></tr><tr><td>Commercial Support</td><td>Nginx Plus (F5)</td><td>Official sponsorship&#x2F;commercial licensing</td></tr></tbody></table><p>A few points worth highlighting:</p><ul><li><strong>Extensibility</strong>: Caddy&#39;s plugin experience is significantly better. A single command like <code>xcaddy build --with github.com/...</code> builds a custom binary complete with Cloudflare DNS verification, rate limiting, and security modules. Anyone who has compiled third-party C modules in Nginx knows the pain (which is why OpenResty exists).</li><li><strong>Configuration as an API</strong>: Caddy is fundamentally a JSON configuration engine, with Caddyfile serving as a human-friendly frontend. This makes it naturally programmable—SaaS platforms can add or remove sites dynamically without generating configuration files and reloading.</li><li><strong>Battle-Tested</strong>: Nginx&#39;s handling of edge cases and compatibility with obscure clients&#x2F;upstreams has been forged by twenty years of production traffic. Choosing Nginx in conservative, enterprise production environments is a choice no one will question.</li></ul><h2 id="Selection-Guide"><a href="#Selection-Guide" class="headerlink" title="Selection Guide"></a>Selection Guide</h2><p><strong>Choose Caddy if:</strong></p><ul><li>You are working on personal projects, small-to-medium teams, or startups—saving you from wasting DevOps hours on certificate management.</li><li>You run a SaaS platform requiring custom customer domains (On-Demand TLS is practically the only hassle-free solution).</li><li>You need to dynamically manage configuration for a large number of sites via an API.</li><li>Your team lacks dedicated DevOps engineers and prefers a configuration format that can be understood in three lines.</li></ul><p><strong>Choose Nginx if:</strong></p><ul><li>You already have extensive Nginx configurations and team experience—the migration benefits do not justify the cost.</li><li>You face extreme high-concurrency, edge nodes, or workloads highly sensitive to memory and tail latency.</li><li>You rely heavily on Kubernetes ingress-nginx or the OpenResty&#x2F;Lua ecosystem.</li><li>You require commercial support and enterprise features of Nginx Plus, or your organization mandates the most conservative choices.</li></ul><p><strong>Or use both</strong>: Many teams deploy Caddy for edge TLS termination (enjoying automatic certificate handling) and proxy requests back to Nginx or a legacy setup behind it. This architecture is entirely viable.</p><h2 id="Closing-Thoughts"><a href="#Closing-Thoughts" class="headerlink" title="Closing Thoughts"></a>Closing Thoughts</h2><p>The relationship between Nginx and Caddy is akin to Vim vs VS Code: the former can do anything but requires you to understand its inner workings, while the latter makes 90% of common needs work out of the box. Today in 2026, <strong>I would default to Caddy for new projects</strong>—and switch only if running into limitations, which for most projects may never happen. However, if you already have a well-functioning Nginx setup, remember the first rule of DevOps: <strong>If it works, don&#39;t fix it.</strong></p>]]>
    </content>
    <id>https://ooo.run/en/post/nginx-vs-caddy.html</id>
    <link href="https://ooo.run/en/post/nginx-vs-caddy.html"/>
    <published>2026-06-12T03:00:00.000Z</published>
    <summary>
      <![CDATA[<p>If you are selecting a reverse proxy or Web server for a website, API, or a group of containers, you will likely hesitate between Nginx a]]>
    </summary>
    <title>Nginx vs Caddy: A Comparison Guide for DevOps Practitioners</title>
    <updated>2026-06-24T13:21:55.198Z</updated>
  </entry>
</feed>